Creating an asset tag
Asset tags may be created on placed assets as well as imported models and assemblies in an Inventor Factory layout. Do the following to create an asset tag.
 On the ribbon, click Factory tab
  Annotations panel Asset Tag. The asset tag mini-toolbar appears.
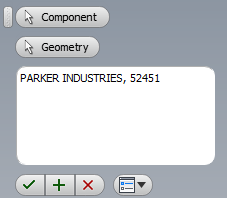
If necessary, move the mini-toolbar to a more convenient location if it is obscuring the object you wish to tag.
- Click the Component button, if not already active, and select the asset or component to tag.
- The Geometry button now becomes active. Select the location on the object where you want the asset tag to be placed. Valid selections include a face, an edge, a vertex, or a work point.
- Next, enter the asset tag information in the text input field. Multiple lines of alphanumeric characters are permitted.
- If you wish to place another asset tag on a different object, click the Apply button
 in the mini-toolbar.
 - Click the Cancel button
 if you want to cancel the procedure. No asset tag is created.
 - Click the OK button
 to create the asset tag and complete the command.
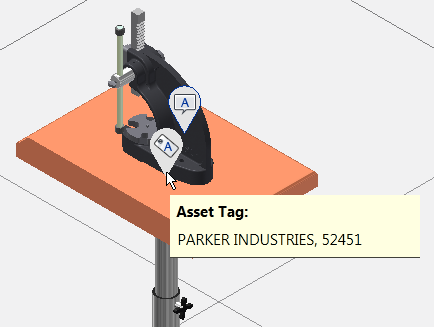
 - The asset tag appears on the selected object with this icon
 . If you hover your mouse over the asset tag icon, the asset tag information displays in a floating tooltip.
After creating one or more asset tags in the current layout, an Asset Tags node is added to the browser and is indicated with this icon  .
.
Editing an existing asset tag
Do the following to edit an existing asset tag.
- Double-click over the asset tag you wish to edit. The asset tag mini-toolbar appears.
- Click the Geometry button if you want to move the asset tag to a different location on the asset or component. Valid selections include faces, edges, vertices, or work points.
- Edit the existing asset tag information in the text input field as required.
- Click the green OK checkmark to finish the editing operation.
Deleting asset tags
To delete a single asset tag, do the following:
- Locate the asset tag you wish to delete in the graphics window.
- Right-click over the asset tag icon . The icon color changes to blue.
- Select Delete from the pop-up context menu.
Do the following to delete all asset tags from the current layout:
- Right-click the asset tag node in the browser.
- Select Delete from the pop-up context menu.
- A dialog box appears warning you that all asset tags will be removed and prompts you to proceed or not with the operation. Click the OK or Cancel buttons as appropriate.
Controlling the visibility of asset tags
To turn off the display of all asset tags in the current layout, do the following:
 On the ribbon, click Factory tab Annotations panel Visibility.
 - The Visibility drop-down menu displays with the Asset Tag check box activated. Uncheck the check box to turn off asset tag visibility. Observe that the visibility of Descriptors may also be toggled on and off using this method.
- To restore visibility, repeat the command and activate the check box.
How to search for asset tags
The Search function helps you locate all assets or inserted components with a specific asset tag, descriptor, or both. Only a portion of the annotation need be entered for search purposes, and both upper-case and lower-case characters are acceptable.
To perform a search, do the following:
- First, obtain the annotation associated with an asset tag by hovering your mouse over the object's asset tag icon .
- The asset tag annotation displays in a floating tooltip.
 On the ribbon, click Factory tab Annotations panel Search. The Factory Annotation Search dialog box appears.
 - Click the drop-down arrow to the right of All annotations at the top of the dialog and select Asset Tags only.
- To the right of the drop-down arrow, enter all, or just a portion, of the text displayed in the floating tooltip and press Enter.
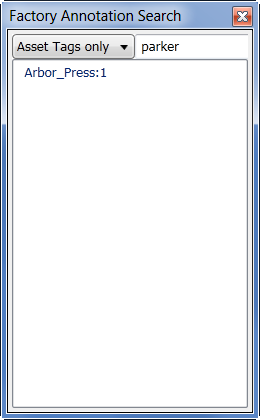
- The name of the asset or component associated with the asset tag is displayed with the same name as it appears in the browser.