You can use the Grip Snap command to drag models to a new location or precisely position them. After selecting a point or an edge on a model, you can also move it based on the selection or reference geometry.
You make one move at a time with Grip Snap. The command stays active and retains the model selection set so you can make multiple moves without reselecting the models each time.
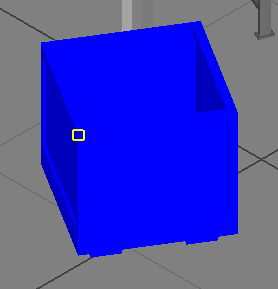
Position a model by selecting a point
- To move multiple models simultaneously, press and hold the Ctrl key and select them before starting the command. Tip: If you select a point on a model that is not part of the selection set, the rest of the set is discarded and only the current model is moved.
 On the ribbon, click Factory tab
 Position panelGrip Snap.
 - Select a point on a model. Tip: For Free Drag, you should select a point that lies on the floor.
- Click Free Drag
 to manually move the model. The model is connected to the pointer, and as you move the model the point snaps to the floor grid and geometry on other models. Click to place the model in the new location. Tip: When you click to place the model, the originally selected point is placed where you clicked. If you click a point on another model, those points become coincident. If you click on the floor, part of the model can move below the floor if the original selection was above the floor.
 - Click Move Point Using Reference Geometry
 to move the model along a vector defined by an edge or two points on another model. The vector direction and length are defined by the endpoints of the selection.
 - Click Rotate About Point
 to rotate the model in the XY plane. A Heads-Up Display (HUD) appears which has a field for the rotation angle. You can drag the model in either direction and click to place it, or enter an angle directly in the field and press Enter.
 - Click Back
 to undo the point selection, leaving the model selected and the command active.
 - The command remains active after you move the model so you can apply another transformation or move other models. Press Esc to exit the command.
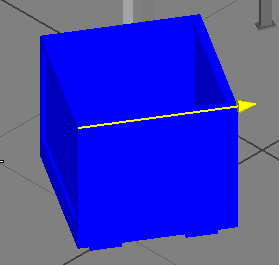
Position a model by selecting an edge
- To move multiple models simultaneously, press and hold the Ctrl key and select them before starting the command. Tip: If you select the edge of a model that is not in the selection set, the rest of the set is discarded and only the current model is moved.
- On the ribbon, click Factory tabPosition panelGrip Snap.
- Select a linear edge on a model. Tip: For Free Drag, you should select an edge that lies on the floor.
- Click Free Drag to manually move the model. The model is connected to the pointer where you clicked the edge. As you move the model it snaps to the floor grid and geometry on other models. The model can change orientation as it aligns the edge while snapping.
- Click Drag Along Ray
 to move the model along a line defined by the selected edge. A yellow arrow displays on the edge to indicate the positive direction. A Heads-Up Display (HUD) appears which has a field for the distance. You can drag the model in either direction and click to place it, or enter a distance directly in the field and press Enter.
 - Click Move Along Ray Using Reference Geometry
 to move the model along a vector defined by an edge or two points on a different model. The vector direction and length are defined by the endpoints of that edge.
 - If desired, click Back to undo the edge selection, leaving the command active.
- After moving the model, the command remains active so you can reposition more models. Press Esc to exit the command.