Once you have signed into the Factory Asset Warehouse (hereafter referred to as the 'Warehouse'), you are presented with the Warehouse display window and browser. You are now ready to upload, publish, share, and manage your Inventor Factory cloud-based assets.
Warehouse Browser Elements
Located at the far left of the Warehouse window is the browser containing asset display options.
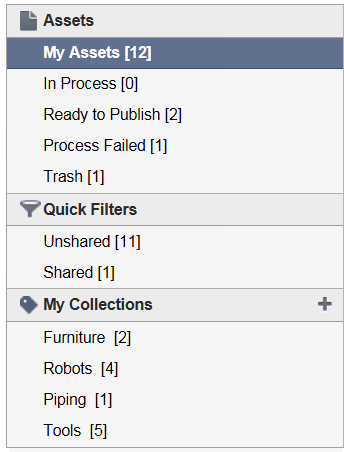
Cloud-based assets appear in a document list to the right of the display menu. The assets can be displayed as graphical icons in the default Grid view, or in List view format.
Each of the browser options are described below:
- My Assets - The default browser option, My Assets displays all assets, in all collections, owned by you.
- In Process - This option displays an icon in a separate window identifying the file that has been uploaded and is currently being processed/translated. The icon contains a green progress bar to display the rate of progression
 .
. - Ready to Publish - Displays in a separate window the uploaded files that have completed processing/translation and are ready to be published.
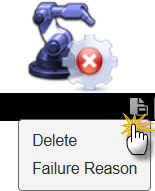
- Process Failed - Shows which files failed to process/translate in a separate window. Click the Actions icon to display a pop-up context menu where you may delete the failed asset or discover the reason why it failed to process
 .
. - Trash - The Trash option displays any deleted assets in a separate window. Clicking the Actions icon once again displays a pop-up context menu providing you the option to restore the asset or delete it permanently.
Quick Filters
The Quick Filters section contains two options:
- Unshared - This option displays in a separate window only the assets owned by you and not shared with other users.
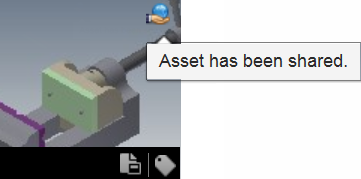
- Shared - Displays only the assets you have chosen to share with other users in a separate window. A shared asset features a small shared symbol at the upper-right to confirm its shareable status.
My Collections
Cloud-based assets managed by the Warehouse are stored in named collections. A collection must first be specified for an asset before it can be uploaded and published to the cloud. Collections may be created in the Inventor Factory Asset Builder, or in the Warehouse. The collections you own are listed in the My Collections section at the bottom of the browser. Assets can be moved from one collection to another, and asset collections can be renamed or deleted at any time. Click an existing collection name from the list to display all members of that collection in a separate window.
Do the following to create a collection in the Warehouse:
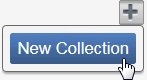
- Click the 'plus' button at the right of the My Collections section in the browser.
- Next, click New Collection
 from the pop-up context menu to display the Create New Collection dialog box.
 - Provide a name for the new collection (spaces are permitted) and click the Save button.
- The dialog closes and the new collection name appears in the My Collections list.
Another method to create a collection is to:
- Right-click over an existing collection name from the list.
- Select New Collection from the pop-up context menu.
- Provide a name for the new collection (spaces are permitted) and click the Save button.
- The dialog closes and the new collection name appears in the My Collections list.
Do the following if you wish to rename a collection:
- Right-click over the collection name you wish to change from the list.
- Select Rename from the pop-up context menu.
- Provide a new name for the collection and click the Save button.
- The dialog closes and the renamed collection appears in the My Collections list.
Use the following procedure to delete a collection:
- Right-click over the collection you wish to delete.
- Select Delete from the pop-up context menu.
- The Delete Collection? dialog box appears.
- Click the Delete Collection button to confirm the deletion and close the dialog. Note: This action only deletes the collection. The assets in the collection are still viewable under My Assets.
Uploading an Asset
An asset can be selected in one of many different file formats and uploaded to the Warehouse. In addition to Inventor part (.ipt) and assembly (.iam) files, the following CAD file formats are supported:
- IGES Files (*.igs; *.ige; *.iges)
- SAT Files (*.sat)
- STEP Files (*.stp; *.ste; *.step)
- STL Files (*.stl; *.stla; *.stlb)
- Alias Files (*.wire)
- CATIA V4 Files (*.model; *.session; *.exp; *.dlv3)
- CATIA V5 Files (*.CATPart; *.CATProduct; *.cgr)
- JT Files (*.jt)
- NX Files (*.prt)
- Parasolid Text Files (*.x_t)
- Parasolid Binary Files (*.x_b)
- Pro/E and Creo Parametric Files (*.prt*, *.asm*)
- Pro/E Granite Files (*.g)
- Pro/E Neutral Files (*.neu*)
- Rhino Files (*.3dm)
- SolidWorks Files (*.prt, *.sldprt, *.asm, *.sldasm)
Do the following to upload an asset to the Warehouse:
- Click the Upload button
 at the upper-left of the Warehouse window.
 - When the Upload File(s) dialog box appears, click the Select Files button
 .
. - Navigate to the folder that contains the asset you wish to upload. Use the Files of Type drop-down list to specify the type of CAD format you require.
- Select the file and click Open.
- The Upload File(s) dialog box reappears and displays the name of the file you selected. Click the Upload Now button
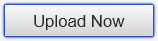 .
. - The Upload File(s) dialog box closes and a progress meter appears at the bottom of the screen which displays the number of files being uploaded.
- After uploading is complete, In Process in the Warehouse browser indicates the number of assets currently being processed. If any translation is required, it is performed during this operation.
- When processing/translation is complete, Ready to Publish in the Warehouse browser specifies the number of assets that are ready to be published.
Can I Upload an Assembly?
Yes, an assembly file and its constituent part files can be uploaded simultaneously. When doing so, it is important to designate the assembly file (.iam for Inventor, .sldasm for SolidWorks, etc.) as the Top-Level File. This is accomplished by activating the Top-Level File check box in the Upload File(s) dialog box.

Publishing the Asset
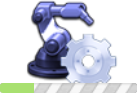
- Click Ready to Publish in the Warehouse browser to display the uploaded asset. This symbol
 at the upper-right of the asset indicates that it uploaded and processed successfully and is ready to be published.
 - Click Publish from the Actions icon pop-up context menu.

- The Asset Publish dialog box appears with the asset title and author text field pre-populated. You may also add your company name, keywords, and comments to the dialog box.
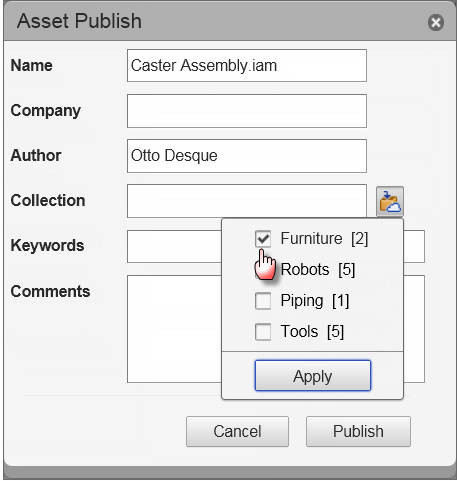
- Click the Collection button at the middle-right of the dialog box to display a pop-up menu of available collections. Observe that the menu also displays the number of existing assets in each collection. Select the collection where you wish to store the asset and click the Apply button.
- Finally, click the Publish button to publish the asset and close the dialog box.
Once the asset is published, it is removed from the Ready to Publish window and placed in the appropriate collection.
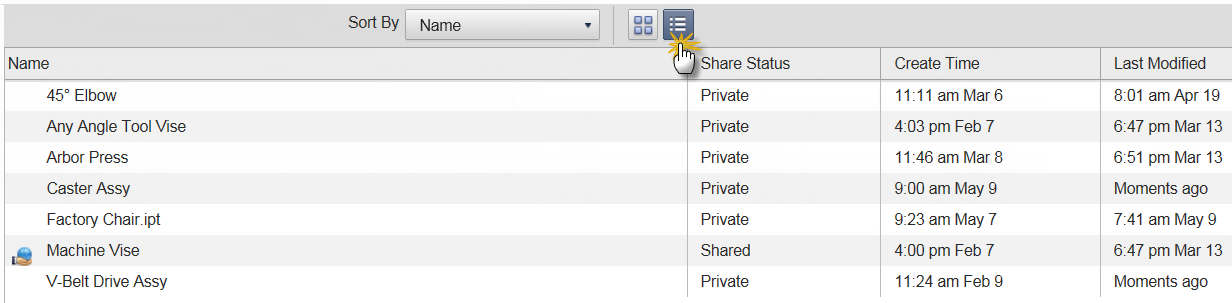
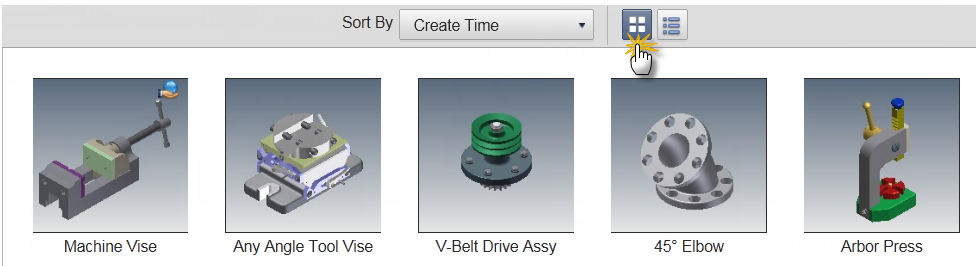
Document List Viewing Options
Assets can be viewed as graphical icons in the default Grid view format, or in List view format using the appropriate button at the top of the Warehouse window.
Click the List view button  to display the assets in list format. Observe that this format lists the asset name, its share status, creation time and date, and when it was last modified.
Click the Grid view button  to display the assets in graphical format.
Displaying Asset Details
Click an asset from the document list to display its details in a separate display window.

The asset properties, as defined by Inventor iProperties or the Inventor Factory Asset Properties command, are listed for the selected asset. The collection name to which the asset belongs is also provided. Observe also that the Share status of the asset may be toggled on and off by clicking the Public Sharing button. Additionally, any ratings or comments added in Inventor Factory to a shared asset appear in the asset information window.
Renaming, Deleting, Sharing, and Modifying Properties of Assets
Regardless of whether assets are displayed in the Grid view or List view, a variety of actions can still be performed on them.
- Click the Collection icon
 if you wish to move an asset from one collection to another.
 - Clicking the Actions icon
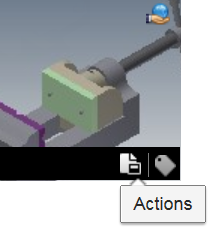 displays a pop-up context menu with the options to share/unshare, rename, or delete an asset. You can also modify the properties (metadata) of an asset using this icon.
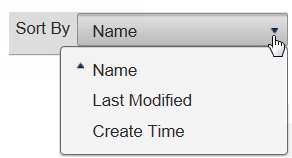
Sort Options
Assets can be sorted by name, when they were last modified, and by their creation date and time. Use the Sort By drop-down menu at the top-center of the Warehouse window to choose your sorting preference.