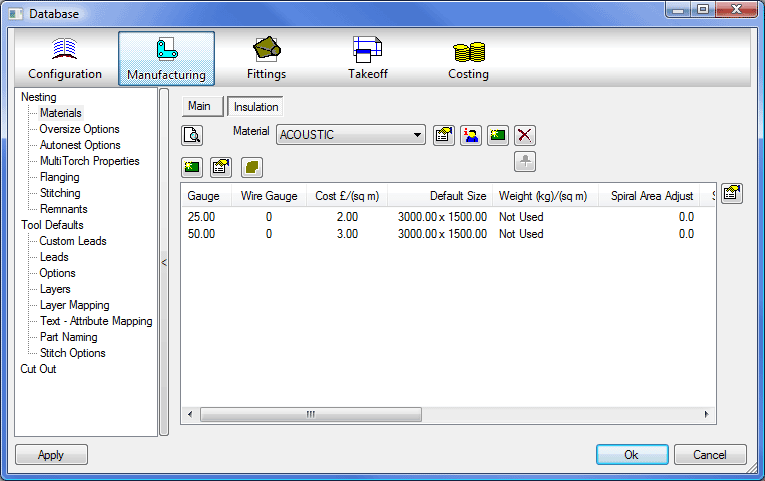
It is possible to apply insulation to fittings and subsequently report, nest and manufacture these parts. Insulation Material can be setup within the Manufacturing or Fittings section of the Database.
Please use the Navigation & Toolbars for information on how to access the Global database using your application.
- Click on the "New"
 icon next to the Material field and the program will ask if you wish to copy the currently selected Material Properties, if there are no other materials set up then the Material Properties dialogue box will appear.
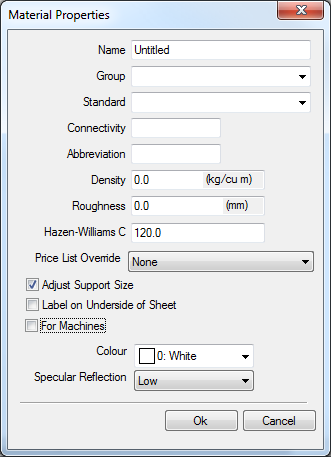
- Complete the fields as required, and clickOK.
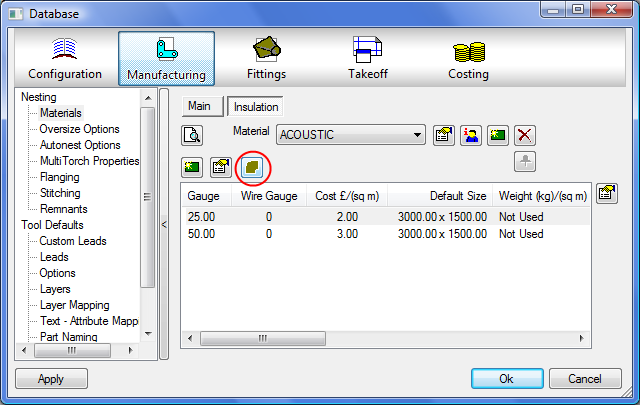
- The newly created material will now appear in the material field. The New icon will now become active just above the Gauge field in the lower section of the Insulation tab.
- Click on the New icon and the Edit Gauge dialogue box will appear. It is also possible to edit existing material gauges by double clicking on the item in the table.
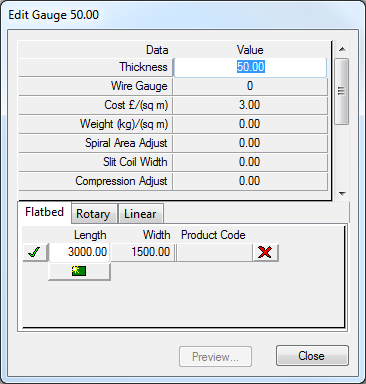
It is now possible to enter different properties for the selected material.
Thickness
This field, denotes the thickness of the insulation material to be used.
Wire Gauge
This field allows the user to enter a Wire Gauge.
Cost £ /(sq m)
This field allows a value for the insulation material to be entered.
Weight (kg)/(sq m)
This field allows a weight for the insulation material per square metre to be entered.
Compression Adjust
This field is used to modify airturns and tracks, the amount entered here will be the amount that the airturns will be adjusted.
F time (mins)/(sq m)
The time, in minutes, required to manufacture one square metre of insulation material.
F-Rate
The skill rate that the fabrication requires, these are set up in the Costing Database.
E time (mins)/(sq m)
The time in minutes required to fit one square metre of insulation material.
E-Rate
The skill rate that the fitting and installation requires, these are set up in the Costing Database.
Splitter Adjust
This field affects the depth of the splitter plates, the amount entered here will be the amount that the airturns will be adjusted.
Double Wall
This field uses the entered value for the distance between skins when this insulation is used.
 next to it will be used when automatically nesting.
 Enabling Insulation parts to be produced
If insulation is to be cut it is necessary to enable the Cut Insulation option by Clicking File > Setup > Pattern Database and selecting the Pattern Switches tab.
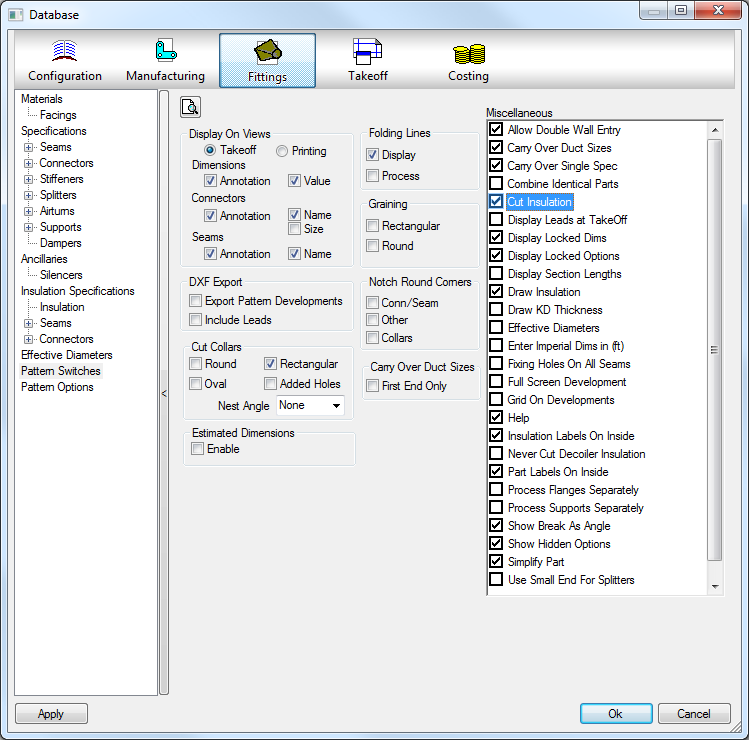
- Enable the Cut Insulation option under the Miscellaneous heading.
- Apply and OK.
The software has now been instructed to produce Insulation patterns when requested within individual patterns. It is now necessary to enable patterns to use Insulation material when requested.
- Click on Utilities > Item Folders and select a fitting to which Insulation should be applied.
- Within the Takeoff screen clickTakeoff > Customise > Item Information.
The Customize Main Takeoff window will now appear.
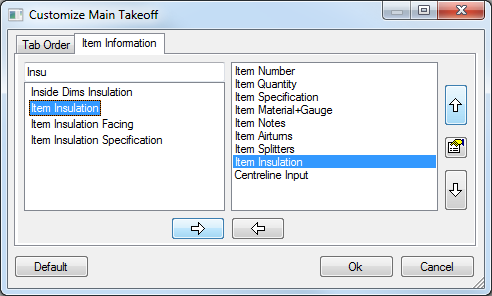
- In the Left hand window locate the Item Insulation option and Click on it. It will now be highlighted.
- Click on the button with the Arrow pointing to the right on it.
This moves the Item Insulation option to the right hand window. This window contains all the options that are visible in the Item tab within the Takeoff screen. The Up/Down arrows adjusts the position of each option within the Item tab.
- Highlight the Item Insulation option and move it to the bottom of the list and clickOK.
- Click on the Item tab and the Insulation option will now be visible.

- In the Insulation field, click on the drop down menu to select whether the insulation material is to be placed on the inside or the outside of the pattern. When one of these options has been selected the field on the right becomes active.
- From the drop down menu select the insulation material to be used.
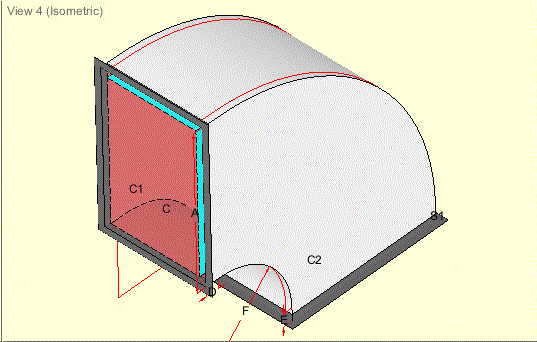
- Click on the Develop button and the developments of the parts will now be visible.

The image above shows the development of the bottom cheek of a Square Bend, in this scenario the Options within the Item for Insulation Parts is set to " Same".
The blue line denotes the cutting line of the actual parts of the fitting. The brown line shows the development of the insulated parts.
- Click on Previous or Next to browse the various parts within the pattern.
The Development of Insulation is controlled by the selection made within the item itself in the " Insulation Parts" option. Depending on the option selected the Development will be controlled by either the settings within the " Insulation Developments"section of this Help File or by the Insulation Database (Pattern Options - Insulation).
If the Item is accepted with the Insulation Parts Option set to Same then the developed parts of the Insulated patterns is determined from the original pattern used along with setting within the Pattern Options.
- Select the Fittings Database and open the Pattern Options tab.
- Click the Insulation button and the Insulation dialogue box appears.
This gives the user the chance to adjust the developments of the insulated patterns by the factors set here.
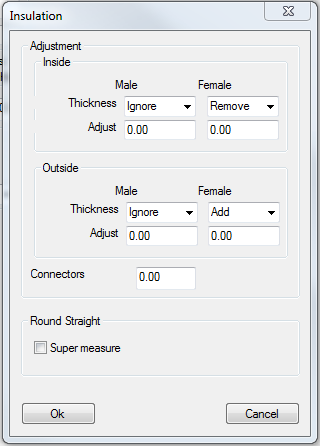
If the Insulation type is selected as Inside, then the settings within the Inside section will be used. The Thickness field allows the user to choose whether an amount equal to the Insulation thickness is added or removed from Male and Female seams. There is also an Ignore option which will not make any adjustments.
Alternatively an amount entered in any Adjust field will add or remove the specified amount. The Outside section works in the same way as the Inside section but is applied when the Insulation Type is set to Outside.
Depending on the Pattern Template there is the ability to alter the Development type of Insulation within the Item Template, this uses the settings created in the Insulation materials Database. The common Options available on most templates are:
- Same
- Wraps Inside
- Wraps Outside
Wraps Inside
Wraps Outside
Adjustments are taken from the Insulation Material Thickness and the Insulation Development Database, and applied to the Development of the Insulation Material.
The Straight templates ( CID 1, CID 35, CID 36, and CID 866) have slightly different options than the Fittings Templates. These are:
- Same
- 1 Part
- 2 Parts - L
- 2 Parts - UI
- 4 - Wraps Inside
- 4 - Wraps Outside
Insulation Material has a Development Adjust option in the Materials Database, under the Insulation tab.
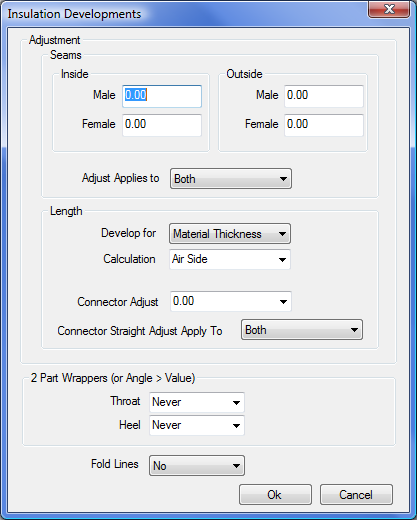
The Insulation Developments window allows for the adjustment of the developments governed by the Male Seam, Female Seam, Inside or Outside insulation parts, Connectors, Wraps, Cheeks, and Lengths.
Inside Male Seam Adjust:
This is the allowance that can be added or subtracted to the Insulation Development where it meets with a Male Seam.
Inside Female Seam Adjust:
This is the allowance that can be added or subtracted to the Insulation Development where it meets with a Female Seam.
Adjust Applies to:
This allows the user to select whether the Seam adjustments are made to the Wraps, Cheeks, Both, or None.
Length:
This section will make changes to the Insulation Development length, the changes made are
Develop for:
If Longest Lengths is selected then the developments will be calculated to give the Longest Length possible.
If Material Thickness is selected then the user can select whether the Calculations are applied from the Metal Side, Middle, Air Side, or a Value.
The calculations, used for the Back Wrapper on a Radius Bend for example, would be:
- Metal Side = ((Radius x Pi) / 2) + Extensions
- Middle = ((Radius - ( Material Thickness / 2 ) x Pi ) / 2 + Extensions
- Air Side = ((Radius - Material Thickness) x Pi ) + Extensions
- Value = The Value is a number between 0 and 1 and is used as a percentage of the Material Thickness, i.e 0.25 would be 25% of the Insulation thickness, 0.75 would be 75%. This would then be used in the Calculation for the Insulation Length.
Connector Adjust:
The connector adjust has a drop down selection box.

The Connector Adjust has 4 settings:
- + Thickness
- - Thickness
- Auto
- and a Value that the user can enter.
The + and - Thickness settings will add or remove the Insulation Material thickness, from the developments, at the connector ends.
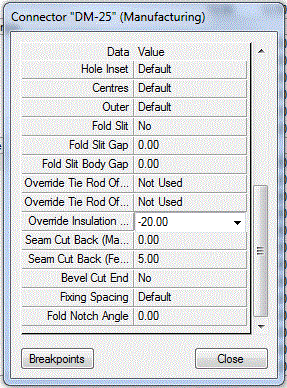
When Auto is used it will pick up the settings associated with the Connector under the Overide Insulation Adjust.
Entering a positive or negative value in here will adjust the development at the connector ends by with the value entered.
The Connector Straight Adjust can be applied to either:
- None: This will have no effect on the development
- Wraps: This will apply the adjustment to the Wrapper only
- Cheeks: This will apply the adjustment to the Cheeks only
- Both: This applies the adjustment to the Wrapper and the Cheeks
2 Part Wrappers (or Angle > Value)
This option enables the wrapper sections to be made in 2 parts dependant on what value is selected. The same selections are available for both the Throat section and the Heel or Back Wrapper. The options available are:
- Never: which will ensure that the Wrappers are always created in one part, or
- Always: which will ensure that the wrappers are always made in 2 parts.
- Value: Will apply the 2 part Wrapper if the wrapper development length is bigger than the value entered.
When the Pattern specific Insulation Parts options are used, the Insulation options within the Fittings > Pattern Options Database are effectively ignored, except when set to " Same" (which is the pattern default) where it will continue to use the existing Insulation adjustments that are defined in the Fittings Database > Pattern Options > Insulation.
When the options in the pattern are set to Wraps Inside or Wraps Outside then the settings in the Fittings > Insulation > Insulation Developments Database take precedence.