Stiffener breakpoints are configured by 3 separate tables. 2 of these configure internal stiffeners (tie rods) and the 3rd configures external stiffening. Each allowing for configuration of when quantities and values will change based on dimensions of the duct.
This topic will identify what each parameter means and how it effects the stiffeners applied.
Length Breakpoints
The length breakpoint table is for specifying the quantity of rods along the width and/or depth of duct, based on the length of that dimension. We can allocate a quantity on each position (Centrally and Externally). Only if the Stiffener have been set to Internal or Both for Central or End types would tie rods quantities be used based on this dialogue. Application of 1 central and 1 end would result in at least 3 tie rods as there would be at least 1 in the middle and at least 1 at each end of the duct.
To read more about setting up Stiffener types, please view the Stiffeners - Example topic.
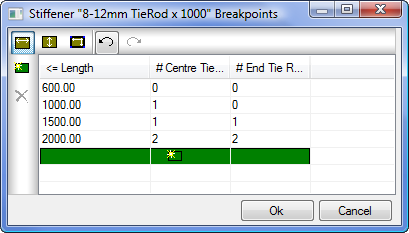
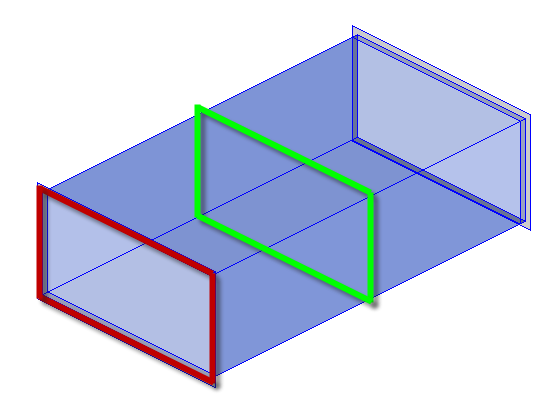
For example a 1500x750 duct will obtain for the 1500 side, 1 central and 1 at each end. The 750 dimension obtains just the 1 central as per the above table. RED indicates End Type tie rods and GREEN are Central Type rods.

Evidence of this can be seen by selecting Cost Breakdown on the item as shown below.
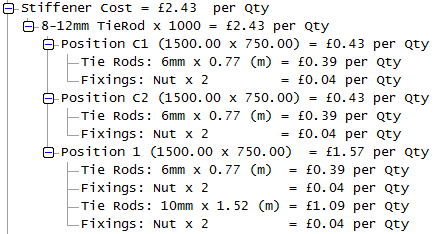
Position C1 relates to Connector 1 end, Position C2 is for Connector 2 and Position 1 is in this example the Central Tie Rods. Position 1 in this example showing 0.77m for the 750mm side plus the 20 mm extension for the Nut and then 1.52m across the long side with allowance for 20mm extension for the Nut.
Span Breakpoints
The span breakpoints only apply when using internal based stiffening (Tie rods). The span of the tie rod (it's length) determines the type (diameter) of it. The length used is the opposite duct side length than was used to determine the number of tie rods in the 'Length' breakpoint table and it defines the rod & bolt types + hole diameter to cut for each tie rod. Although the number of tie rods is determined off the width, the type of tie rod is determined by the depth (and vice-versa...).
As shown in the example cost breakdown above, Span breakpoints can be specified to allow for variant rod thicknesses and values to offset 2 rods when using vertical and horizontal rod placement. Based on the size, we can dictate the Hole diameter to be cut on the development for manufacture, and where to offset the holes from the edge of the duct.
In the example below there will be a 20mm inset on all holes.
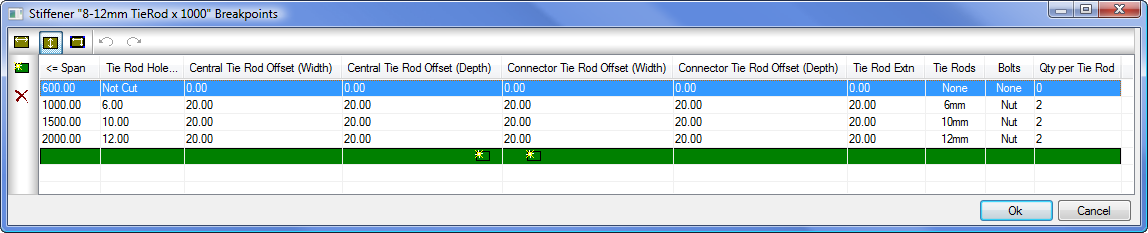
The ancillary assignment for the Rods can be allocated using the Tie Rods drop down and refers to the Ancillary list for Tie Rods that can be created and linked to a price list per meter. Bolts can be assigned specifying the quantity per tie rod as shown in the Cost Breakdown dialogue earlier. Notice the 1500 side used a 10mm Rod and the 750mm side uses a 6mm rod.
External Breakpoints
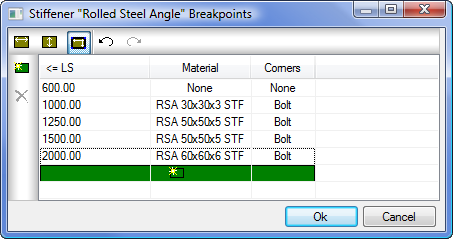
When specified to use External stiffening, the External breakpoints become active and is where to specify the materials wanting to be used/costed for the stiffener.
This dialogue shows you to select ancillary materials which will be coasted per meter to calculate the material around the periphery of duct (plus any adjustments). Corners can be allocated as shown above, where a Bolt has been assigned at each corner proving me with 4 x Bolts for each external stiffener. The stiffener material can change based on the size of duct and further breakpoints can be allocated to the requirement. The larger the duct, the more resistant the material assigned needs to be.