Numpad allows the set up of custom number pad layouts, these are used to speed up the process of entering numerical data. This topic will show you how to create your own number pads using the Numpad Editor.
Creating new layouts
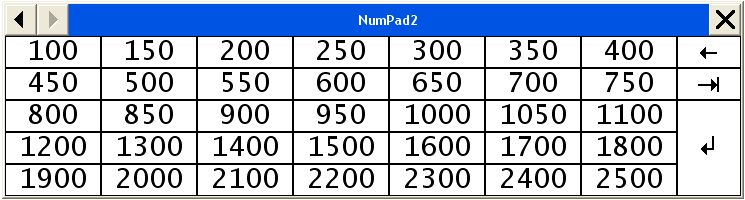
The image below shows one possible configuration, the following example can be used as a general overview on how to create new layouts.
- Type NUMPAD at the command line to prompt the NumPad dialogue.
- Type EDITNUMPAD to prompt the Numpad Editor dialogue.
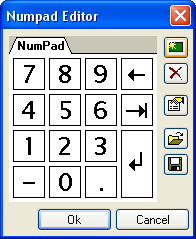
The following Numpad Editor options are available:

New Creates a new layout tab 
Delete Deletes an existing layout tab 
Rename Prompts the Keypad Properties dialogue Open Open pre-saved *.KPL (KeyPad Layout files) 
Save Save the selected Keypad Layout as *.KPL (KeyPad Layout files) - Select the New icon to create a new layout.

-
Click the Rename button
to prompt the Keypad Properties options. 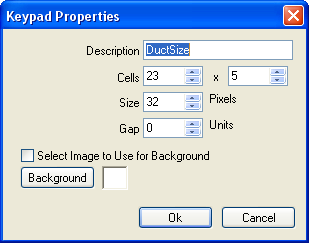
- Enter a Description DuctSize for example.
- Enter the number of Cells: 23 x 5 (Columns x Rows)
- Use the default 32 Pixel Size (Individual Cell size).
- Use the default Gap at 0 (Cell gap size).
- If you wish to use a background image check the Select Image box:
Custom *.BMP image files may be used, the size depends on the number of cells in the layout i.e. if each cell is 32x32 pixels and the number of cells is 23x5 then a *.BMP image of 736x160 pixles is required.
Note: The Keypad properties for a given layout can be changed at anytime, this enables you to change the number of cells to allow the addition or removal of buttons. - Click Ok.
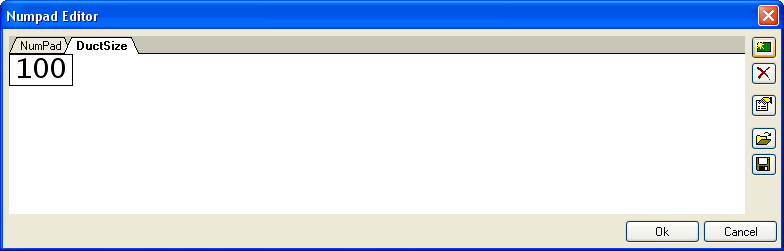
You should now see the Numpad editor dialogue with the DuctSize layout tab selected.
Adding the Keypad Buttons
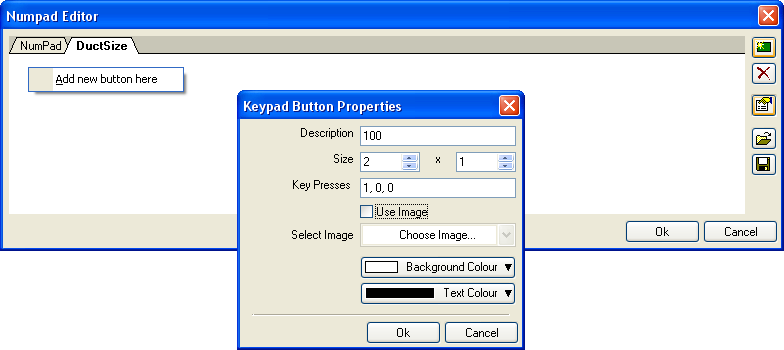
The first button added will represent the numerical input of "100".
-
Right Click any part of the blank area, select Add New Button Here to prompt the Keypad Button Properties.
- Enter a Description of 100.
- Enter the Size of 2 x 1 (64x32 Pixles).
- Left Click in the Key Presses box (the cursor should be present, ready to record the relevant keyboard input). Note: The keyboard Number Pad cannot be used for the recording of key presses.
- Enter 100, you should now see "1,0,0" as shown in the image above .
- Use Image option: Leave un-checked to use the Description field as the default button image.
Check the box to use one of the preset images or select Choose Image to Import your own (*.BMP).
Other button options:
- Background Colour - Select the background colour for the button
- Text Colour - Select the text colour for the button
- Click Ok to add the button.
You can now drag & drop the button to the desired position on the layout, as shown below. Repeat the process to add the remaining buttons.
- Once complete Click Ok to the Numpad Editor dialogue, remember you can change the size of the NumPad at any time via the Keypad Properties dialogue.
Although the Numpad layouts are stored by the program, you may want to use the Numpad Editor Save option to generate KeyPad Layout files for use on other systems or as backup.