When modifying railway styles, map the overall style to a Material Group. A material group applies a combination of railway components to a single railway. Material groups can vary the railway appearance when the feature passes through a tunnel or over a bridge.
- Click


 .
. - Display the style to edit.
- On the left side of the Style Palette, click the Railway tab.
- Select the style to edit.
- Click
 to duplicate an existing style before editing it.
 It is good practice to copy an existing style instead of changing the original version.
- Double-click the new copy of the style to edit its properties.
You can also select the style and click
 Edit the Properties of the Selected Style.
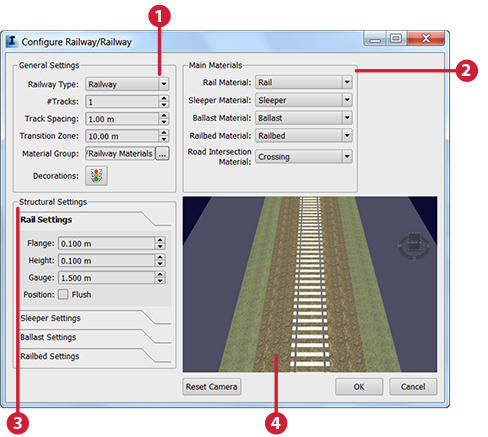
- General Settings
- Main Materials
- Structural Settings (click a heading to see its settings)
- Preview area
- Under General Settings, specify the following:
Setting Description Railway Type Select Railway, Bridge, or Tunnel.
#Tracks Changing the number of tracks updates the preview. This is a default value, which is replaced by any actual value for a particular feature when you apply the style.
Track Spacing This setting affects only styles with multiple tracks (#Tracks = 2 or more). You can see the spacing adjustment in the preview. Transition Zone Defines the distance in which the terrain blends into either side of the railway. For example, with a transition zone of 9m, there is a 9m corridor to the left and to the right of the railway, where the terrain changes from its original height to the height of the railway. The larger the transition zone, the more gradual the terrain adjustment.
Material Group The collection of materials and associated categories that map a material to the different parts of a railway style. You can define each component of the material group separately, from within its catalog. See Edit Styles.
- Under Structural Settings, specify the following:

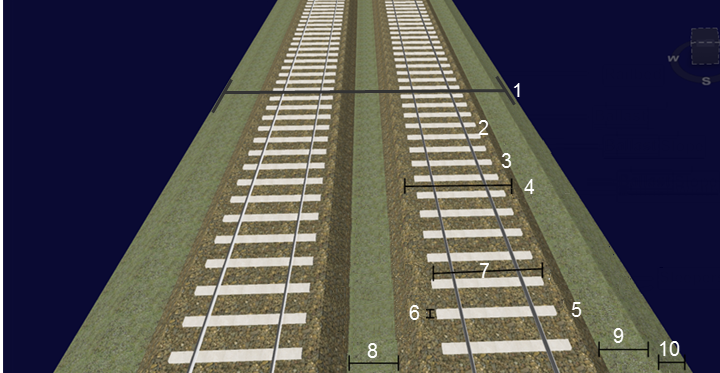
- Railbed
- Ballast
- Ballast Run
- Ballast Width
- Sleeper
- Sleeper Width
- Sleeper Length
- Track Spacing
- Railbed Cess
- Railbed Run
Setting Description Note: To view each group of settings, click its title.Rail Settings Specify the measurements for the flange, rail height, and rail gauge. Indicate whether the rails are flush to the ground (no sleepers) or not.
The flange must be set lower than half the sleeper's length, and the rail gauge must be lower than the sleeper's length.
Sleeper Settings Specify the measurements for the sleeper width (perpendicular to the tracks), length, height, and spacing.
Sleepers are called railroad ties in the United States.
Ballast Settings Specify the measurements for the ballast area (the material between the sleepers). Specify the width, rise, and run of the ballast.
Railbed Settings Specify the measurements for the railbed area (the surface on which the railway sits). Specify the cess, rise, and run of the railbed.
The cess is the part of the railbed outside the ballast area. It can be used as an area for workers to stand when trains go by, if it is wide enough. The run cannot be greater than 70 degrees.
- Under Main Materials, specify the materials to use for the rail, sleeper, ballast, railbed, and road intersection areas.
- If you are editing a railway bridge style, under Bridge Settings, specify the thickness of the bridge wall, the material for the bridge bottom and sides, and the width, depth, spacing, and material for the pylons.
- If you are editing a railway tunnel style, under Tunnel Settings, specify the height and thickness of the tunnel wall, and the materials for the tunnel ceiling top, ceiling bottom, and inner and outer walls.