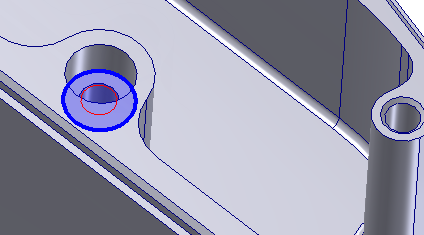
Use the 2D Pocket strategy with a 4 mm flat end tool to machine the counterbore on the single 4.5 mm hole.
- On the ribbon, click
CAM tab
 2D Milling panel
2D Pocket
2D Milling panel
2D Pocket
 .
.
 Tool tab
For this pocket, a flat tool with a diameter less than 4.5 mm is required to plunge into the pre-drilled hole.
- On the Tool tab, click the
 button to open the Tool Library dialog box.
 - From the Sample Libraries > Tutorial tool library, select tool #5 - Ø4 mm flat.
- Click
 to close the Tool Library dialog.
 Geometry tab
- Click the Geometry tab. Make sure that the Pocket selections button is active.
- Select the edge at the bottom of the counterbore.
 Passes tab
On the Passes tab, change the following parameter values and leave all others at their defaults.
- Set the Maximum stepover to: 0.5 mm
- Disable the Stock to Leave check box.
 Linking tab
To make sure that the tool plunges at the center of the hole, disable the lead-in.
- Click the Linking tab.
- Expand the Leads & Transitions group and disable the Lead-in (entry) check box.
- Set the Linear lead-out distance to: 0.0 mm
- Set the Horizontal lead-out radius to: 1.0 mm
- Expand the Ramp group, and select Plunge from the Ramp type: drop-down menu.
Now, adjust the lead-out slightly to obtain a smoother exit.
Finally, make the tool plunge into the pre-drilled hole.
Start the Calculation
- Click
 at the bottom of the Operation dialog box, or right-click in the graphics window and select OK from the marking menu, to automatically start calculating the toolpath.
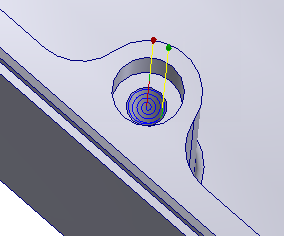
The toolpath should appear as shown below.
Continue to To Machine the Countersinks...