Use Data Connect to connect your map to a file containing parcel data.
Use the Data Connect window to attach any non-DWG data source:
- Database formats, such as ArcSDE, Oracle, or SQL Server
- An ODBC source, such as Microsoft Access
- A raster file
- Web-based sources such as WMS or WFS
- Spatial data files, such as SDF and SHP
Data Connect displays information about all attached non-DWG data sources, even if you did not use Data Connect to attach them. For example, the SDF file you dragged and dropped into your map is listed in the Data Connect window.
This exercise uses the build_map1.dwg map you created and modified in the previous exercises.
Video Tutorial
|
|
If you are connected to the Internet, play the video to see how to connect to a live data store and display it in your map. You can also click "Let Me Try" to try it yourself. The steps for this procedure are listed below the video. |
To use Data Connect
- If you have not already done so, copy the tutorial sample files to a local drive.
- In the build_map1.dwg file, in
Display Manager
, click Data
 Connect to Data.
 - Under Data Connections By Provider, select Add SDF Connection.
- Click the file icon next to Source File.
- Navigate to the folder where you copied the sample files and select PARCELS.SDF. Click Open.
- Click Connect to add the parcel data file as a data source.
Under Add Data To Map, Parcels is selected.
The coordinate system for this feature class is displayed next to its name. If this information was incorrect, you could click Edit Coordinate Systems to change the coordinate system.
Note:Change the incoming coordinate system only if you know the original coordinate system for the feature—do not change the coordinate system to match your map. AutoCAD Map 3D automatically converts each feature from its own coordinate system into the coordinate system for the current map. If you change the coordinate system, the conversion might not be correct.
- Click Add To Map.
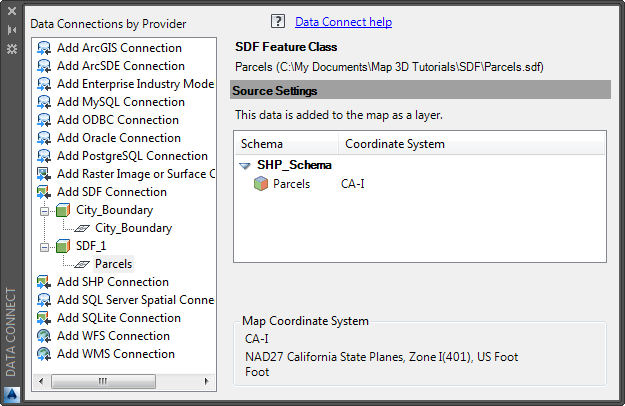
In the Data Connect window, connect to a data provider and then select the feature class you want.
When you click Add To Map, a layer called Parcels is displayed in the list in the Display Manager . A layer can be styled, saved, displayed, or hidden, independent of other layers in your map.
- Save your work. Click
 Save.
Save.
To continue this tutorial, go to Exercise 5: Add a raster image.