This procedure assumes that you have prepared your image source files and have them all in one folder, together with any georeferencing files. The simplest way to load images is to drag them into the Site Explorer. This automatically prepares a raster catalog for them. (The raster catalog is created when you click Load Resources.)
Before you start loading files, you may want to create a folder in the Site Explorer to store the resources produced by the load. To find out how to create the recommended folder structure, see Organizing and Sorting Your Resources.
To load image files and create a catalog
- Drag one or more image files from the Windows Explorer to the Site Explorer.
A new load procedure is displayed to the right of the Site Explorer. Autodesk Infrastructure Studio prepares a catalog file for your images and names it after the first image file.
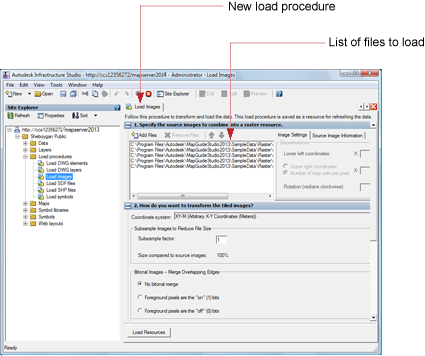
- Optional: Use the up and down arrows to arrange the order of the images. Images higher in the list are displayed above any overlapping images that are lower in the list.
- For How Do You Want To Transform The Tiled Images, select the coordinate system you want to use.
- For Where Do You Want To Load The Resources, select the destination folder for the raster-catalog and layer resources that will be created by this load. (You can also move the resources later in the Site Explorer.)
- Rename the raster catalog (the default is the name of the first raster file in the list).
- Click Load Resources.
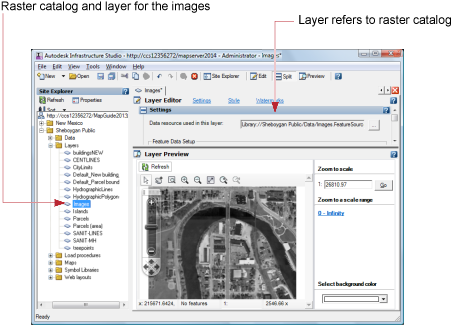
Autodesk Infrastructure Studio converts the images into a single raster-catalog resource and creates a layer to reference it. The raster catalog and layer icons are displayed in the Site Explorer.
- On the Autodesk Infrastructure Studio toolbar, click Save and save the load procedure in the Site Explorer.
- Double-click the new layer to open it.
The Layer Editor is displayed to the right of the Site Explorer. (For more information about the Layer Editor, see Working with Feature Source Layers).
After you have a raster catalog, you can easily create another catalog, using the same image files. This is an easy way to build another set of image resources at a different resolution. You can then set the scale ranges for the layers so that the appropriate images appear at different zoom levels.
To create another catalog with a different resolution
- In the Site Explorer, select the load procedure for the images, right-click and click Copy.
- Select the destination folder, right-click and click Paste.
- Double-click the new load procedure to open it.
- For How Do You Want To Transform The Tiled Images, select the coordinate system you want to use, if the source images do not have a coordinate system, or use a different one.
- For Subsample Factor, enter a number. The higher the number, the lower the resolution. For example, a factor of 2 reduces the resolution of the images to 25% of the original.
- For Where Do You Want To Load The Resources, select the destination folder for the raster-catalog and layer resources that will be created by this load. (You can also move the map resource later in the Site Explorer.)
- Rename the raster catalog (the default is the name of the first raster file in the list).
- Click Load Resources.
Autodesk Infrastructure Studio converts the images into a single raster-catalog resource and creates a layer to reference it. The raster catalog and layer icons are displayed in the Site Explorer.
- On the Autodesk Infrastructure Studio toolbar, click Save and save the load procedure in the Site Explorer.
Other Controls in the Dialog Box
- Bitonal Images--Merge Overlapping Edges
-
Any overlapping bitonal (black and white) images that are referenced by the raster catalog are merged. When images overlap, the foreground pixels are preserved and may overwrite the background pixels of an overlapping image. Specify whether you want the "on" bits (the drawing pixels) or the "off" bits (the pixels surrounding the drawings) to be the foreground pixels.