In this exercise, you set a basic style for a polygon layer by selecting a fill color and a border color.
Note: The following exercise uses the
standard layer style to configure styles in the Layer Editor. Also available is the
enhanced layer style, which supports compound symbols and composite styles. To change the layer style, click Tools menu

Options
Layer Editor tab. Under Layer Style, select Standard for this exercise. See the Studio User's Guide for instructions on using enhanced styles.
| |
Detailed steps |
|---|
|
|
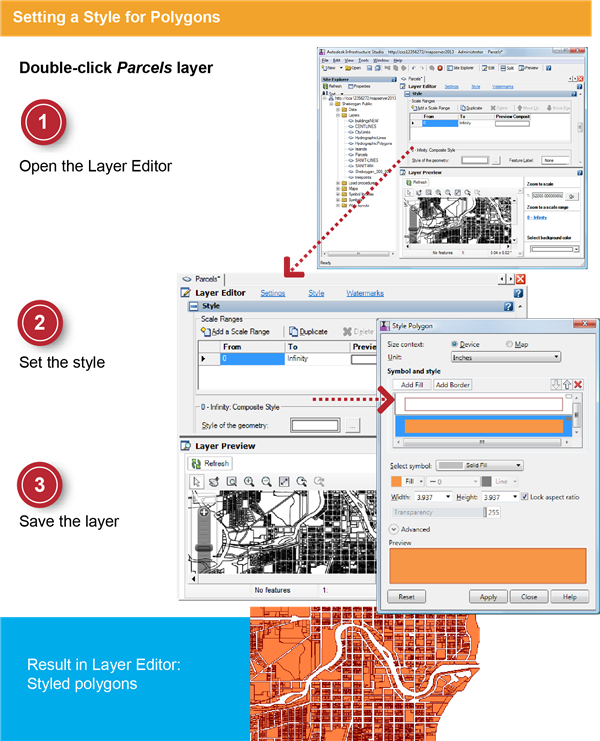
- In the Site Explorer, double-click the layer Parcels (not the Parcels feature source).
The Layer Editor is displayed with the default window split between the Preview panel (below) and Editor panel (above).
- Click Refresh in the Preview panel to see the layer.
- Use the Zoom To Rectangle tool to zoom the Layer Preview window so that you can see the parcels clearly.
- At the top of the Layer Editor, click Style (blue text, not a button).
The Layer Editor brings the Style panel of the editor to the top. Scrolling to the Style panel makes it easier to specify the style for the layer.
|
|
|
- In the Layer Editor, for Style Of The Geometry, click [...].
- In the Style Area dialog box, for Fill Foreground Color, select an orange color. For Border Line Color, select a dark-red color.
- Click OK.
|
|
|
- In the Layer Preview panel, click Refresh to test the style.
- On the toolbar, click Save to save the layer resource.
|