You can set the following preferences in the Display category of the Preferences window.
Performance
- Render swatches (startup)
-
Disable this option to disable swatch rendering in the Hypershade, Attribute Editor, and Node Editor upon Maya startup to improve performance. You can override this option in the Node Editor menu.
Tip: This option may help improve performance slowdowns caused by swatch refresh. You can override this option and re-enable swatch rendering for your current Maya session by enabling the Options > Render Swatches option from the Node Editor Options menu. - Max res. for swatches
-
You can now set a maximum resolution for your Material Sample swatches. If your file texture size exceeds the specified resolution, a swatch will not be created until explicitly requested: in the Hypershade,
 -click the swatch and select Refresh Swatch from the marking menu; or, in the Material Sample swatch in the Attribute Editor, click on the swatch to refresh the display.
 This reduces memory consumption and improves conversion time, increasing performance especially when dealing with many large textures. This is most useful for initial load of scenes with many large file textures. Once a swatch is created, it will always be displayed.
Select the maximum resolution from the drop-down list. You can also select the Custom option and enter the resolution that you like. File textures of a resolution above this value are not displayed in the Material Sample swatch in the Attribute Editor or in the Hypershade. The default is 2Kx2K.
- Custom Resolution
-
Select Custom from the drop-down list under Max res. for swatches and enter the resolution for your file textures in this field.
View
- Axes
-
Displays one or both of the XYZ coordinates (view and origin axes). If you disable both choices, no XYZ coordinates appear.
- View Axis
-
Displays the XYZ coordinates in the bottom left corner of the view. The default is on.
- Origin Axis
-
Displays the XYZ coordinates at coordinates 0, 0, 0. The default is off.
- Grid plane
-
Displays or hides the grid plane. The grid is a 2D plane that represents 3D dimensions in the view. It is useful when you want to animate motion relative to a solid surface. Select Hide to hide the grid. The default is Show.
This setting overrides the Display > Grid setting.
- Active object pivots
-
Specify whether to display pivot points. The default is off.
- Affected highlighting
-
Turns highlighting display on or off. An object associated with or affected by a selected object is highlighted in a different color. The default is on.
Note:You can edit this highlight color by selecting Window > Settings/Preferences > Color Settings, clicking the Active tab, expanding General, and modifying Active Affected.
- Wireframe on shaded
-
Select how you want to display the wireframe on shaded objects.
- Full
-
Displays normal resolution wireframes on shaded objects. This is the default.
- Reduced
-
Displays fewer wires on shaded objects.
- None
-
Displays no wires on shaded objects. Performance is enhanced if you select None.
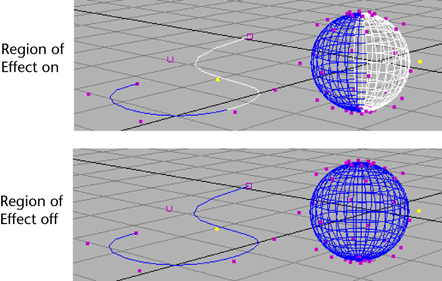
- Region of effect
-
This option lets you turn on or off the region of effect display. Region of effect is the part of an object that potentially changes as a result of moving selected CVs. Note that curves show the region of effect as well as surfaces. The default is on.
- Shade templates
-
If on, template objects appear shaded in shaded view. If off, the templated objects appear as wireframes while all other objects appear shaded. The default is off.
- Background gradient
-
When on, the main viewport displays with a gradient background color. The default is on. See also Change the scene view background color.
- Line Width
- Adjust the line width of solid and dashed lines in the scene. Use this attribute to create thicker lines.
Viewport 2.0
- Rendering engine
- Select between using the OpenGL or DirectX 11 rendering engine for the scene view. For more information about DirectX 11, see Using DirectX 11 with Viewport 2.0 and DirectX 11 Shader.