
- Select Window > Settings/Preferences > Plug-in Manager and ensure that the Substance plug-in is loaded.
- Select Window > Material/Texture Baking Editors > Hypershade to open the Hypershade window. Tip: You can also visualize the substance shading network in the Node Editor (Window > Node Editor).
- Select Maya > 2D Textures > Substance.
 Note:
Note:Do not use the Substance Output node, which is an intermediate node that is created automatically by the Substance node.
- In the Attribute Editor, select the Substance node tab, then set the Substance file attribute to point to a substance texture.
(Navigate to your <Maya Directory>\plug-ins\substance\substances folder, or the folder in which your substance texture is installed).
Note: By default, the substance texture files are installed to your <Maya Directory>\plug-ins\substance\substances folder. However, it is recommended that you copy the textures that you need to your <MayaProject>\sourceimages folder instead. This ensures that your substance files are loaded properly on all operating systems. Copy only the textures you want to use, as the substance library includes a large number of files. - Click Create shader network.
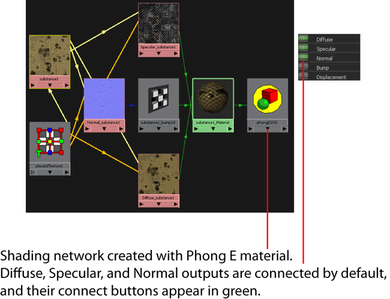
This creates a shading network with a Phong E material that, by default, connects the Diffuse, Specular, and Normal substance outputs.
Note: The Diffuse, Specular, and Normal substance outputs are marked with green connect icons to indicate that these output nodes exist and are connected to the material shader.
 You can now apply this Phong E material to the objects in your scene.

- Select the resolution for your substance output nodes.
- Expand the Normal Format section and select the format for your normal map (if a Normal substance output is available for the substance you have selected).
- Modify Substance node attributes to create custom effects.
- (Optional) To connect additional substance outputs to your shading network, such as a Bump or Displacement map, click the Connect
 icon beside the list of available substance outputs.
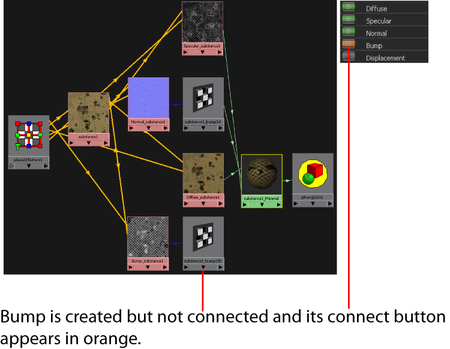
 If the input of the material attribute is already occupied by another substance output, for example Normal, a warning message appears, and the output is created but not connected. The substance output connect icon appears orange. You can then delete the connected output and attach a new output.
 Tip: A grey connect icon (initial state) means that no Substance Output node has been created for this output map. An orange connect icon indicates that an output node is created but not connected to another node. A green connect icon indicates that the Substance Output node has been created and is connected to another node.
If you want to export the shading network to a game engine, you must export the images to disk.