In the top panel of the Hypershade are tabs containing the rendering components that contribute to the current scene.
You can customize the Hypershade to display only the top tabs or only the bottom tabs. For more information, see Show top and bottom level tabs.
Each Hypershade tab displays specific rendering node as a node icon (a swatch), that visually represents the characteristics of the node. When you edit a node’s attributes or assign textures or special effects, the swatch updates in Hypershade.
Create additional Hypershade tabs
You can customize the top panel of your Hypershade by creating additional tabs. For more information, see Create Hypershade tabs.
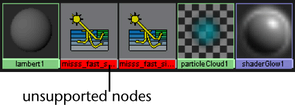
Unsupported nodes
The Hypershade indicates when a node is unsupported by the currently specified renderer in the Texture Baking Settings window. Unsupported nodes appear with a red swatch label.

Projects tab
The Projects tab displays the contents of the default projects directory.
If you keep projects elsewhere, create a new disk tab pointing to the directory in which you keep your projects. See Create Hypershade tabs.
For example:
- Windows
drive:\Documents and Settings\username\My Documents\maya\projects
- Mac OS X
/Users/username/Documents/maya/projects