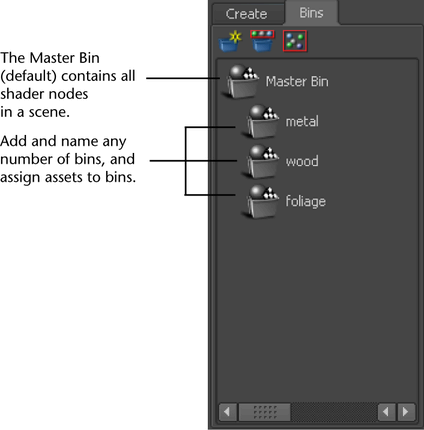
Sorting bins, which are containers for shading nodes (materials, textures, and so on), have been added to Hypershade to help you organize and track shading nodes in your scenes.
A default Master bin contains all shading nodes in your scene. You can add any number of additional bins to a scene and assign nodes to one or more of those bins. By strategically naming the bins, (for example, wood, metal, doors, foliage), you can quickly and more easily locate shading assets to work with them.
- When a node is assigned to a bin, all the shading nodes upstream to this node are also assigned to this bin.
- The Hypershade asset tabs (Materials, Textures, and so on) exist for all sorting bins, allowing for further organization and filtering.
- While shading nodes can be assigned to more than one bin, they are not duplicated in the scene.
To select (see the contents of) bins
- When you select one or more bins, you can see the contents of the bins.
- To select and see the contents of one bin, click the bin.
- To select multiple bins, do one of the following:
- Shift+click a range of bins.
- Ctrl+click each bin you want to select.
- Ctrl+click a bin to toggle between selecting and deselecting it.
To create a new empty bin
- In the Hypershade Bins tab, click the Create Empty bin button. The New Bin Name window appears.
- Type the new name, then click OK. A new empty bin appears.
To create a new bin with selected content
- Select the assets you want to add to a bin.
- In the Hypershade Bins tab, click the Create bin from selected button.
To rename a bin
- In Hypershade, double-click the bin you want to rename.
- Type the new bin name and press
 .
.
To duplicate a bin
- In Hypershade, right-click the bin.
- Select Duplicate. The bin is duplicated and all the same assets are assigned to it.
To select assets
- To select one asset, click the asset.
- To select multiple assets, do one of the following:
- Marquee drag across the assets.
- Shift+click to switch between selecting and deselecting an asset.
- To select assets that are not assigned to a bin, in the Hypershade Bins tab, click the Select unsorted content button.
To add assets to a bin
- In Hypershade, do one of the following:
- Select the assets you want to add to a bin, then right-click bin and select Add Selected.
- Select the assets you want to add a bin, then middle-drag them to the bin.
- To add a single asset to a bin, drag it to the bin.
To make assets exclusive to one bin
- This procedure removes selected assets from all other bins.
- In the Work Area, select the assets you want to make exclusive to one bin.
- Right-click any existing bin.
- Select Make Selected Exclusive.
To remove some assets from a bin
- Select the assets you want to remove from a bin.
- Right-click the bin.
- Select Remove Selected.
To remove all assets from a bin
- Right-click the bin, then select Empty.