Skins a surface along a series of profile curves.
Related topics
NURBS > Loft > 
- Parameterization
-
This modifies the parameterization of the lofted surface (see Parameterization of NURBS curves and surfaces).
Uniform knot spacing makes the profile curves run parallel to the V direction. The parameter values of the resulting surface in the U direction are equally spaced. The first profile curve corresponds to the isoparm on the surface at U[0], the second to U[1], and so on.
Chord Length spacing causes the parameter values on the resulting surface in the U direction to be based on the distance between the start points of the profile curves.
Tip: If the curves have the same curve degree and number of edit points, the lofted surface will have the same number of spans in the U direction. The surface will be easier to manipulate and texture. A convenient way to accomplish this is to make copies of a single curve and transform CVs on the copies as necessary to get the desired profile curves.If the parameterization of the curves differs, the lofted surface might have more spans than any of the profile curves. If you create the curves as Edit Point curves with Chord Length, the surface will be more complex and harder to work with.
- Auto Reverse
-
If Auto Reverse is off, the curves are used as they are, which may result in a twisted surface. If on, the curves are automatically reversed.
In the following example, the two top curves and the two bottom curves are going in different directions.
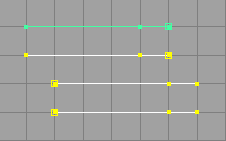
If Auto Reverse is off, the result is a twisted lofted surface. If on, the curves are automatically reversed.
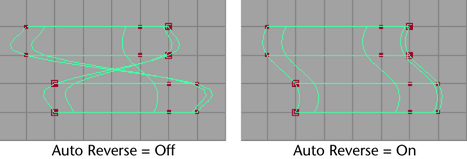
If Auto Reverse is off, you can use the Show Manipulator Tool to reverse the curve direction of the original profile curves as needed. Simply click the manipulator handle to reverse the curve direction.

- Close
-
The Close option sets whether the created surface is periodic in one dimension (U or V). Close is off by default. See Periodic, closed, and open geometry.
- Surface Degree
-
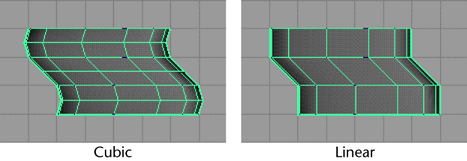
You can set the Surface Degree to either Linear or Cubic. This sets the lofted surface to linear or cubic in the U direction. Linear creates surfaces that appear faceted. Cubic creates smooth surfaces.
- Section Spans
-
This option sets the number of spans between the lofted curves. Higher numbers give finer control of surface deformations at the expense of extra processing time.
- Curve Range
-
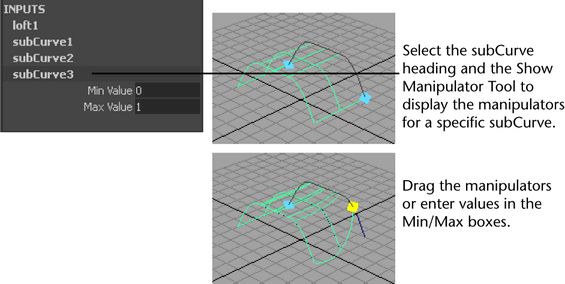
If you select Partial, you can use the Show Manipulator Tool after the loft operation to change the length of the subCurves used to create the surface. This changes the length of the surface.
- Output Geometry
-
Specifies the type of geometry created. (Subdiv means subdivision surfaces.)
- Input Curves
-
The options in the Loft History section of the Attribute Editor gives you access to the history of the lofted surface you constructed. This information is read-only. Click the arrow buttons to select the surface, isoparms, or curves, then open its section of the editor.
- Reverse Curve
-
If you turned Auto Reverse off when you lofted the surface, a Reverse Curve option is displayed for each curve, primitive, or surface isoparm you used to create the lofted surface. Select the Show Manipulator Tool to display the reverse manipulators. Click the options to reverse the direction of the input curves, or click the manipulators.
In the following illustration, the first curve used to create the lofted surface is selected for reversal.
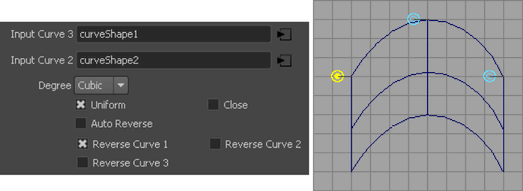
Editing the subCurves in the Attribute Editor
If you set the Curve Range to Partial in the options window when the loft was created, you can use the Attribute Editor for the resulting subCurves.