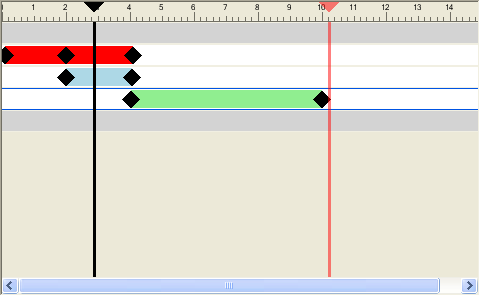
The timeline view shows the timelines with keyframes for animation sets, cameras, and section planes in your scenes.
Use it to visualize and edit the animations.
Timescale Bar
At the top of the timeline view is the timescale bar in seconds. All timelines start at 0. Right-clicking the timescale bar opens a context menu.
Use the ![]() and
and ![]() icons at the bottom of the Animator tree view to zoom in and out on the timescale bar.
icons at the bottom of the Animator tree view to zoom in and out on the timescale bar.
The default timescale shows around 10 seconds of animation on a standard screen resolution, zooming in and out has an effect of doubling or halving the visible area. So, for example, zooming in shows around 5 seconds of animation, and zooming out shows around 20 seconds.
Another way of changing the timescale is to use the Zoom box. For example, type in “1/4”, and press Enter to quarter the visible area. The value you enter is halved when you zoom in, and doubled when you zoom out. You can return to the default timescale by deleting the Zoom box value, and pressing Enter.
Keyframes
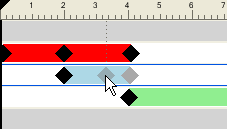
The keyframes are shown as black diamonds in the timelines. You can change the time when a keyframe occurs by dragging the black diamond left or right in the timeline view. As you drag a keyframe, it changes the color from black to a lighter grey.

Left-clicking a keyframe moves the time slider to that position. Right-clicking a keyframe opens a context menu.
Animation Bars
The colored animation bars are used to visualize the keyframes in a timeline, and cannot be edited. Each animation type is shown in a different color, and the animation bars for the scenes are gray. Typically, the animation bar ends with the last keyframe. If an animation bar carries on in a faded color after the last keyframe, this indicates that the animation will play indefinitely (or, loop animation).

Sliders
You can use two sliders in the timeline view:
- Time Slider
-
The black vertical line is the time slider, representing the current position in the playback. This can be adjusted by either using the VCR controls on the Animator toolbar, by dragging the time slider left or right in the timeline view, or by selecting the time slider in the timeline view and using the left and right arrow keys. As the time slider is moved, the model in the Scene View updates to reflect movements caused by keyframes in the current scene as if the animation were playing back.
- End Slider
-
The red vertical line is the end slider, representing the end point of the current active scene. It is hidden if you selected the Infinite check box for the current scene in the tree view. By default, the end slider is set to the last keyframe in the scene and can’t be moved. You can switch on manual control of the end slider in a scene by right-clicking the end slider, and choosing Manually Position Endbar from the context menu. Then, manually adjust the end slider, by dragging it left or right. This end marker will be used as the animation end point when scenes are set to loop or ping-pong.
Context Menu
Right-clicking the timescale bar opens a context menu that allows you to adjust the sliders.
- Move Time Here - moves the time slider into the current mouse pointer position.
- Move Scene End Here - moves the end slider into the current mouse pointer position. Note: This option is not available until you select the Manually Position Endbar option.
- Reset Endbar to the Scene End - moves the end slider to its original position.
- Manually Position Endbar - switches on manual control of the end slider in a scene.
Right-clicking a keyframe opens the context menu with the following options:
- Edit - enables you to edit the selected keyframe.
- Go to Keyframe - moves the black time slider to this keyframe.
- Cut, Copy, Paste - standard cut, copy, and paste commands. They only work inside the selected timeline.
- Delete - deletes the selected keyframe.
- Interpolate - determines whether Autodesk Navisworks automatically interpolates between the current and the last keyframes. This is the default option. When disabled, there will be no gradual transition between the two keyframes; instead the animation will instantly jump to the position/view of the second keyframe when it’s reached. Also, there will be no colored animation bar between the keyframes.