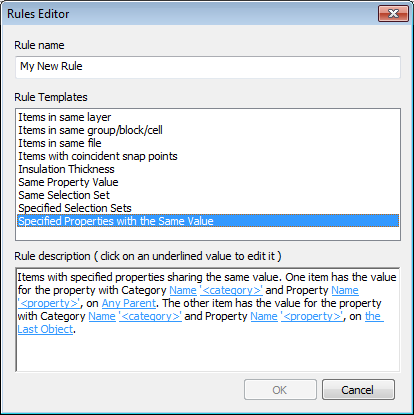
To add a custom clash rule
- If the Clash Detective window is not already open, click Home tab
 Tools panel
  Clash Detective
 .
. - On the Rules tab, click the New button.
- In the Rules Editor dialog box, enter a new name for your rule.

- In the Rule Templates list, click the template you want to use.
- In the Rule Description box, click each of the underlined values to define your custom rule. The customizable values available with the built-in templates are:
- Name. Use the name of the category or property as it is displayed in the interface (recommended). You can also choose Internal Name which is that accessed via the API (for advanced use only).
- “<category>”. Choose from the available list, which category the property you wish to define is in. Only the categories that are contained in the scene are available in the drop-down list.
- “<property>”. Choose from the available list, which property you want to define. Again, only the properties in the scene within the chosen category will be available.
- Any Parent. Search for the defined property on the specified selection. Any Parent is the default option, though you can also choose a Model, a Layer, the Last Object, or the Geometry
- the Last Object. Search for the defined property on the specified selection. The Last Object is the default option, though you can also choose Any Parent, a Model, a Layer, or the Geometry.
- “<set>”. Choose from the available list, which Set you require to define the rule. Only the pre-defined Selection and Search Sets are available in the drop-down list.
- Click OK. The rule is added to the Ignore Clashes Between area on the Rules tab.