To compare two versions of the model
- Open the first file that you want to compare in Autodesk Navisworks.
- Click Home tab
 Project panel
  Append drop-down
  Append
  , locate the second file, and click Open.
 - Hold down CTRL key, and select both files in the Selection tree .
- Click Home tab
 Tools panel
  Compare
  .
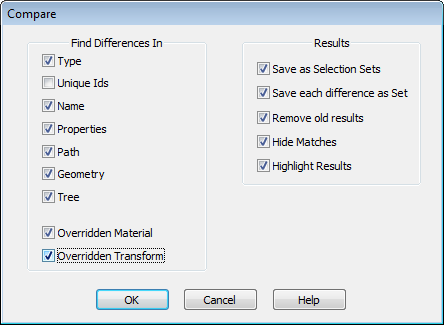
. - In the Compare dialog box, the Find Differences In area, select the check boxes for all required options. Note: The Overridden Material and Overridden Transform check boxes relate to changing the color and transparency in Autodesk Navisworks, and changing a file's origin, scale or rotation since loading into Autodesk Navisworks, respectively. These check boxes are clear by default. All the other criteria relate to properties of items from the original CAD model.
- In the Results area, select the check boxes to control how the comparison results are displayed:
- Save as Selection Sets. Saves the items that you are comparing as a selection set. You can then use this set for later comparisons between the same items.
- Save Each Difference As Set. Saves the resulting differences found in the comparison between the two items as a selection set for later analysis. The selection set will also have a comment attached detailing the differences in more depth.
- Remove Old Results.Removes any selection sets resulting from a previous comparison, in order to reduce confusion when looking at the results.
- Hide Matches. Hides all items that turn out to be the same in the comparison, when the comparison finishes.
- Highlight Results. Highlights each resulting difference with a color override, when the comparison finishes. You can reset the colors back by clicking Home tab
 Project panel
  Reset All drop-down
  Appearances
  .
.

- Click OK.