Although the analytical model will be verified automatically before the analysis is performed, it is good practice to run member support and consistency checks manually before sending the model to the Autodesk® 360 Structural Analysis website (see Verifying the Analytical Model).
Analysis is performed for the analytical model uploaded to the cloud. You can analyze a whole analytical model or a part of it. For a selected part of a structure, supports are created automatically in places where the model is cut off from the project. For a given project (RVT file) you can define several models and submit them for analysis. For each model, you can run several analyses. Results are calculated for each analysis.
To perform the analysis of an analytical model from Revit
- Open a Revit project that includes an analytical model.
- Click Analyze tab
 Structural Analysis panel
  Analyze in Cloud. Note: The Analyze in Cloud dialog appears and displays steps of the preparation process for uploading the model to the cloud.
- To use Structural Analysis for Autodesk Revit, you need to sign in to your Autodesk account or create a new account by clicking Need an Autodesk ID? link.
- The Structural Analysis for Autodesk Revit tool is available to Subscription customers. You need to have proper entitlements to use it. Your Subscription can be verified within your Autodesk Account. After signing in, click Enable your Subscription benefits to verify your Subscription and enable your account with the Autodesk® 360 cloud services you're eligible for.
- To perform an analysis you need to have enough cloud credits. To see the FAQs on cloud credits, go to http://www.autodesk.com/cloud-credit-faq.
- In the Analyze in Cloud dialog specify the desired values for Model, Analysis name and Report name. Note: Each analysis for a given model must have a different name.
- For Report template, select:
- Status only, to obtain short information that the analysis is completed or failed.
- Simple report, to view the analysis results including maps and diagrams.
- For Analysis profile, select:
- Draft. The assumed maximum size of a mesh element is 2 m (7 ft).
- Normal. The assumed maximum size of a mesh element is 0.8 m (3 ft).
- Fine. The assumed maximum size of a mesh element is 0.4 m (1.5 ft).
Note: This setting only affects models that include analytical walls, floors, and foundation slabs. See: Analysis Assumptions. - In the Self-weight options, specify if you want to generate a self-weight on an existing load case or not.
-
Select Add to existing load case, and then select the load case on which the self-weight will be generated.
- Select Ignore if you do not want to generate a self-weight on the load case.
Note: If there are no loads defined, then the Ignore option is disabled and the self-weight is generated on the existing load case. -
- Click Start Analysis.
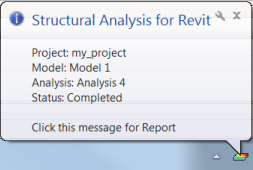
- When the balloon message indicates that the analysis is complete, click the message to view the analysis report. If you want to view the report later, click
 (Structural Analysis for Revit) on the system taskbar, and then click Completed.