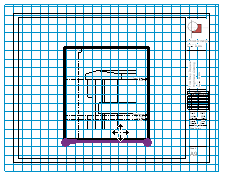
Guide grids help arrange views so that they appear in the same location from sheet to sheet.
You can display the same guide grid in different sheet views. Guide grids can be shared between sheets.
When new guide grids are created, they become available in the instance properties of sheets and can be applied to sheets. It is recommended to create only a few guide grids and then apply them to sheets. When you change the guide grid's properties/extents in one sheet, all the sheets which use that grid are updated accordingly.
Video: Use Guide Grids to Align Views
To align views to grid lines on the current sheet
- Open a sheet view.
- Click View tab
 Sheet Composition panel
 (Guide Grid).
 - In the Assign Guide Grid dialog, select Create new, enter a name, and click OK.

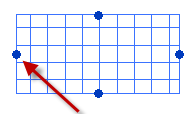
- Click and drag the extent controls to specify the extents of the guide grid.

- (Optional) Drag additional views onto the sheet.
- Select a placed viewport, and on the ribbon click
 (Move).
 - Snap to the crop regions or datums in the viewports and move them into alignment with the guide grid lines to specify a precise location on the sheet.
No constraints will be created between the guide grid and other elements on the sheet.
Note: You can only snap to the intersection of datums (reference planes or grids) that are parallel to the guide grid. You cannot snap to non-orthogonal datums, such as arc grids or angled reference planes.
The default guide grid extents match the sheet extents plus an offset. If the sheet is empty, the extents will be 36” by 24” (900 mm by 600 mm).
To apply a guide grid to a sheet
- Open a sheet view.
- Click View tab
 Sheet Composition panel
 (Guide Grid).
 - In the Assign Guide Grid dialog, select Choose existing, select a guide grid to add to the sheet, and click OK.
To change the line styles for guide grids
- In a project, click Manage tab
 Settings panel
 (Object Styles).
 - Click Annotation Objects tab.
- Under Category, select Guide Grid.
- Use the Line Weight, Line Color, and Line Pattern columns to specify the desired settings.
- Click OK.
To modify guide grids
- Select a guide grid.
- Click Modify | Guide Grid tab
 Properties panel
 (Properties).
 - On the Properties palette, under Dimensions, specify Guide Spacing.
- Under Identity Date, specify the guide grid Name.
- Click Apply.