April 9, 2014
Release Notes - Read Me file Autodesk® Simulation CFD 2015
Autodesk, Inc.
Contents
- Installation Requirements
- Installation Preparation
- Installation Instructions
- Autodesk® Simulation CFD 2015 Notes
- Legal Notice
Installation Requirements
- Autodesk® Simulation CFD supports the following operating systems:
- Windows 8 and 8.1 Enterprise x64
- Windows® 7 Home Premium, Professional, Enterprise, Ultimate (SP0 or SP1 for x64)
- HPC operating systems: Windows Server 2008 R2, Windows Server 2012.
-
Note: Windows Server 2008 is not supported. Simulation CFD 2015 is verified to neither install nor operate on Windows Server 2008.
- Verify that you have administrator privileges on your local machine to install Autodesk® Simulation 2015.
Installation Preparation
Prior to installing Autodesk® Simulation CFD 2015, you will need to uninstall any pre-release (Beta) versions of Autodesk® Simulation CFD 2015.
To check if an earlier version has previously been installed, open the Control Panel (Start > Control Panel), select Programs and Features, and look for entries titled Autodesk® Simulation CFD 2015.
To uninstall an earlier version of Autodesk® Simulation CFD 2015:
- Verify that Autodesk® Simulation CFD is not running.
- Open the Control Panel (Start > Control Panel).
- Select Programs and Features.
- Select the entry you want to remove, and click Uninstall/Change to launch the uninstall procedure.
- Restart the computer to complete the process.
Additionally, you should shut down any CAD systems that are currently open.
Installation Instructions
Autodesk® Simulation CFD uses an Installation Wizard to guide you through the installation process.
- Log in to the computer using an account with Administrator privileges.
- Exit any Autodesk® programs that are currently running.
- You can install Autodesk® Simulation CFD from either a downloaded installation executable or from an installation DVD.
- If installing from a downloaded executable file, navigate to the file, right click on it, and select Run as Administrator.
- If installing from the DVD, insert it into the DVD drive. If Autorun is enabled, the DVD main menu displays automatically. Otherwise, navigate to the DVD drive folder, right-click on setup.exe, and select Run as Administrator.
- After the Installation Wizard initializes, the Welcome page appears.
- Click Install to begin the installation process.
- The License Agreement page appears.
- Select the appropriate entry in the Country or Region list.
- Review the agreement.
- Select the option to accept the agreement.
Note: If you reject the license agreement, you cannot install the software. - The Product Information page appears.
- Enter a Serial number and Product key for one of the modules that you purchased. (It does not matter which module you use.)
- Select the License Server Model. There are three options:
- Single License Server: In the single license server model, the Network License Manager is installed on a single server. License management and activity is restricted to this server. A single license file contains the total number of licenses available on the server.
- Distributed License Server: In the distributed license server model, licenses are distributed across multiple servers. A unique license file is required for each server. To create a distributed license server, you must run the Network License Manager on each server that is part of the distributed server pool.
- Redundant License Server: In the redundant license server model, you use three servers to authenticate a single license file. One server acts as the master, while the other two provide backup if the master server fails. Licenses are monitored and issued as long as at least two servers are functional. The license file on all three servers is the same. You must install the Network License Manager on each server.
Note: Network License is the only license type available for Autodesk® Simulation CFD.Check with your system administrator if you are unsure which model to select.
Enter the name of the license server computer that will run the Network License Manager (NLM).
- If the NLM is installed on another computer, enter the name of that machine. (Do not enter the name of the local machine.)
- If the NLM is installed and configured to run on the local machine, enter 127.0.0.1 as the license server name. If the "FLEXnet License Finder" dialog opens when Autodesk® Simulation CFD is first started, enter 127.0.0.1 as the Computer Name of the License Server System.
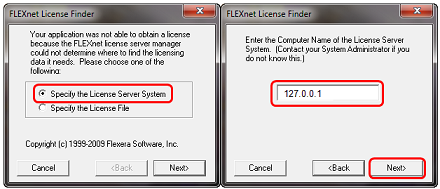
Check with your system administrator if you are unsure which computer to specify.
- The Configure Installation page appears.
- Select Autodesk Simulation CFD.
- Accept the default Installation Path or click Browse to select a different folder.
- Review the installation settings. You can change settings by clicking Back until the relevant screen appears. When you are satisfied with the settings, click Install to begin the installation.
- The Installation Progress page appears.
- The Wizard begins installing Autodesk® Simulation CFD.
- A progress indicator shows how much of the installation has been completed.
- The Installation Complete page appears.
- The successfully installed products are listed, as are any products that failed to install.
- Click Finish to close the Setup Wizard.
Notes:
- Before you can use Autodesk® Simulation CFD, the Network License Manager must be installed, and you must be able to access your network.
- You must have activated your licenses on the license server machine.
- To change the language of the installed version, open SimCFDConfig, located in the Autodesk Simulation CFD installation folder. Click here for more details...
Autodesk® Simulation CFD 2015 Notes
Here is a brief summary of some of the exciting new functionality in Autodesk® Simulation CFD 2015:
- Heat Sink Material Device: The introduction of the heat sink material device addresses the problem of including highly complex heat sink components in your electronics simulations. The heat sink device approximates the flow and thermal characteristics of several different types of heat sinks using a simple ("lumped") geometric model. You can define the thermal properties and the geometric characteristics of your heat sink, and Simulation CFD computes the effects of the sink on the flow and surrounding components.
- Report Generator: The Report Generator simplifies sharing your results and communicating your findings. You can customize the content of the report to include the items of interest and select which scenarios to include.
- Spatially Variable Boundary Conditions: You can now define velocity and temperature boundary conditions that vary across a dimension of the applied surface. This is useful for simulating a known velocity or temperature profile caused by phenomena or equipment located upstream of, but not included in, the simulation model.
To learn more about all the new Autodesk® Simulation CFD 2015 functionality, please consult the What's New section in the Help. You can access it by clicking What's New from the Autodesk® Simulation CFD Start & Learn tab.
Additional notes:
- Be sure to update the NLM on the license server to the version that comes with Simulation CFD 2015. Older versions of the NLM software will not work with Simulation CFD 2015.
- A few user interface strings appear in English in non-English versions. These include the string "Thermodynamic table fie" on the Material Editor and the tool tip for the Application button.
- In a specific, highly complex multiphase simulation, the solver may crash when running on multiple cores. If you encounter this issue, adjust the solver to run on a single core.
- When using the "Select Surface" option to apply a spatially varying boundary condition , the feedback arrow does not appear on the model. Note that this does not prevent application of the spatially varying boundary condition.
- On the Design Study tree, the Show and Hide options on the Results > Materials branch do not work. The work-around is to use the right-click menus directly on the model.
- After selecting a results plane from the Design Study Bar, the ribbon context panel does not update to the Planes mode if another results mode had been active.
- After changing the name of a results plane, the original (default) name of the plane continues to appear in the Design Study tree.
- After enabling the Office plugin to view Dynamic Images in either Microsoft® PowerPoint or Word, you will see a "Glview error" if you do not have the plugin currently installed. To download and install the plugin, go to http://ceetron.com/products/end-user-products/glview-3d-plugin . Note that this opens the Ceetron website.
- The in-product help links for the non-English versions open the English language on-line Help. To open localized help with in-product help links, open the "SimCFDHelpIds.xml" file located in the Program Files\Autodesk\Simulation CFD 2015 folder, and change the value for "language" from "ENU" to either "JPN" or "DEU" for Japanese or German, respectively.
- Clicking "More information" on error dialogs does not open the correct page. To fix this, open the "SimCFDHelpIds.xml" file located in the Program Files\Autodesk\Simulation CFD 2015 folder, and change the value of online_search from "/?=" to "?query=".
Legal Notice
Autodesk Simulation CFD, Autodesk Simulation, Autodesk Inventor, Autodesk Fusion, Autodesk Vault, Autodesk Moldflow Insight, Autodesk Moldflow Advisor, AutoCAD, and Mechanical Desktop are trademarks or registered trademarks of Autodesk, Inc. in the United States and/or other countries.
Windows 8, Windows 7, Windows 2000, Windows Server 2003, Windows XP, Microsoft Office XP, Microsoft Office 2000, Microsoft Office 2003, Microsoft Office 2007, Microsoft Word, Microsoft PowerPoint, and Microsoft Excel are either trademarks or registered trademarks of Microsoft Corporation in the United States and/or other countries.
All other trademarks are the property of their respective owners.
Thank You
We thank you for your business, and encourage you to use Autodesk® Simulation CFD to its fullest. Your feedback is important, and we greatly appreciate your input and feedback about the product.
Respectfully,
Autodesk® Simulation CFD Team