Dynamically enable and disable fields in the Data Standard dialog based on values entered by the user.
For instance, if you have a combo box where the user selects a value, you can automatically enable new fields based on the selected value.
Example Overview
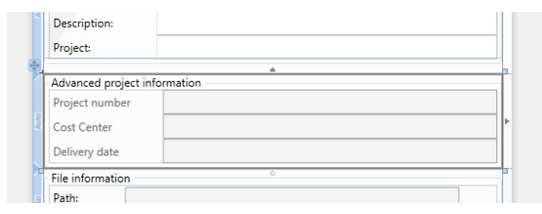
In this example, new fields are created and grouped by a GroupBox. The GroupBox content is enabled or disabled based on the text entered into a TextBox project.
Here is how it might look in the dialog:
Example: Group the Fields and Set the IsEnabled Attribute
To simplify the steps, fields are grouped in the code. This way, the complete group can be enabled or disabled in case a rule returns false or true. So, first, create a GroupBox which contains optional fields. Here is the code:
<GroupBox

      Header="Advanced project information" Grid.Row="2" HorizontalAlignment="Stretch" VerticalAlignment="Top"

      IsEnabled="{Binding Source={StaticResource DataStandardModelResource}, Path=IsCustomControlEnabled}">

  <Grid>

    <Grid.RowDefinitions>

      <RowDefinition Height="*"/>

      <RowDefinition Height="*"/>

      <RowDefinition Height="*"/>

    </Grid.RowDefinitions>

    <Grid.ColumnDefinitions>

      <ColumnDefinition Width="120"/>

      <ColumnDefinition Width="*"/>

    </Grid.ColumnDefinitions>

    <Label Content="Project number" Grid.Column="0" Grid.Row="0" />

    <TextBox Text="{Binding Prop[ProjectNumber].Value}" Grid.Column="1" Grid.Row="0"/>

    <Label Content="Cost Center" Grid.Column="0" Grid.Row="1" />

    <TextBox Text="{Binding Prop[Costcenter].Value}" Grid.Column="1" Grid.Row="1"/>

    <Label Content="Delivery date" Grid.Column="0" Grid.Row="2" />

    <TextBox Text="{Binding Prop[DeliveryDate].Value}" Grid.Column="1" Grid.Row="2"/>

  </Grid>

</GroupBox>
The GroupBox, like most of all other controls, exposes the property IsEnabled, which controls whether the control and its children are enabled for use or not. To dynamically enable or disable this control and its children, the IsEnabled attribute is bound to the property of a custom view model (custom DLL), created in the next section.
The logic if and when the control should be disable or enabled is then written into the custom code.
Example: Create the Custom View Model
- Start your Visual Studio and create a Class Library. The name of the project is up to you.
- Define a constructor and create an event handler for the property that you can control. In this case, it's the project property. If this property changes, you can be notified. Check the content and if it is compliant to your rule, set the value for another helper property.
- Create the helper property that will be used to set the enable/disable behavior of your control. In this case, the helper property is called IsCustomControlEnabled
- Define in the event handler your logic and set the property accordingly. In this case, the code verifies that the project property contains the text "advanced". If so, then the additional property is made available. If not, the properties of the GroupBox is disabled.
Here is the DLL code:
namespace DynEnableDisable

{

    public class DataStandardModel : CustomerViewModelBase

    {

        public DataStandardModel()

        {

            if(!base.IsInDesignMode)

                base.Properties["Project"].PropertyChanged += DataStandardModel_ProjectValueChanged;

        }


        void myViewModel_ProjectValueChanged(object sender, System.ComponentModel.PropertyChangedEventArgs e)

        {

            if (e.PropertyName == "Value")

            {

                if (Properties["Project"].Value.ToString().ToLower().Contains("advanced")) IsCustomControlEnabled = true;

                else IsCustomControlEnabled = false;

            }

        }

        private bool _IsCustomControlEnabled = false;

        public bool IsCustomControlEnabled

        {

            get { return _IsCustomControlEnabled; }

            private set { _IsCustomControlEnabled = value; OnPropertyChanged("IsCustomControlEnabled"); }

        }

    }

}
In the constructor, the PropertyChanged event is overloaded with an event handler. This way, we get notified every time the user applies changes to the Project property. To avoid that, the Visual Studio generates an error as it tries to render the XAML file. The if statement checks whether we are InDesignMode or not. In the event handler, (myViewModel_PropertyValueChanged), the first if statement checks whether the event was called by a value change or another type of change. In case of a value change, we check what the user has inserted in the TextBox and if the value "advanced" has been typed by the user, then we set the property IsCustomControlEnabled to true.
Compile the DLL and place it into the add-ins folder for Data Standard.
Example: Declare the New DLL in the .xaml File
Declare in your XAML file the existence of your new DLL. In the header of the XAML file, define a namespace alias for your DLL:
<prop:dsWindow

    xmlns="http://schemas.microsoft.com/winfx/2006/xaml/presentation"

    xmlns:x="http://schemas.microsoft.com/winfx/2006/xaml"

    xmlns:prop="clr-namespace:dataStandard.UI.View;assembly=dataStandard.UI"

    xmlns:myvm="clr-namespace:DynEnableDisable;assembly=DynEnableDisable"

    x:Name="MainWindow" Title="{Binding PathAndFileNameHandler.FileName}" WindowStyle="ToolWindow" ShowInTaskbar="False"

    Topmost="True" SizeToContent="WidthAndHeight">
The xmlns:myvn is the DLL alias in the example. Now define your class as a resource so you can use it later in the XAML:
<prop:dsWindow.Resources>

    <myvm:DataStandardModel x:Name="DataStandardModelResource">

</prop:dsWindow.Resources>
Create an instance of the class DataStandardModel out of the myvm namespace (your DLL) and give the alias myViewModelResource, which will be used later. In the first step, the IsEnable property of the GroupBox is already bound to the IsCustomControlEnabled by way of the resource DataStandardModelResource defined a few rows above.
Now when the user edits the project property, your event gets notified, your custom logic works and decides whether to set the IsCustomControlEnable to true or false. Based on this value, the GroupBox is enabled or disabled.