Create multiple combo-boxes (also known as selection lists) for your Data Standard dialogs, where the next combo box depends on the selection made in the first.
When a value is selected in the first box, the next box should show values based on the first selection. For example, you have two combo boxes: one shows car company names (BMW, Mercedes, Ferrari, etc.) and the second shows car types for the selected company (for BMW: 1, 2, 5, X2, X5...; for Mercedes: A, B, C, CL, CLS...).
Step 1: Create a Data Source
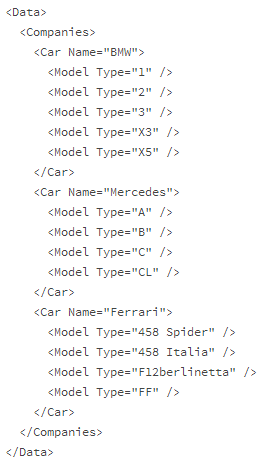
In order to fill the combo-boxes you need a source where the data should come from. As WPF comes with a native XML engine, you can create an XML file that contains the data. The XML file has the first level content for the first selection. Every entry has child entries for the second selection. These second entries could have even more children in case you need a three level or even more nested selection list. This is how it looks:
Create a data.xml file, copy this content into the file, and save the file near the .xaml file in which you want to add cascading combo boxes (e.g., in C:\ProgramData\Autodesk\Vault <release>\Extensions\DataStandard\Vault\Configuration).
Second Step
- Add the following lines to your XAML file in the resource section:
<XmlDataProvider x:Key="comboDataSource"
Source="C:\ProgramData\Autodesk\Vault 2015\Extensions\DataStandard\Vault\Configuration\data.xml"/>
Note: Vault 2015 R2 users should use this path: C:\ProgramData\Autodesk\Vault 2015\Extensions\DataStandard\Vault\Configuration\data.xmlThis is how the whole resource section might look:<prop:dsWindow.Resources xmlns:prop="clr-namespace:dataStandard.UI.View;assembly=dataStandard.UI"> ... ...... .... <XmlDataProvider x:Key="comboDataSource" Source="C:\ProgramData\Autodesk\Vault 2015\Extensions\DataStandard\Vault\Configuration\data.xml"/> </prop:dsWindow.Resources>
Note: Vault 2015 R2 users should use this path: C:\ProgramData\Autodesk\Vault 2015\Extensions\DataStandard\Vault\Configuration\data.xmlAs you can see, the new resource is named comboDataSource and the path points to the data.xml.
Third Step
<ComboBox x:Name="ComboCarCompanies" Grid.Column="1" Grid.Row="5"
  ItemsSource="{Binding Source={StaticResource comboDataSource}, XPath=/Data/Companies/*}"
  Text="{Binding Prop[CarVendor].Value}" DisplayMemberPath="@Name"
  SelectedValue="{Binding Prop[CarVendor].Value}" SelectedValuePath="@Name" />
In the example, the combo is named ComboCarCompanies and it is positioned at column 1, row 5. The source for the content of this combo comes from the resource named comboDataSource. XPath points to the right path for reading the content. Everything is under the element Companies. The children of the element Companies have one member each called Name. So, the attributes DisplayMemberPath and SelectedValuePath point to @Name. The attributes Text and SelectedValue point to the property that is filled with the value selected by the user.
- Once you have made your changes, save the file and review the dialog. The first combo should display the values correctly.
The second combo looks similar to the first one. The only difference is that the data source comes from the first combo. The user selects one node from the XML file. So that node is now loaded as the selected item in the first combo. The node also knows about the selection's children.
- Point with the second combo to the selected item of the first and just grab the child values for displaying. Here is the code:
<ComboBox x:Name="ComboCarType" Grid.Column="1" Grid.Row="6"
ItemsSource="{Binding SelectedItem, ElementName=ComboCarCompanies}"
Text="{Binding Prop[CarType].Value}" DisplayMemberPath="@Type"
SelectedValue="{Binding Prop[CarType].Value}"
SelectedValuePath="@Type"/>
Most attributes in our example play the same role as in the first combo. The real difference is in the ItemSource. In this example,the first combo called ComboCarCompanies points to the SelectedItem.
- Save your changes and review the dialog.