Viewport Layouts gives you a special tab bar for switching quickly among any number of different viewport layouts. For example, you might have a four-viewport layout, zoomed out for an overall view of your scene from different angles simultaneously, plus several different full-screen closeup views of different parts of the scene. The ability to activate any of these with a single click can speed your workflow tremendously. The layouts are saved with the scene so you can return to your custom viewports setup at any time.

Viewport Layouts tabs at bottom-left, showing three tabs below the Presets menu button
The Viewport Layouts tab bar is open by default when you first start 3ds Max, oriented vertically on the left side of the viewports. The single tab at the bottom of the bar bears an icon that depicts the startup layout. You can add tabs to access additional layouts by choosing them from the Presets menu, which opens when you click the arrow button on the tab bar. After loading additional layouts onto the bar from the presets, you can switch to any layout by clicking its icon.
- Viewport Layout tabs You add these from the Presets (arrow) menu on the tab bar. You can customize any layout by navigating the viewports, changing point-of-view and rendering modes, and moving viewport boundaries. You can also set any viewport in any layout to Track View, Scene Explorer, or any other Extended Viewport option.
You can have as many different layouts in a scene as memory permits. Tabs you add in a session are saved and loaded with the scene. Saved data includes all pertinent aspects of each layout including viewport navigation settings and rendering modes.
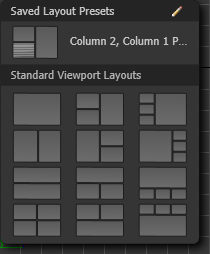
- Layout Presets (Standard and Custom) Open the Presets menu by clicking the arrow button on the tab bar. By default, this menu contains 12 of the standard viewport layouts (see Layout Panel). To open a new layout, choose any preset by clicking it. This also adds a tab for the layout to the tab bar. You can add a custom preset based on any existing tab by right-clicking the tab and choosing Save Configuration As Preset. The custom preset remembers the layout (number and arrangement of viewports) and the viewport points of view, and when the Nitrous display driver display driver is active, it also remembers the viewport rendering modes. The custom preset does not store view transforms (pan/orbit/zoom). Custom presets persist between sessions, and can be renamed and deleted.
Managing the Viewport Layouts Tab Bar
- To float the tab bar, drag it by the top end.
- To dock the floating tab bar, drag it to the left side of the interface, or right-click the top and choose Dock
 Left. (The tab bar docks to the left side only.)
 - To access the toolbars menu, right-click the top end of the tab bar.
- To toggle the tab bar, right-click near the top or left end of any toolbar to open the Customize Display Right-Click menu and click the Viewport Layout Tabs item. Also, if the tab bar is floating, you can close it by clicking the X button on the title bar.
Procedures
Example: To use Viewport Layouts:
- Start 3ds Max. If the default layout isn't the standard 2 x 2 viewports, use the Layout panel to set it.
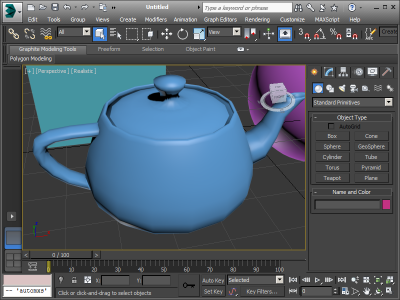
- Add a few different objects in the Perspective viewport, such as a teapot, a sphere, and a box.
All three objects appear in all four viewports.
- Use Zoom and Pan to fill the Top viewport with the teapot and the Front viewport with the sphere.

- Note the Viewport Layouts tab bar, the vertical bar to the left of the viewports. The bar contains a single tab, which represents the current layout. You'll add a layout by loading it from the available presets. Start by clicking the arrow button above the tab on the tab bar.
The Viewport Layouts Presets menu opens. Because you haven't saved any custom presets, it contains only the standard viewport layouts. Each item is represented by a thumbnail icon that depicts its layout.
- On the Presets menu, click the icon for the first layout; it resembles a single, undivided rectangle.

A new tab is added to the tab bar and its layout opens with a single, full-screen viewport. It uses the Top wireframe view because that's the default single-viewport view from the Layout panel.
Note: When you load a preset layout, it activates automatically. - Press the P key to switch it to a Perspective viewport and F3 to switch to a shaded view, then pan, zoom, and rotate the view so you're zoomed in on the teapot.

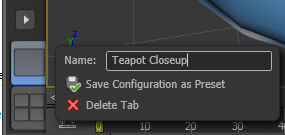
- Right-click the tab to open the context menu, then click in the Name field and change the name to Teapot Closeup.

Check the tooltip for the tab; it's the same as the layout name.
- Repeat steps 4-6 to create another closeup view for the sphere and name it Sphere Closeup.
- Click the arrow button again and this time choose the first preset in the third row.
This creates a new, fourth tab with two horizontal viewports. Its name is Row 1, Row 1.
- In the top-left corner of the upper viewport, click the Top menu header (the one between the other two menu headers), then choose Extended Viewports
 Track View
  New.
New. A new Track View setup replaces the viewport contents. You can use this layout to animate the scene and edit your animation at the same time. Also, note that the upper part of the icon on the tab contains horizontal lines to indicate that it contains an extended view.

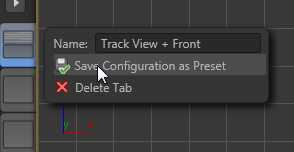
- Change the tab name to Track View + Front.
- Click each of the four tabs in turn and note that it invokes its own viewport setup.
This shows how you can use the Viewport Layouts feature to switch quickly among various viewport setups: viewing the whole scene from different angles simultaneously, editing specific objects in a full-screen, closeup view, and animating the scene in a single viewport with easy access to Track View.
You can also delete a layout when you're done with it, removing it and its tab and recovering the memory it occupied.
- Save the scene, then right-click the Sphere Closeup tab and choose Delete Tab.
The layout and its tab disappear.
Note: The Delete Tab command is not undoable. - Reset 3ds Max and take a look at the tab bar.
The tabs you created are gone. Tabs do not persist between sessions. To use a custom layout in different scenes, use the Presets feature as described in the next procedure.
- Load the scene from step 13.
The tabs and setup are restored intact. Tabs and their contents are saved and loaded with the scene.
The Viewport Layouts feature can facilitate any number of different workflows in 3ds Max. This procedure illustrates one that enables multiple views of a scene plus an extended viewport.
Example: To create custom layout presets:
- Continue from the preceding procedure.
- Click the first (lowest) tab. It should still have the name Quad 4.
The standard four-viewport layout appears.
- Click the top tab: Track View + Front.
- Right-click the Track View + Front tab and click Save Configuration As Preset.

The message "Preset is created" appears briefly.
- Open the Presets menu by clicking the arrow button.
The upper part of the menu contains a new section titled Saved Layout Presets, which includes a single entry: Track View + Front Preset.
- Close the menu by clicking anywhere outside it.
- With the Track View + Front layout still active, right-click the next tab down, Sphere Closeup, and save it as a second preset.
This shows that you can save a custom preset from any tab, not just the active one.
- Open the Presets menu again and click the Sphere Closeup Preset item.
A new layout opens showing the scene from above. Note that the single viewport uses the Perspective viewpoint that was saved with the preset, but it uses a default zoomed-out view. Also, if you're using a display driver other than Nitrous, the viewport uses Wireframe rendering mode. The preset does not remember the viewport transforms, but instead uses the default setting. And if you're not using Nitrous as the display driver, it uses the default viewport rendering option as well.
- Reset 3ds Max and add a torus in the center of the grid in the Perspective viewport, then open the Presets menu.
The presets you created a few moments ago are still there.
- Choose Track View + Front Preset.
The same multi-purpose layout opens, this time showing the torus. This shows that the Custom Presets feature is particularly useful with layouts containing Extended Viewports options and viewports showing default views.
- To edit the presets, open the presets menu and click the
 button to the right of the Saved Layout Presets heading.
 The edit fields containing the custom preset names become visible, each with a red X button on its right side.
- To change a preset name, click in its edit field and use the keyboard. To delete a preset, click its X button. To finish editing, click the
 button again or click anywhere outside the presets menu.
Interface
- Viewport Layouts Tabs
- To retrieve a stored layout, including viewport-navigation and viewport-rendering settings, extended viewports, and so on, click a tab on the tab bar. To add a tab to the bar, choose it from the Layouts (arrow-button) menu (see following).
To open a menu with contextual commands for a particular layout, right-click its tab. The layout need not be active.

The menu entries are as follows:
- Name To edit the tab, click in the Name field. Doing so highlights the current name, so you can replace it simply by typing. Otherwise, to edit the name, use standard mouse and keyboard functions.
When you add a preset with the following command, it's saved under this name. You can subsequently edit the preset name
- Save Configuration as Preset Makes the viewport layout associated with the tab available semi-permanently on the Presets (arrow-button) menu as a layout preset. The saved preset includes the viewport sizes and positions as well as and points of view, but not viewport transforms, which always load the defaults. Also, if you're using the Nitrous display driver, the preset remembers the viewport rendering modes, but otherwise it loads the default settings.
Saved presets persist between sessions and remain available on this menu until deleted.
- Delete Tab Removes the layout and its tab from the tab bar and the scene. Note: Delete Tab is not undoable.
- Name To edit the tab, click in the Name field. Doing so highlights the current name, so you can replace it simply by typing. Otherwise, to edit the name, use standard mouse and keyboard functions.
- Layouts menu
-

Open the Layouts menu by clicking the arrow button on the Viewport Layouts tab bar. The tooltip for this button is "Create a New Viewport Layout Tab." To load a new layout and tab from any preset on the menu, click its icon. After you load a preset, you can customize it by changing the viewport size proportions, point of view, and Extended Viewport options, then save it as a new preset.
The menu entries are as follows:- Saved Layout Presets Lists custom layout presets created by the user with Save Configuration As Preset (see preceding). Each preset is listed with a representative icon and the name. If no saved custom presets exist, this menu section does not appear.
 Rename or Delete Saved Presets Available only when the Saved Layout Presets menu section is present; that is, when presets exist. When you click this button, the menu entry changes to "Editing Saved Layout Presets" and you can edit a preset name by clicking in its field and typing. You can also delete a preset by clicking the red X button next to its name. To exit this mode, click this button again or click outside the Layouts menu.
 - Standard Viewport Layouts Lists the viewport setups that come with 3ds Max. These are a subset of those available on the Layout Panel. Each setup is represented as an icon that depicts the layout.