A coordination model is a Navisworks model used for virtual coordination of various trades through the pre-construction and construction phases of a project.
Attach a Coordination Model
- Click

 .
Find
- In the Select Reference File dialog box, select the file type Navisworks files (*.nwc, *.nwd).
- Select the file.
- Click Open.
- In the Attach Coordination Model dialog box, select a path type:
- Full absolute path.
- Relative to the host drawing path.
- No Path where the file resides in the same folder as the host drawing.
- Use one of the following methods to specify the insertion point, scale, or rotation of the model:
- Select Specify On-Screen to use the pointing device to attach the model at the location, scale, or angle you want.
- Clear Specify On-Screen and enter values for Insertion Point, Scale, and Rotation.
- Specify whether to show or hide the geometry in the coordination model that is the same as the geometry in the current drawing.
- Specify whether to automatically zoom to view the coordination model.
- Click OK.
Change the Properties of an Attached Coordination Model
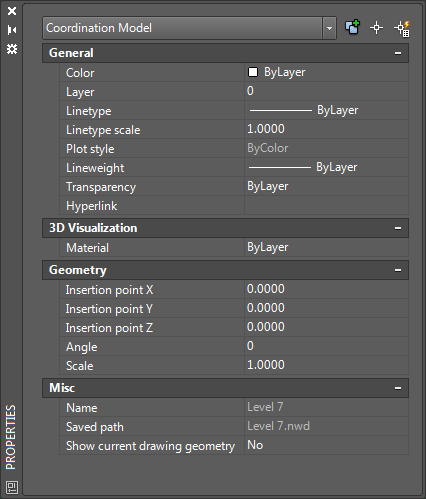
- To display the Properties palette, double-click the coordination model or the bounding box around the model.

- In the Properties palette, do any of the following:
- Change the insertion point by entering new X, Y, Z values.
- Change the rotation by entering a new value.
- Change the scale by entering a new value.
- Set Show Current Drawing Geometry to Yes or No.
The coordination model updates in real time as you change settings in the Properties palette.
Unload, Reload, or Detach a Coordination Model
- Click

 . Find
- In the External Reference palette, select a coordination model reference.

- Right-click the selected model and do one of the following:
- Unload. Hides the attachment.
- Reload. Reloads and refreshes the attachment.
- Detach. Removes the attachment.
Change the Appearance of All Coordination Models
Use the system variables CMFADEOPACITY and CMFADECOLOR to change the appearance of all attached coordination models, making it easier to differentiate between the drawing geometry and attached coordination models.
- To change the amount of dimming:
- At the Command prompt, enter cmfadeopacity.
- Enter a value from 0 to 90.
0 Coordination models are not dimmed. >0 Controls the percent of dimming up to 90 percent.
- To change the amount of black blended with the model:
- At the Command prompt, enter cmfadecolor.
- Enter a value from 0 to 90.
0 No black is blended with the coordination model. >0 Controls the percent of blending up to 90 percent.
Use Object Snaps
Coordination models support the standard 2D endpoint and center object snaps. Use the CMOSNAP system variable to turn object snapping for coordination models on and off.
- Attach a coordination model to your drawing.
- Use any command that requires you to select a location point, for example LINE, CIRCLE, and so on.
- Hold down Shift and right-click in the drawing area.
- Choose Endpoint or Center.
- Move your cursor over the desired object snap location.
By default, your cursor automatically locks onto the object snap location you specified, and a marker and tooltip indicate the object snap location.
- Select the object.
The cursor snaps to the specified geometric feature closest to where you selected the object.
- Geometry within the coordination model can contain nonstandard snapping points, such as circles with no center points. So object snapping may not behave the same as it does with AutoCAD objects.
- When working with complex models with many snap points, you may want to turn off object snap tracking (F11) or adjust the settings.
Support for object snapping to geometry in an attached coordination model is installed as a feature update for AutoCAD 2016.