In this exercise, you will renumber the table tags you created in the previous exercise.
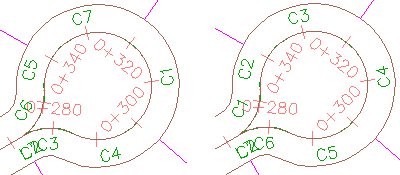
You will renumber the curve table tags around the cul-de-sac on the East Street alignment so that they follow a clockwise pattern. You will use the Table Tag Numbering dialog box that you examined in the previous exercise to specify the starting number and increment with which to renumber the table tags.
This exercise continues from Exercise 2: Converting Labels to Tags.
Examine the table tag numbering settings
- In Toolspace, on the Settings tab, right-click the drawing name. Click Table Tag Numbering.
- In the Table Tag Numbering dialog box, notice that the Table Tag Creation Starting Number values are not 1 as they were Exercise 2: Converting Labels to Tags.
The Starting Number values are the next available numerals based on the line, curve, and spiral tags that exist in the drawing and the specified increment value. If you add more table tags in the drawing, these values prevent the duplication of tag numbers.
Note:The Table Tag Numbering dialog box specifies the tag numbering settings for all objects. The settings that you specify in the following steps will apply to table tags for all objects.
- Under Table Tag Renumbering, accept the default values.
For this exercise, you will restart the curve numbering at 1 and use an increment of 1.
- Click OK.
This exercise uses Labels-4a.dwg with the modifications you made in the previous exercise, or you can open Labels-4b.dwg from the tutorials drawings folder.
Renumber the table tags
- In the drawing, zoom in to the area around the cul-de-sac at the end of the East Street alignment.
- Click a label tag to select it. Click Labels tab
 Modify panel
  Renumber Tags.
 - Click tag C6.
You are notified that tag number 1 already exists. If you press Enter, the next available curve tag will be applied to this tag. For this exercise, a duplicate tag is acceptable, because you will continue the renumbering to resolve duplicates.
- On the command line, enter C to create a duplicate curve table tag.
The curve table tag now appears as C1.
- Press Esc.
- Repeat steps 3 through 5 on the remaining curve table tags, so that the curve table tags are labeled C1 through C7 clockwise around the cul-de-sac.

Table tags: original (left) and renumbered (right)
- Pan to the parcel line and curve table you created in Exercise 2: Converting Labels to Tags.
Notice that the table has automatically updated to reflect the new curve numbering.
Further exploration: Add segment labels to the rest of the parcels along the East Street alignment, and then convert the labels to table tags. Renumber the table tags along the right-of-way so that they follow a clockwise pattern.

Table tags renumbered along right-of-way
To continue to the next tutorial, go to Working with Label Styles.