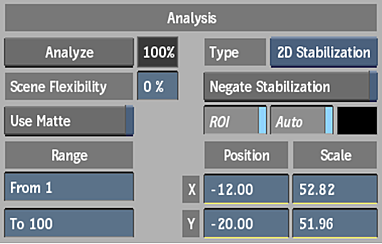
Analysis Settings

- Analyze button
- Click to run the stabilization analysis. During analysis, the viewport defaults to the Front view, and the frame advances as the stabilization is calculated. Progress can be monitored by the keyframes that have been created during analysis and the percentage of completion displayed next to the Analyze button. Track points are displayed on the clip to indicate how the stabilization was tracked.
- Progress field
- Displays the percentage of the analysis that is complete. Non-editable.
- Scene Flexibility field
- Displays the level of focus on rigid objects that move in the clip. Enter 0% to focus on a single rigid object as it moves or 100% to analyse all visible motion paths. If the analysis has no scene flexibility, the stabilization will focus on a single rigid object as it moves in the clip. Use the following values as a general guideline:
Select: To: 0%-20% Stabilize a pan, tilt, zoom, or the motion of a single rigid object that is visible during the entire analysis. 30%-70% Stabilize objects that change their shape or depth, and exclude objects that are smaller or moving rapidly. 80%-100% Stabilize all visible movements.
- Use Matte button
- Enable to exclude black areas on the matte from analysis on the front clip, and constrain the Analysis region.
- Range From field
- Displays the value of the first frame to include in the analysis. Editable.
- Range To field
- Displays the value of the last frame to include in the analysis. Editable.
- Stabilization Method box
- Select whether to perform a two-dimensional or perspective analysis.
- Negate Stabilization button
- Enable to apply the inverted parameter values.
- Region of Interest button
- Enable to display a rectangle that can be resized to indicate the region you want to analyse on the front clip. Select Front from the View box.
- Auto button
- Enable to automatically track motion within the region of interest. At each frame, the position of the region of interest is updated based on the motion within the area. If this button is disabled, and the region of interest was not previously tracked, the region of interest remains static.
Stabilization Settings
- Position X button
- Enable to include the X-axis position in the stabilization.
- Position X Option box
- Select whether to lock the X-axis position at the reference frame to all frames in the analysis (Fixed), or to apply smoothness to the stabilization curve on the X-axis.
- Position Y button
- Enable to include the Y-axis position in the stabilization.
- Position Y Option box
- Select whether to lock the Y-axis position at the reference frame to all frames in the analysis (Fixed), or to apply smoothness to the stabilization curve on the Y-axis.
- Rotation button
- Enable to include the rotation in the stabilization.
- Rotation Option box
- Select whether to lock the rotation at the reference frame to all frames in the analysis (Fixed), or to apply smoothness to the stabilization curve on the rotation.
- Scaling button
- Enable to include scaling in the stabilization.
- Scaling Lock Option box
- Select whether to lock the scaling at the reference frame to all frames in the analysis (Fixed), or to apply smoothness to the stabilization curve on the scaling.
Note: You can change the centre of rotation and scaling for the image. By default, the centre of rotation and scaling is the centre of the image, represented by a yellow crosshair. Switch to Front view, then hold down C and click the new centre point.
- Perspective button
- Enable to include perspective in the stabilization.
- Perspective Option box
- Select whether to lock the perspective at the reference frame to all frames in the analysis (Fixed), or to apply smoothness to the stabilization curve on the perspective.
- Smoothness field
- Displays the level of smoothness of the stabilization curves generated by the analysis and determines the mix between the original motion and the completely stabilized transformation. Editable.
- Mix field
- Displays the percentage of smoothness used in the final stabilization output and determines how smooth the stabilization curves are. Editable.
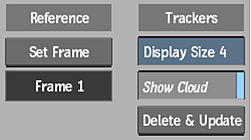
Reference and Tracker Settings

- Set Reference Frame button
- Click to set the current frame as the reference frame for the stabilization.
- Reference Frame field
- Displays the current reference frame. Non-editable.
- Display Size field
- Displays the pixel width and height of track points. Editable.
- Show Cloud button
- Enable to display the track point cloud.
- Delete and Update button
- Click to delete selected track points and update stabilization curves. Selected points are displayed in red in the image.
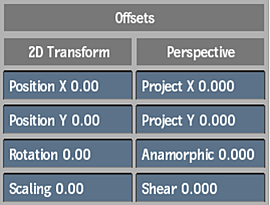
Offset Settings

- Position X field
- Displays the X-axis offset applied to the clip. Editable.
- Position Y field
- Displays the Y-axis offset applied to the clip. Editable.
- Rotation field
- Displays the rotation offset applied to the clip. Editable.
- Scaling field
- Displays the scaling offsets applied to the clip. Editable.
- Project X field
- Displays the X-axis projection offsets applied to the clip. Editable.
- Project Y field
- Displays the Y-axis projection offsets applied to the clip. Editable.
- Anamorphic field
- Displays the anamorphic offsets applied to the clip. Editable.
- Shear field
- Displays the shearing offsets applied to the clip. Editable.
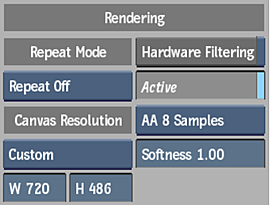
Rendering Settings

- Repeat Mode box
- Select an option to fill the empty portions of the frame.
Select: To: Repeat Last Repeats last pixel color. Tile Repeat Wrap the image around to fill the area. Mirror Repeat Repeats the source pixels both vertically and horizontally. Repeat Off Use a colour to fill the area. Use the adjacent colour pot to pick the colour. You will lose texture and will fill the rest of the image with a black border.
- Resize Fit Mode box
- Select whether to resize the clip with width and height values.
Same As Input The output resolution remains the same as the input resolution. User Defined You define the output resolution. Auto Scale The output resolution changes dynamically, which insures that any transformation applied will not crop the image across the whole length of the clip.
| Select: | To: |
|---|---|
| Same as Input | The output resolution remains the same as the input resolution. |
| Custom | You define the output resolution. |
- Width field
- Displays the width of the image. Editable.
- Height field
- Displays the height of the image. Editable.
- Hardware Filtering button
- Enable to filter subpixel information.
- Anti-Aliasing button
- Enable to activate sampling and softness.
- Sampling box
- Select the number of samples to use in the anti-aliasing process.
- Softness field
- Displays the level of softness of the samples. Editable.