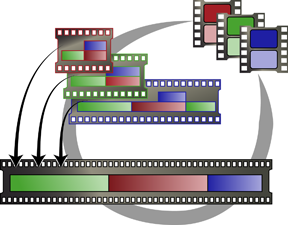
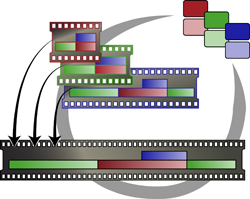
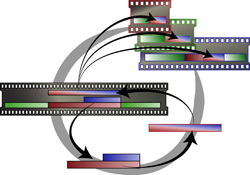
Connected Conform is a set of tools created to help you conform sequences that share similar sources and similar contents. Aimed at helping you deliver multiple deliverables, it offers you two new types of specialized sequences, the Sources Sequence and the Shots Sequence. The former helps conforming multiple sequences in a single operation, the latter helps consolidate with shot distribution and processing.
Connected Conform is there to help you when you have multiple deliverables that share structure and source media but:
- Are of varying length.
- Require different finishing tasks such as visual effects or titling.
- Use the same media, but in different locations, or of different durations, or even uses different sections of said media.
The Connected Conform tools allow you to:
- Conform a group of imported sequences in a single operation.
- Consolidate media ingest and linking by tying together related segments' metadata.
- Manage and distribute shots to be worked on from a central location.
- Integrate the worked on shots with the imported sequences for final delivery.
All this can be accomplished using the Connected Conform tools which include:
- Sources Sequence, a specialized sequence to conform multiple sequences in a single operation.
- Shots Sequence, a specialized sequence to help with shot distribution and processing
- Shared Segments, a concept to share information between related segments across different sequences.
- Reel Group and the Sequences reel, which provides a clear location for the Connected Conform workflow.
Connected Conform Workflow Overview
Below is an example of a Connected Conform workflow. Also provided, links to online tutorial videos.
| Step 1: Connecting Sequences | |
|---|---|
| Online tutorial: Connected Conform Workflow - Conforming & The Sources Sequence | |
 |
|
| Step 2: Sharing Segments | |
|---|---|
| Online Tutorial: Connected Conform Workflow - Metadata & The Shots Sequence | |
 |
Note: If you defined a limited amount of handles but need more content from the original source media file:
|
| Step 3: Apply VFX and Distribute Shots | |
|---|---|
| Online Tutorial: Connected Conform Workflow - Using BatchFX and Batch | |
 |
Work in context of the timeline:
Work on individual shots, in the context of Batch:
Note: The above example assumes there is only one artist working on the sequences. But you could very well distribute the shots (Batch Groups) using the Shared Libraries. Or without creating Batch Groups, you could use the Shot Publish approach to distribute the shots. Both approaches create a new Version track and use placeholder segments.
|
Operations To Avoid When in Connected Conform
When working in the context of Connected Conform, avoid the following:
- Applying a Gap FX
- Any created Gap FX is local to the sequence where it is created. This means that a Gap FX is not shared between connected sequences.
- Applying a Batch FX to vertically composited segments
- The flattening of the vertical structure require by a Batch FX disables segment sharing since it destroys the spatial information for the concerned segments. Use instead the Create Batch Group workflow, where such information is preserved. Note that applying a Batch FX to an individual segment is a supported operation in the context of Connected Conform.
Creating Batch Groups
Once you have created a Shots Sequence, you can, from Conform, create Batch Groups. One batch group is created for each different Shot Name within the selected segments. Each batch group can be seen as a discrete unit of work completely encapsulated.
Creating a Batch Group:
- Select the segments for you need to edit in Batch.
The Batch Group can be created from any sequence within a Sequences reel, including from the Shots Sequence.
- Assign a Shot name to the segments, using the Events list in Conform View, or the contextual menu.
Segments without a shot name will not create a Batch group.
- Create the Batch Group. Do one of the following:
- In Conform View, click Create Batch Group.
- In Timeline View, right-click the timeline and select Create Batch Group.
One Batch group is created for each unique Shot name, in the location defined by the Batch Group Destination box. When you use Create Batch Group in Conform, that Batch group's Render node uses the following settings:
- Its attributes, such resolution, source timecode, or tape name, are taken from the back plate. The node is also connected to the back plate.
- Its In/Out marks are from the original timeline segment.
- Its name is set to the Shot Name, or by the Default Render Node Name preference.
When you create a Batch group, a receptacle segment is created on a new Version track, in every sequence connected to Shots Sequence by the shared segments. By using Replace Shared Segment, this receptacle segment can be replaced with the Batch group result, with every connected sequence automatically inheriting the replacement.
Once the work is done in Batch:
- Render the result.
The rendered clip, with the original clip's metadata, can be found in the Batch Renders reel.
- Open the Timeline view.
- In the Shots Sequence, on the new Version track created previously, select the receptacle segment to update.
- Select the rendered clip from the Batch Renders reel.
- Select Replace Media from the Secondary Edit box. The new media is now available across all connected sequences.
Selecting where Batch Groups are created:
- Use the Create Batch Group Destination box to decide where the Batch Groups are created.
- You can choose to create Batch Groups in a new library, a new shared library, or as a series of batch group of reels in the Desktop.
- Pick Destination allows you to select a destination when you create the Batch groups.