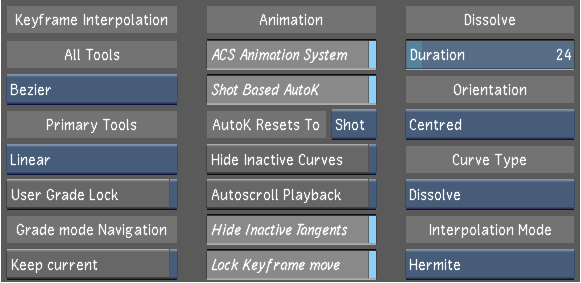
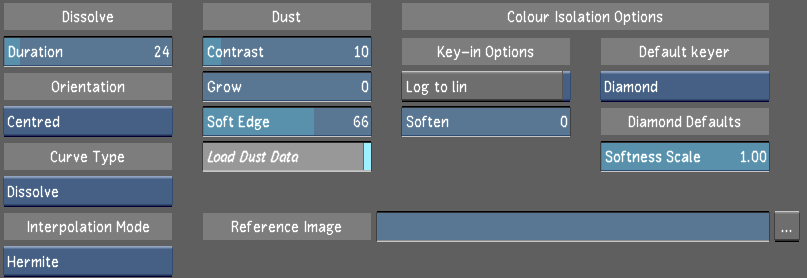
Use the Tools Settings page to configure keyframe, animation, dissolve, dust, colour isolation and reference image settings for this user.


- All Tools option box
-
Toggle to select the default keyframe interpolation mode for all tools, except the input and output primary grading.Note: The settings in the All Tools sub-group do not affect tools in the Colour > Grading menu.
Select: Linear Select to use a linear default interpolation for all tools. The linear interpolation joins keyframes with a straight line. This affects all parameters (other than the input and output primary grading) in the Colour menu. Bezier Select to make the default interpolation for all tools to be Bezier. The bezier interpolation produces a smooth curve with a smooth transition between keyframes and each keyframe on the curve has tangent handles. This affects all parameters (other than the input and output primary grading) that are in the Colour menu. Constant Select to use a constant default interpolation for all tools. Constant interpolation produces a square curve. This affects all parameters (other than the input and output primary grading) in the Colour menu. Hermite Enable to make the default interpolation for all tools Hermite. Hermite interpolation produces a smooth curve with a smooth transition between keyframes. This affects all parameters (other than the input and output primary grading) in the Colour menu. - Primary Tools option box
-
Toggle to select the default keyframe interpolation mode for all primary grading tools.
Select: Linear Select to use a linear default interpolation for all primary grading tools. The linear interpolation joins keyframes with a straight line. This affects all parameters within the Colour menu for input and output primary grading. Bezier Select to make the default interpolation for primary grading tools to be Bezier. The bezier interpolation produces a smooth curve with a smooth transition between keyframes and each keyframe on the curve has tangent handles. This affects all parameters within the Colour menu for input and output primary grading. Constant Select to use a constant default interpolation for all tools. Constant interpolation produces a square curve. This affects all parameters within the Colour menu for input and output primary grading. Hermite Select to make the default interpolation for primary grading tools Hermite. The hermite interpolation produces a smooth curve with a smooth transition between keyframes. This affects all parameters within the Colour menu for input and output primary grading. - User Grade Lock button
- Enable to lock the currently loaded grade when working in Lustre. This is handy when working in a collaboration workgroup where multiple users work with the same content. With this option enabled, the currently loaded grade cannot be overwritten.
- Grade Mode Navigation
- You can enable the Keep Current button to preserve the current grading stage of shots (Primary, Secondary, etc.) as you navigate. This means that when you navigate back to a shot, the last grading stage is automatically recalled.
- ACS Animation System button
- Enable to have Lustre mimic the behavior of the ACS panel when animating from the user interface. Using the ACS Panel, Lustre automatically updates the first keyframe in your timeline whenever a keyed parameter is modified before the first keyframe or the last keyframe in your timeline whenever a keyed parameter is modified after the last keyframe.
- Shot Based Auto Key button
- Enable to activate the Auto-key button on a shot basis rather than having AutoKey active for all the shots.
- Hide Inactive Curves button
- Enable to hide animation curves that are not in use. Hiding inactive curves can make it easier for you to manage your keyframes and modify your animations.
- Autoscroll Playback button
- Enable to configure Lustre's default behaviour to scroll automatically when the positioner plays off the edge of the Channel Editor or Timeline.
- Hide Inactive Tangents button
- Enable to hide tangent handles for keyframes that are not selected.
- Lock Keyframe move button
- Enable to allow only vertical movement when dragging a keyframe. Note: You can temporarily override locked movement by holding down the Shift key and dragging the keyframe horizontally. If you want to move the keyframe without any restrictions, disable the Lock Keyframe Movement button.
- Duration Slider
- Use to set the default duration, in frames, of dissolves.
- Orientation option box
- Toggle to select Centered, From Cut or Up To Cut as the default orientation of dissolves.
- Curve Type option box
- Toggle to select Dissolve or Blend as the default curve type for dissolves.
- Interpolation Mode option box
- Toggle to select Constant, Linear, Hermite or Bezier as the default interpolation mode for dissolves.
- Contrast slider
- Use to set the amount of contrast used to find dust during automatic analysis. Low contrast values cause the algorithm to accept low colour value differences between corresponding pixels on the current, previous, and next frames. Therefore, low values result in more complete removal of the artefact. However, if the contrast is set lower than actually needed, adjacent pixels are modified more than actually required to remove the dust.
- Grow slider
- Use to control the number of pixels around the pixels detected by Lustre.
- Soft Edge slider
- Use to soften the stroke of the pixels specified by the Grow slider in order to replicate a natural paint stroke.
- Load Dust Data button
- Enable to load the dust removal metadata after you have already loaded the grade.
- Reference Image field
- Enter, or browse to, the path of the reference image. Then, you can press Shift+K to load the image into the single file system for reference and then view the image by pressing L. For information about defining paths, see Browsing for Paths.
- Log to Lin button
- Enable to apply colour transformation prior to keyer input processing.
- Soften slider
- Use to reduce image grain and noise and to keep edges intact prior to keyer input processing.
- Default keyer option box
- Toggle to select the Diamond Keyer or the HLS Keyer as the default keyer in the secondary menu.
Note: The default keyer setting only applies to ungraded shots and unused secondaries. A loaded grade file has priority over this setting. This means that the keyer that was used to grade a shot or modify a secondary is the keyer that will be displayed.
- Softness Scale slider
- Use to adjust the scale of the Softness Diamond on the hue cube for the Diamond Keyer.
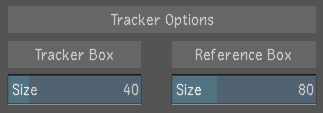
- Tracker Options
- Define the default size of Tracker and Reference boxes.
- Tracker Box slider
- Use to define the default size of Tracker boxes.
- Reference Box slider
- Use to define the default size Reference boxes.