General Settings

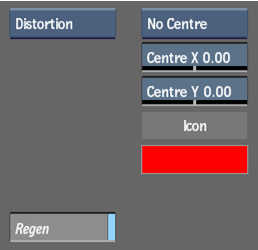
- Distortion box
- Select whether to perform a lens distortion or rectification. All other radial distortion controls are implemented based on this selection.
- Regen button
- Enable to get dynamic updating of the image as you make changes.
- Centre box
- Select the size of the crosshair icon in your image.
- Centre X field
- Displays the horizontal position of the centre of the lens. Editable.
- Centre Y field
- Displays the vertical position of the centre of the lens. Editable.
- Icon colour pot
- Displays the colour of the crosshair in your image. Editable.
Radial Settings

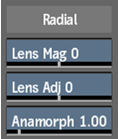
- Lens Mag field
- Displays the magnitude of radial distortion or rectification. Editable.
- Lens Adj field
- Displays the radial distortion or rectification. Editable.
- Anamorph field
- Displays the ratio of distortion or rectification along the X or Y axis. A value greater than 1.00 stretches more on the X axis, while a value less than 1.00 stretches more on the Y axis. Editable.
Lens Distort Controls

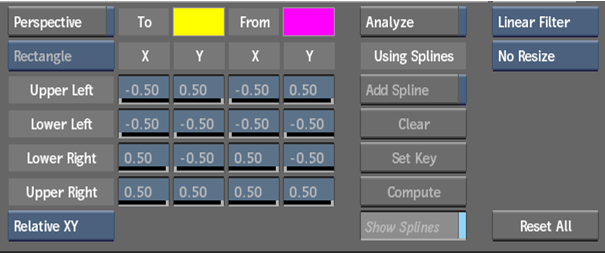
- Perspective button
- Enable to perform a perspective rectification.
- Perspective Type box
- Select an option to map the source anchor points to a rectangle, preserving either the horizontal or vertical edges of the image, or mapping one four-corner free-form shape to another. Active when Perspective button is enabled.
- Range box
- Select whether to set the X and Y range from -0.5 to 0.5 (relative) or set the X and Y range to half of the image size (absolute).
- Source colour pot
- Displays the colour of the source anchor points. Editable.
- Destination colour pot
- Displays the anchor points of the destination shape. Editable.
- Upper Left X field
- Displays the horizontal value for the upper left source anchor. Editable.
- Lower Left X field
- Displays the horizontal value for the lower left source anchor. Editable.
- Lower Right X field
- Displays the horizontal value for the lower right source anchor. Editable.
- Upper Right X field
- Displays the horizontal value for the upper right source anchor. Editable.
- Upper Left Y field
- Displays the vertical value for the upper left source anchor. Editable.
- Lower Left Y field
- Displays the vertical value for the lower left source anchor. Editable.
- Lower Right Y field
- Displays the vertical value for the lower right source anchor. Editable.
- Upper Right Y field
- Displays the vertical value for the upper right source anchor. Editable.
Note: The following fields are available when Free Form is selected from the Perspective Type box.
- Upper Left X field
- Displays the horizontal value for the upper left destination anchor. Editable (active when the Perspective Type box is set to Free Form).
- Lower Left X field
- Displays the horizontal value for the lower left destination anchor. Editable (active when the Perspective Type box is set to Free Form).
- Lower Right X field
- Displays the horizontal value for the lower right destination anchor. Editable (active when the Perspective Type box is set to Free Form).
- Upper Right X field
- Displays the horizontal value for the upper right destination anchor. Editable (active when the Perspective Type box is set to Free Form).
- Upper Left Y field
- Displays the vertical value for the upper left destination anchor. Editable (active when the Perspective Type box is set to Free Form).
- Lower Left Y field
- Displays the vertical value for the lower left destination anchor. Editable (active when the Perspective Type box is set to Free Form).
- Lower Right Y field
- Displays the vertical value for the lower right destination anchor. Editable (active when the Perspective Type box is set to Free Form).
- Upper Right Y field
- Displays the vertical value for the upper right destination anchor. Editable (active when the Perspective Type box is set to Free Form).
- Analyse button
- Enable to use the spline controls.
- Add Spline button
- Enable to draw a spline along a feature that you want to straighten.
- Clear button
- Click to clear splines at the selected keyframe.
- Set Key button
- Click to set a keyframe based on the result of the analysis.
- Compute button
- Click to analyse the image based on the splines you added.
- Show Splines button
- Enable to display splines in the image window.
- Filter box
- Defines the type of filter for your distortion or rectification.
- Resize box
- Assigns the resize option you choose to apply to your image (if any distortion or rectification is present).
- Reset All button
- Click to restore default settings.