Flame Premium can only read VTR archives, it cannot create nor write to one.
When you change projects without exiting Flame Premium, the video timing selected at start-up applies to the project you are switching to.
Configuring a VTR for Archive Restoration
Before you start using a VTR to restore an archive, configure both the hardware and the software.
Hardware Configuration
Verify that:
- Your VTR device is properly connected to video and audio sources and RS-422.
- The sync is properly set up.
Software Configuration
To enable Flame Premium to read VTR archives:
- With Flame Premium closed, open the Flame Premium Setup application.
- Open the VTR tab.
- Enable every VTR you plan on using with Flame Premium.
- Set VTR Archive Restore Device to VTR unless you plan on using an HDCAM VTR to restore archives, in which case you would select HDCAM. For HDCAM SR, you must select VTR.
Note: You can only restore an HDCAM-created archive by using an HDCAM VTR.
- Click Apply.
You can now restart Flame Premium and read archives from the connected VTR.
Restoring Material from a VTR Archive
When you open a VTR archive in read/write mode, Flame Premium performs an auto-test. The auto-test involves checking whether it can write, read, and verify the integrity of the archived material. This auto-test also scans binary and play/record delay information to verify the quality and accuracy of the video signal.
- Insert the archive tape in the VTR.
- In Flame Premium, select .
- Select the VTR from the list of Local Devices.
- Select the start timecode by doing one of the following:
- Select Autostart if you selected this option when you created the archive (the archive rewinds the tape to find the correct start timecode).
- Select Manual Start and enter the appropriate timecode if you selected this option when you created the archive.
- Do one of the following:
- Click Open Archive. Select Open Read/Write or Open Read Only from the Open Mode box.
Note: When you try to open a VTR archive in read/write mode, Flame Premium checks for machine errors (for example, dirty heads). If a problem is detected, the archive does not open. If the tape is write-protected, the archive opens in read-only mode.
- Click the Open Using OTOC button and select the OTOC in the file browser. You are given the option to read slates from the tape. Answer 'Y' if you wish to see clip proxies.
The Flame Premium cues the VTR. Once it's done reading the archive, displays its contents in the MediaHub.
- Click Open Archive. Select Open Read/Write or Open Read Only from the Open Mode box.
- Restore clips one by one using drag and drop, or click Restore Project to restore a full project.
- Click Close Archive once you are done.
Header Information Slate
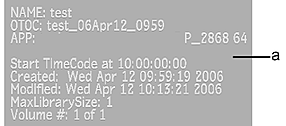
All VTR archives contain a Header Info Slate, which is a single frame providing information about the archive. Located in the archive before the table of contents, the Header Info Slate provides information such as:
- Name of the archive
- Name of the Online Table of Contents (OTOC)
- Name of the workstation where the archive was created and name and version of the Autodesk application used for archive creation
- Start timecode
- Creation date and time
- Modification date and time
- Minimum size of the clip library buffer (in MB) required to restore the archive

(a) Header Info Slate example
Tips for Better VTR Archive Restores
Use the following tips to get better results when restoring from a VTR tape:
- Make sure the input from the computer to the VTR is connected properly. If it is not, yet the output from the VTR to the computer is correct, everything will appear normal when archiving and the monitor will show your material being saved. However, black or random noise is actually being saved to tape.
- Turn the video breakout box on before powering up the computer.
- On the video breakout box, make sure that your house sync is connected to the Sync Genlock and not to the Sync port in the GBRA/YUVA component. The sync should be connected to the Genlock input of the computer and be terminated with a 75-ohm terminator.
- Set the system reference of the VTR to External Analog.
- Track the VTR to get the best RF (Reference) value and error-rate level. If your VTR has an auto-tracking feature, disable it and track manually, or place it on “one shot.”
- Check the following Engineering menu settings:
- Timecode type: Make sure the VITC & LTC timecodes are the same. If they are not, set timecode type to LTC.
- Input format and sync: Make sure that input format and sync match the device.
- Output format and sync: “House” is the recommended output sync.
- The required Scan Mode option is F1.