To access Read File clip settings, double-click a Read File node in the schematic.
Basic Settings
Note: The Import Settings are dynamically generated according to the type of clip imported. You can get a quick description of each setting by viewing its tooltip.
- Basic button
- Opens the Basic menu where you set the clip version, append the available setup, modify the import settings, and set the missing media options.
- Versions box
- Select the active version of the clip. If the available channels differ between versions, the application updates the links to other nodes.
- Creation Date field
- Displays the creation date of the version selected in the Clip Version box. Non-editable.
- Source Setup Name field
- Displays the name of the Batch setup saved with the open clip. Only available to open clip output using a Write file node with Include Setup enabled.
- Append to current Batch button
- Click to add to the current Batch schematic a group made of the Batch setup stored with the open clip. Only available to open clip output using a Write file node with Include Setup enabled.
- Head Media box
- Select to substitute missing media at the beginning of a clip with black frames, the first frame of media, or leave as is.
- Tail Media box
- Select to substitute missing media at the end of a clip with black frames, the first frame of media, or leave as is.
- In field
- Set, as an offset of frames from frame 0, the In mark of a clip. Only frames located after the mark are available and rendered.
- Out field
- Set, in frames from frame 0, the Out mark of a clip. Only frames located before the mark are available and rendered.
- Frame field
- Displays the absolute frame number of the current frame, from the file with the name displayed in the File Name field. Non-editable.
- File Name field
- Displays the name of the file from which the current frame is being read. Non-editable.
Clip Information tabs
Available in the Basic and Extended menus of the Read File clip.
The Clip Information tabs display non-editable information about imported clip.
- Clip Info tab
- The Clip Info tab displays the name of the original media, file format, resolution and FCM, as well as the number of tracks in the clip.
- Metadata tab
- The Metadata tab displays metadata information about the imported media, including but not limited to: path to the sources, camera settings (RED and ARRI), file creator.
- Versions tab
- The Versions tab lists all the versions available for the selected clip. Available to open clips and Maya .precomp imports.
Extended Settings
- Extended button
- Opens the Extended menu where you set the channel options, from the channel displayed in the node proxy to the available outputs.
Note: With a Read File clip selected in the schematic, press Shift+C to expand the node and display its channels in the schematic.

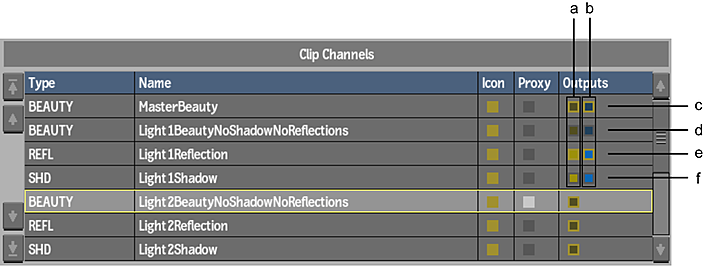
(a)Media output (b)Alpha output (c) Displayed and disconnected outputs (d)Hidden and disconnected outputs (e) Displayed and connected outputs (f) Hidden but connected outputs
- Type field
- Displays the type of channel. Non-editable.
- Name field
- Displays the name of the channel. Non-editable.
- Icon field
- Enable to display the channel in the schematic; disable to hide the channel. The Read File clip must be expanded (press Shift+C) to view the channels in the schematic. Hiding a channel does not break its link to a node.
- Proxy field
- Enable to use a particular channel as the Read File clip proxy in the schematic.
- Outputs fields
- Click to display or hide the outputs available for each channel from the Read File clip in the schematic. Hiding an output does not break its link to a node. There is one output each for RGB and its alpha (if any).
Resize Settings
The Resize settings are the same as when you are using the Resize node in Batch or Batch FX. Click the Active button to activate the Resize settings.
RGB LUT Settings
The RGB LUT settings are the same as when you are using the LUT Editor node in Batch or Batch FX. Click the Active button to activate the RGB LUT settings.