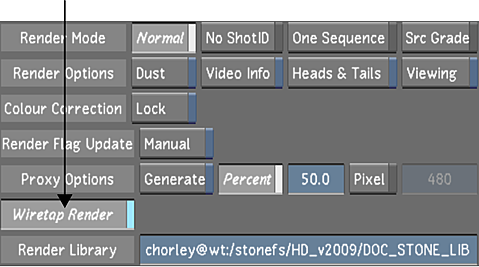
You can create soft-imported clips from rendered material and write the generated timeline back to the Wiretap Clip Library. The rendered results reside in the destination specified in the project settings, and a soft-import link is created on the Stone FS or Standard FS.
To create a soft-imported link to your graded renders in the Wiretap Clip Library:
- Click Setup, and then click Project to display the Project menu.
- In the Renders Full Home field, enter the path for the graded files to be rendered to.
For example, if your Windows drive is mapped to the network storage as S:\, then the renders full home path should be S:/SAN/lustre_renders.
Note: The shared storage network (i.e., SAN or NAS) must be mounted and accessible from both the Wiretap Linux host and the Lustre workstation. - Click Render, and then click Local to display the Local menu.
- Select one of the following render options:
- Normal
- No ShotID
- One Sequence
- Src Grade
- Enter the path for the location of the soft-imported clip in the Render Library field.
For example, 10.145.43.31@wt:/stonefs/project/library.
Note that you can set a default value for the Render Library field when configuring the project, as described in the next procedure.
- Enable the Wiretap Render button.

- Click Start.
This renders the files to the specific path of the shared network storage, and publishes the soft-import links to your rendered files in the destination Wiretap clip library. A new scene grade reel containing the soft-imported clips and/or timeline is created in the location specified by the Render Library field.
To set the Render Library path as a project setting:
- From the Main menu, click Setup, and then Settings. Select the project to edit, and then click Edit in the Project group.
- On the Network Rendering menu, enter the desired path in the Render Library field in either of the following ways:
- Navigate to the directory using the navigation aid button and browser.
- Enter the desired path directly in the Render Library field, in the following format:
<Wiretap_server> @wt:/ <volume> / <project_name> / <library>
For example:
rishikesh@wt:/stonefs/HD_project/lustresmoke
- Save the settings for the project by clicking Save Project.
- Click Exit Project.
- To verify the path shows up as expected, from the Main menu, click Render, and then Local.
The path appears in the Render Library field.