Use the Custom colour channel option in the Channel Keyer to select the colour to be extracted from the key-in clip. This option can give good results when keying transparencies, particularly by experimenting with the Softness and Colour Spread values.
To create a key by extracting a custom colour:
- From the Start Mode dropdown list, select Reset to Channel and click Confirm.
The Channel keyer processing pipeline is displayed in the schematic view.
- Double-click the Channel Keyer node.
The Channel controls appear.

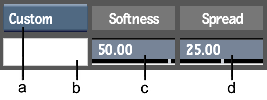
(a) Channel Mode box (b) Average Colour pot (c) Softness field (d) Colour Spread field
- Select Custom from the Channel Mode box.
- Click the Average Colour pot.
The cursor changes to a colour picker.
- Click the image to select a single colour, or drag the colour picker across a region to obtain the average of the colours encountered by the colour picker. Try selecting different colours in the background area to get the best result. Tip: To keep shadows, click just outside them. To remove shadows, click inside them.
- Adjust the softness for the key using the Softness field.
Increasing softness raises the level of grey in the matte. Lowering it makes the matte sharper.
- Adjust the colour spread for the key using the Spread field.
Increasing the colour spread value extends the range of colours extracted from the key-in clip.
- Click the Result node so that you can see the changes in the right side viewer. If you do not see the result, see Setting Up Viewports for Keying. Note: To improve the key at this point, try adjusting it with the histogram in the 2D Histogram node. See Adjusting the Luminance of the Key.