Lustre 2016 is Dolby Vision Enabled and exposes additional UI elements when a suitable Dolby Content Mapping Unit connected to your Lustre system is detected. You should contact Dolby directly for information on how to obtain a Content Mapping Unit for use with Lustre.
Lustre allows you to perform Trim Passes on top of your High Dynamic Range reference in order to adapt the HDR graded version to lower dynamic range display devices and help preserve colour intent for a variety of deliverables. In Lustre this process is labeled High Dynamic Range (HDR) mastering.
This topic covers system and setup requirements for HDR mastering, as well as take you through the HDR mastering workflow.
System Requirements
You need a correctly configured workstation running Flame Premium 2016 or Lustre 2016 and the following:
- An AJA Kona 3G or AJA Kona 4 video IO board.
- An available Ethernet port.
You also need a suitable Content Mapping Unit hardware device from Dolby in order to activate the user interface used to produce HDR grades from Lustre. Please contact Dolby directly for information on how to obtain the required hardware.
Setting Up Lustre for HDR Mastering using Dolby Vision
First, connect the Content Mapping Unit hardware to your Lustre workstation. Refer to the Dolby documentation for specific instructions regarding the configuration of the Content Mapping Unit in particular networking configuration.
Second, connect the AJA video outputs to the Content Mapping Unit video inputs and make sure the Lustre system and the Content Mapping Unit can 'ping' each other over the network.
Last, configure the video output to use an RGB 4:4:4 12 bits raster in order to access the additional user interface and perform HDR mastering work. See Selecting a Raster for Playout. You can also save the selected raster as a project preference.
Additional User Interface Elements for HDR Mastering Using Dolby Vision
When a 12 bits video raster is enabled and a Content Mapping Unit is detected by Lustre, new buttons appear in the Lustre interface.
- In the view selector section, the D button changes to an H.
 Note: HDR mastering using Dolby Vision is only possible while the H view is selected.
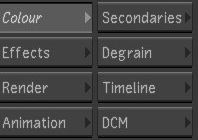
 - In the Colour menu, the DCM button appears. It allows you to access the Trim pass controls.
HDR Mastering Workflow
HDR mastering is the process by which a High Dynamic Range graded reference is optimized, or trimmed, to make the best use of the capacities of a lower dynamic range display. In Lustre, HDR mastering is performed in real-time using the available HDR controls. The generated metadata is streamed instantly to the connected Content Mapping Unit and the results can be viewed immediately on the target display. The result of the HDR mastering can then be saved for later use.
Steps required for HDR mastering:
- Create a new Colour grade version.
This colour grade should be empty and is only used to link the HDR grade to Lustre's metadata files.
- Create an HDR setup.
- Perform HDR mastering.
- Save the HDR setup.
Creating an HDR Setup
The Dolby Vision metadata is saved in a separate file that is distinct from the grade file. It is saved alongside the colour grade file in the Lustre project Library folder. Follow these steps to create an initial setup file for your work.
- In the Main menu, click Setup and then click Grade. The Grade menu appears
- From the Grade list, load the grade that you wish to associate with an HDR setup.
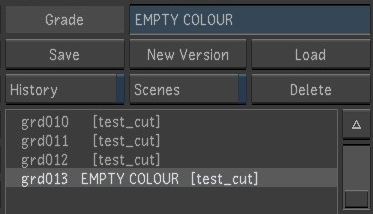 Note: Although grading controls are disabled when performing HDR mastering it is recommended that you use a dedicated colour grade setup for HDR mastering work
 - Click 'H'

- Select the media origin to be used during the trim pass work. Enable Source for original, unrendered material. Enable Rendered for rendered material.
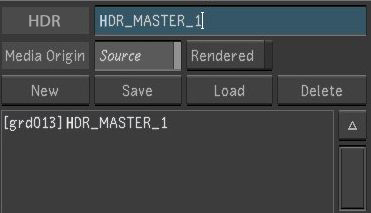 Note: The grading controls are disabled in 'H' view
 - In the HDR field enter an HDR setup name.
- Click New. The setup name is added to the list of setups for the grade.
You are ready to start the Trim Pass work.
Performing HDR mastering
Once the HDR setup file is created you are ready to start HDR mastering work. In this section, learn how to:
- Access the HDR controls and select a Target display
- Perform initial colour analysis
- Perform additional Trim work.
Accessing the HDR controls
- In the Main menu, click Colour, and then click DCM. The HDR menu appears.
- Initially the entire user interface is greyed out, until you click Enabled.

- Click Enabled to instruct Lustre to fetch the Mastering Display and Target Display characterizations from the Content Mapping Unit. This populates the corresponding drop down lists from the data transmitted by the Content Mapping Unit.
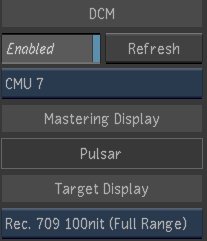 Note: The Content Mapping Unit only knows about a pre-determined set of Mastering and Target displays. You should select the ones that most closely match your display environment. Please consult appropriate vendor documentation for details on display characterization.
 - If more than one Content Mapping Units are detected, the CMU drop-down lists only the first one that was detected.
Performing initial colour analysis
The HDR master must first be analyzed to produce base level metadata. The base level metadata is shot based and every shot in the timeline can have a different set of base level metadata.
- Select a colour transform to bring the HDR master to linear colour space for analysis.
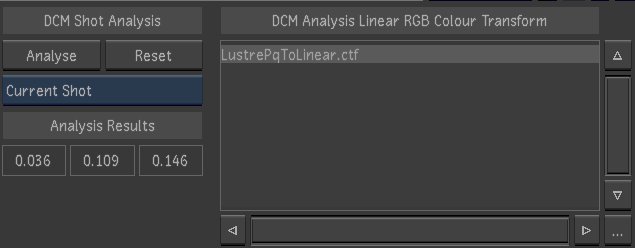 Note: The choice of colour transform depends on the project's working space. Facilities generally have their own sets of transform to adapt the specifics of their colour workflow. Autodesk supplies standard transforms to map from the Lustre log space to linear.
 - From the drop down list, select whether to perform the analysis on the current shot, set of selected shots or the whole timeline
- Click Analyse, the analysis starts and the images are analyzed one by one to produce the base level metadata.
Performing additional Trim passes
It may be necessary to further adjust the look for certain shots. Once the analysis has been performed for a shot, the Trim controls become available to help refine the shot's look
- Click Trim for Display, for the trim controls sliders to become available
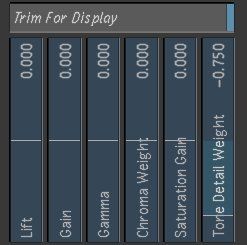
- Adjust the controls to obtain the desired look for the shot.
- The Trim controls can be animated for any shot using standard animation controls. Note: When in H mode, only the HDR mastering controls are visible in the Animation panel.
Saving and Loading an HDR setup
From time to time it is necessary to save your work. You can choose to create a new version of your work by entering a new name in the HDR setup field and by clicking New. You can also overwrite the current setup by clicking on the Save button. The current HDR setup is also saved when you save the current colour grade.
You can load a previously created HDR setup to review previous work or to continue work on a project.
To load an existing HDR setup
- Enter the H mode by clicking the H button in the view selector.
- Select the HDR setup you wish to load.
- Click Load.
The selected HDR setup is loaded along with the associated colour grade.