Once you select the shot you want to adjust or modify, you can access the Reposition menu. This menu provides the commands you need to reframe an image by:
- Repositioning
- Racking
- Changing the orientation
- Tracking a repositioned or racked shot
To access the Reposition menu:
- Make sure you have set the aspect ratio to match the intended output format. See Setting the Aspect Ratio.
- Select the shot to adjust.
- Click Image, and then click the Reposition menu button.
The Reposition menu appears.
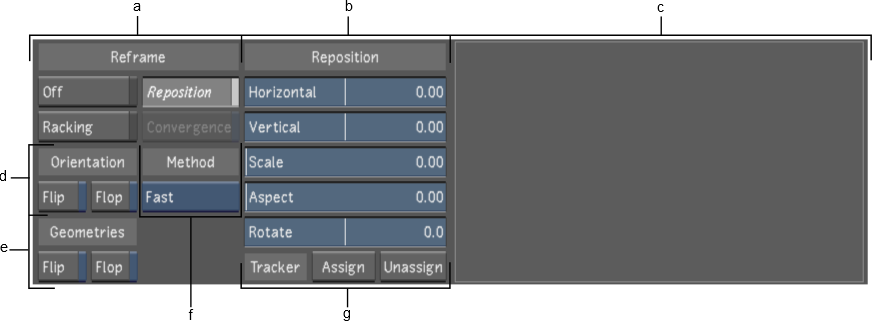
(a) Reframe panel (b) Reposition sliders (c) Preview window (d) Orientation panel (e) Geometries panel (f) Rendering Method box (g)Tracker Method panel
- Reframe panel
- Enables a reframing tool to reposition, rack or converge an image. See Reframing an Image.
- Reposition sliders
- Adjust the position of the shot by changing its vertical or horizontal position, rescaling, changing its aspect ratio, rotating or a combination of these repositioning options. See Repositioning an Image.
- Preview window
- Displays the the relationship of the visible area (red rectangle) to the original image (blue rectangle). By default, the red reference rectangle is hidden by the blue one: they are equal in orientation and scale.
- Orientation panel
- Displays the tools to apply a horizontal or vertical translation to the image. See Flipping or Flopping a Shot.
- Geometries panel
- Displays the tools to apply a horizontal or vertical translation to the geometries associated to a secondary, independently of the orientation of the image. See Flipping or Flopping a Shot.
- Rendering Method box
- Contains the rendering quality levels of the resulting repositioned image. See Setting Rendering Quality.
- Tracker panel
- Controls whether point tracking is enabled or disabled for a repositions image. See Tracking Repositioned Shots.