Contact Types
HumanIK offers four different modes of managing floor contact for your character’s feet and hands, called contact types. The contact type you choose determines the way HumanIK builds an outline of your character’s foot or hand, using measurements you supply in a set of auxiliary properties.
These available contact types, and the way each one interprets its auxiliary properties, are described below. For details on setting up a contact type, see Setting up Foot and Hand Contact.
Choosing contact property values
If you have access to Autodesk MotionBuilder in your organization, it is highly recommended that you or your artists use it to determine the optimal values for the properties described in the following sections. MotionBuilder can render the positions of the markers in the viewport, so that you can easily visualize the dimensions of the feet and hands as understood by the floor contact solver. In addition, you can try out the HumanIK floor contact engine directly in the MotionBuilder viewport, test the results of your settings, and get immediate visual feedback on the results of any adjustments you make. This makes the process of determining optimal values much faster and easier.
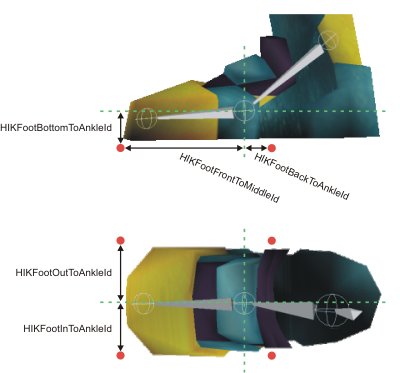
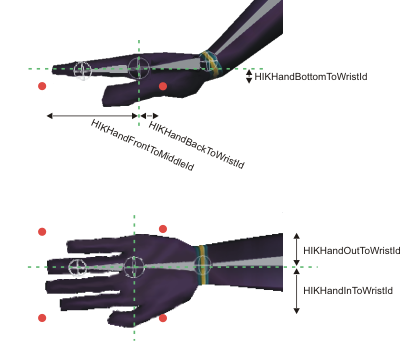
Normal contact type
With the Normal contact type, each of your character’s feet and hands are defined by six markers, shown in red in the images below. The positions of these markers are specified relative to your character’s ankle or wrist joints (the LeftAnkleNodeId, RightAnkleNodeId, LeftWristNodeId and RightWristNodeId Nodes).
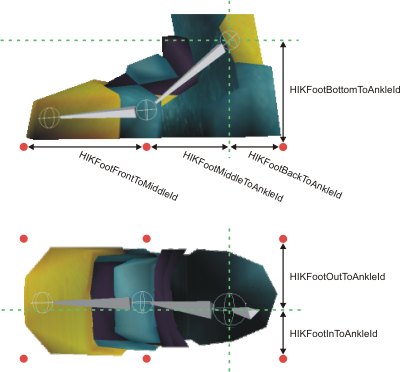
These markers define two planes: one for the sole of the foot or palm of the hand, the other for the toes or fingers. These planes are hinged at the base of the toes or fingers (the location of the middle markers in the image above), allowing HumanIK to bend the foot when required. For best results, you should place this hinge immediately below the base of your character’s toes or fingers—the place in which the foot or hand bends. If your character has individually articulated fingers and toes controlled by HumanIK, you should consider also setting up toe and finger contact. See Setting up Foot and Hand Contact below.
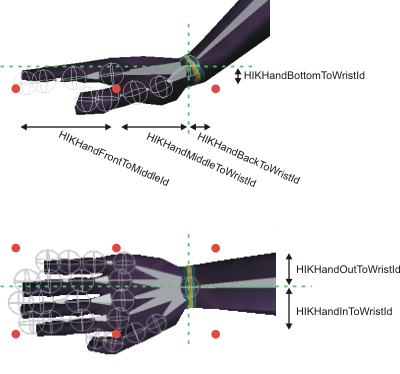
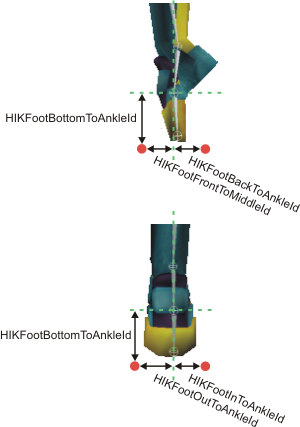
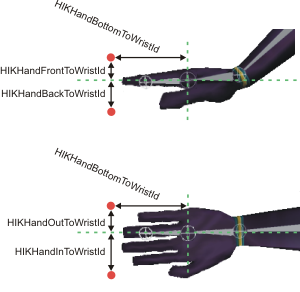
Ankle or Wrist contact type
With the Ankle or Wrist contact type, each of your character’s feet and hands are defined by four markers, shown in red in the images below. The positions of these markers are specified relative to your character’s ankle or wrist joints (the LeftAnkleNodeId, RightAnkleNodeId, LeftWristNodeId and RightWristNodeId Nodes).
These markers define a single plane that represents the entire foot or hand. The foot or hand does not bend at any location other than the ankle/wrist when any marker hits the plane: it is treated as a single object like a flipper. This approach is best suited for characters without in-foot or in-hand joints controlled by HumanIK, and without individually articulated fingers and toes controlled by HumanIK.
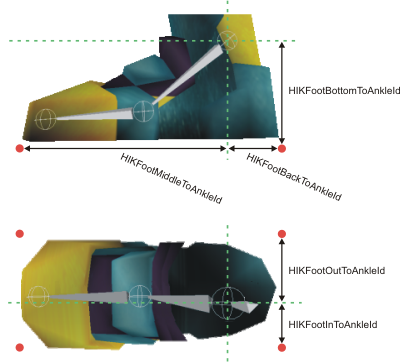
Toe Base or Finger Base contact type
With the Toe Base or Finger Base contact type, each of your character’s feet and hands are defined by four markers, shown in red in the images below. The positions of these markers are specified relative to your character’s foot or hand joints (the LeftFootNodeId, RightFootNodeId, LeftHandNodeId and RightHandNodeId Nodes).
These markers define a single plane that represents the front part of the foot or the hand, in front of the character’s in-foot or in-hand joint. However, with this approach, the character’s ankle or wrist can still pass through the plane. Therefore, this approach is best suited for characters that walk on their toes, or the back legs of quadrupeds such as dogs that touch the ground only with the front part of their back feet.
If your character does not have foot or hand joints controlled by HumanIK, the positions of the markers are determined relative to the ankle and wrist joints instead (the LeftAnkleNodeId, RightAnkleNodeId, LeftWristNodeId and RightWristNodeId Nodes), making this approach functionally equivalent to the Ankle/Wrist contact type described above.
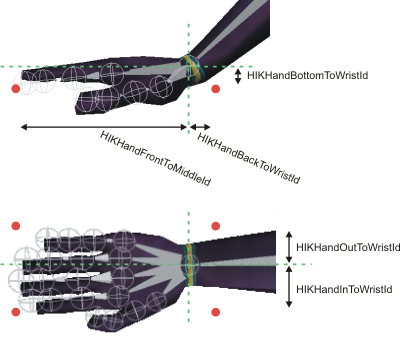
Hoof contact type
With the Hoof contact type, each of your character’s feet and hands are defined by four markers, shown in red in the images below. The positions of these markers are specified relative to your character’s foot or hand joints (the LeftFootNodeId, RightFootNodeId, LeftHandNodeId and RightHandNodeId Nodes).
These markers define a single plane that represents the end of the foot or hand. This approach is best suited for characters whose last foot bone is approximately perpendicular to the ground, such as a hoofed animal or a ballerina dancing en pointe (with pointed toes, as shown in the image above). Characters in this approach typically do not have individually articulated toes or fingers controlled by HumanIK.
When one of the markers in this contact type touches the ground, HumanIK attempts to rotate the ankle/wrist or foot/hand joints in order to make the other markers touch the ground as well. This behavior tends to produce a more solid footing for hoofed characters.
If your character does not have foot or hand joints controlled by HumanIK, the positions of the markers are determined relative to the ankle and wrist joints instead (the LeftAnkleNodeId, RightAnkleNodeId, LeftWristNodeId and RightWristNodeId Nodes).
 Except where otherwise noted, this work is licensed under a Creative Commons Attribution-NonCommercial-ShareAlike 3.0 Unported License. Please see the Autodesk Creative Commons FAQ for more information.