While you could always associate different instances of a particular shape with different materials, you can now associate different UV sets with different instances. This is very useful when baking shadows on instances of an object (for example, lighting a game level), or creating instances of a single shape with different textures (for example, a pile of boxes, some with holes in different locations, and so on).
When the UV sets are per-instance, the term UV set family refers to the associated UV sets which apply to different instances. Within a given family, a single UV set may be applied to one or more instances.
To create a per-instance UV map
- Select a shape.
- Select
.
You can choose to share this UV set (every instance has the UV set), Per Instance Shared (all selected instances share the new UV set), or Per Instance Unshared (all selected instances get a unique UV set).
- Name your UV set as required.
- Select another instance of the shape.
- Right-click on the instance, select UV sets and make the per-instance UV set that you created the selected set.
- Select a UV mapping type under the
Create UVs menu (such as
Planar,
Cylindrical or
Spherical). Make sure that
Create New UV Set is disabled in the mapping’s option window.
A new UV map is create for the selected instance that shares the name of the current set.
- Assign a shader to all instances of the mesh.
- Right-click on an instance and select the UV Sets > UV Linking... Use the Relationship Editor to connect any of the per-instance sets to the color of the shader.
Different (per-instance) UV mappings should now be displayed on your instanced objects when you render them or display them in the scene view with Hardware texturing.

Example: Baking a single shadow map with per-instance UV sets
In the following example, we’ll bake shadows to a single map using per-instance UV sets. At that point, we can delete lights in the scene. This workflow is useful for creating texture maps on objects for game levels.
In this simple scene, there is a long cylinder to cast shadows, a directional light, a small plane with 16 x 16 subdivisions, and two additional instances of the plane.
Setting up your scene
- Create a long, skinny polygonal cylinder whose base is on the ground plane.
- Create a small polygonal plane on the ground plane and from the polyPlane node, set Subdivisions Width and Subdivisions Height to 16 each.
- Select the polygon plane and select .
- Set Geometry Type to Instance and select Apply twice to create two instances of the small polygonal plane (the instances will appear overtop of the original).
- Position the planes one after another like a sidewalk.
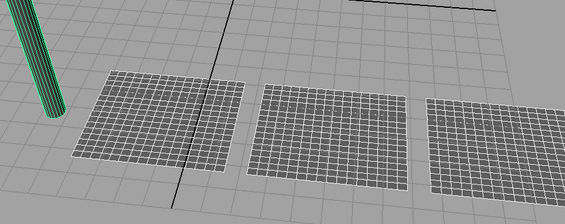
- Create a directional light () and position it pointing slightly down and towards the cylinder and planes.
- In the Attribute editor, change the Intensity of the light to 4.5.
- Open the Shadows section and turn on Use Depth Map Shadows.
- Change the shadow color to blue.
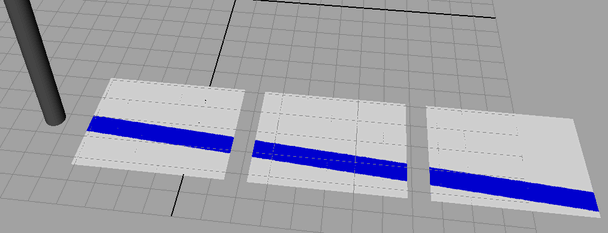
- Render the scene using the mental ray renderer. Your render should look something like this:
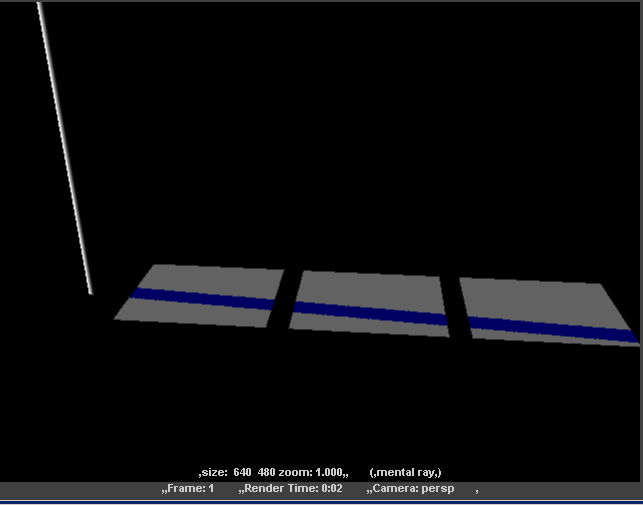
You may need to adjust the direction of the light and re-render so that the shadow falls on each polygonal instance in a different location, as in the above render.
Now we can create UV sets per instance on the planes.
Creating per-instance UV sets
- Select the three polygonal plane instances and in the Polygons menu set, select .
- In the Create UV Set Options dialog box, create a UV set named Sidewalk and select Per Instance Unshared. Then click Create.
- Right-click on one of the polygonal plane instances and make Sidewalk the selected UV set by selecting UV Sets > Sidewalk (n).
- Select all the polygonal plane instances, and create UVs by selecting
; in the
Planar Mapping optionsselect
- Fit Projection to: Bounding Box
- Project from: Y axis
Make sure that Create new UV Set is turned off.
- Click Project.
You’ve now created a per-instances UV set whose UVs don’t overlap in UV space. (You can use the UV Editor to confirm this and move UVs if necessary.)
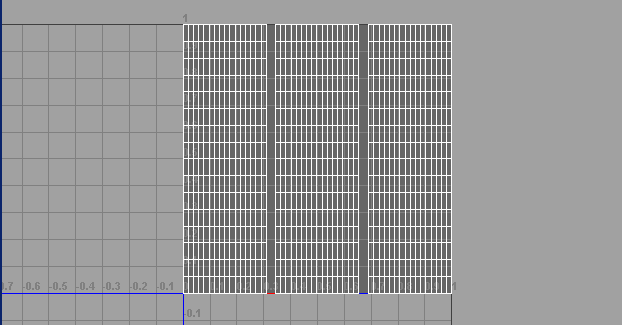
Now we’ll bake the shadows to a single UV map.
Baking to per-instance UV sets
- Select the three polygonal plane instances.
- In the Rendering menu set, select .
- Set the following:
- Objects to bake: Selected
- Bake to: Texture
- Bake shadows: on
- Use bake set override: on
- Color mode: Only light
- Bake to one map: on
- Click
Convert and Close.
While the shadows are baked, you now have to connect the bake set to the UV map.
- Right-click one of the instances and select .
- In the Relationship editor, link the Sidewalk(0) map to baked_inBake1.
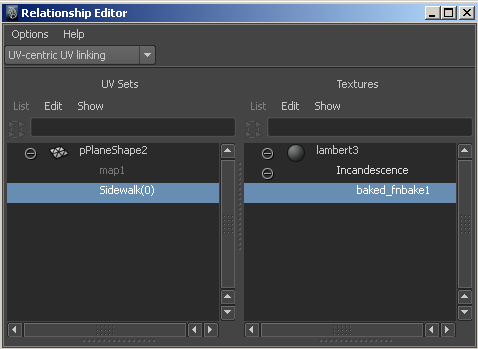
The shadows are baked and properly linked. You can see this in the Scene view if you’re in Shaded mode (Hotkey: 6) or High-Quality rendering mode.
- At this point, you can delete the light in your scene since its shadows have been baked to the UV textures on your polygonal instances.
Deleting per-instance UV sets
Deleting UV sets works slightly differently now that there can be UV set families shared between instances.
For example, a per-instance set family named myMap has two child sets. One is applied to multiple instances (instances a, b, and c) and one is applied only to instance d. It is the current UV set. If you select instance d, and select Delete Current UV Set, only the map on instance d is deleted. (The other UV map is used by unselected instances and is not deleted.)
If you then select instance a and select Delete Current UV Set, the UV set is unshared from instance a, but still exists on instances b and c. To delete it altogether, you can then select instances b and c and select Delete Current UV Set.
Limitations
Per-instance UV sets do not support color sets or paint effects.