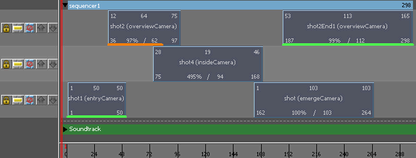
The shot view area is where you manipulate shots. See also Manipulate camera shots in a sequence.

Camera Sequencer track controls
Each track has the following individual controls.
-
Lock

-
Locks the position and duration of all shots on the track.
- Solo

-
Mutes all shots except those on this track.
-
Mute

-
Mutes the track.
-
Move Track Up

-
Click to move the selected track up in the view area.
-
Move Track Down

-
Click to move the selected track down in the view area.
Movie Clip Indicators
When a shot is rendered out to a clip, Maya draws a ‘movie clip indicator’ line under the shot to give an you visual feedback on the shot status. This indicator provides information on both the range of the clip and its status.
The Shot Movie Indicator displays the extents of the movie clip associated (using either the various Camera SequencerPlayblast menu items, or directly through the Attach Image Plane), with the current shot.
If you trim a shot after you playblast, the movie clip indicator extends out past the ends of the shot to indicate there are additional movie frames on disk. If the shot source range is extended, the movie clip indicator appears shorter than the shot.
Movie Clip Indicators underline shots in the shot view area. The style and color of the indicator shows you the synchronization status of the clip. Look for the following indicators to understand the status of a clip:
- Green: The clip is synchronized with the scene view, and the clip’s frames are matched 1:1 with the Camera Sequencer.
- Orange: The clip is synchronized with the scene view, but the movie may be scaled to match the Camera Sequencer.
- Red: The clip is not synchronized with the scene view. This can be caused by scale/time changes that are not handled by the clip, or a change in the shot’s camera.
- Solid line: The movie clip is synchronized with the 3D geometry in the scene view.
- Dashed line: Indicates the 3D geometry is not synchronized with the geometry in the scene view. (This can occur as you manipulate the clip, change its camera, and so on.) You can select Playblast > Re-Playblast Selected Shot to re-synchronize the clip.