You can build your Stingray Physically Based Shader using the ShaderFX editor window and the available ShaderFX nodes.
To start, first create a Stingray PBS node from the Hypershade or the Assign New Material window.
Creating a preset shader graph
When creating your shading network, you can save the graph as a preset and re-use it next time you create a new Stingray PBS node. This allows you to avoid repeatedly creating identical shader graphs which would lower the performance of your game.
To create a new custom preset, select Custom in the Preset Material drop-down list of the Stingray PBS Attribute Editor. See Create a custom preset for your Stingray Physically Based Shaders.
To open ShaderFX to edit your shader graph
Click Open ShaderFX to open the ShaderFX editor window.
Create and connect nodes as you would for any ShaderFX network. Right-click in the work area of the ShaderFX editor and select Add from the marking menu; then select from among the available nodes. Alternatively, you can drag and drop from the Node Browser.
Although you can create your Stingray PBS shader network via the ShaderFX editor similarly to how you can create your Shaderfx Shader network, you cannot save a .sfx file from the former and use it in the latter and vice versa. Although the ShaderFX editor interfaces are similar, the set of available nodes are different and therefore not interchangeable.
To create a float or color value in the shading network
To create a float, create a Material Variable node, then select Scalar or Vector 3 or Vector 4 from the Type drop-down list in the Attribute Editor to create a float, float3 or float 4 respectively.
To create a color, create a Material Variable node, then select Vector 3 from the Type drop-down list in the Attribute Editor, and select a color from the Vector attribute color pot.
You can connect any combinations of float1-4; that is, you can connect a float3 port to a float4 port, for instance.
To create a texture map
To create a texture map, create a Sample Texture node, and connect to it your file texture.
You must connect a UV set node (for example Texcoord 0) to the UV attribute of Sample Texture to set the texture co-ordinates of your object.
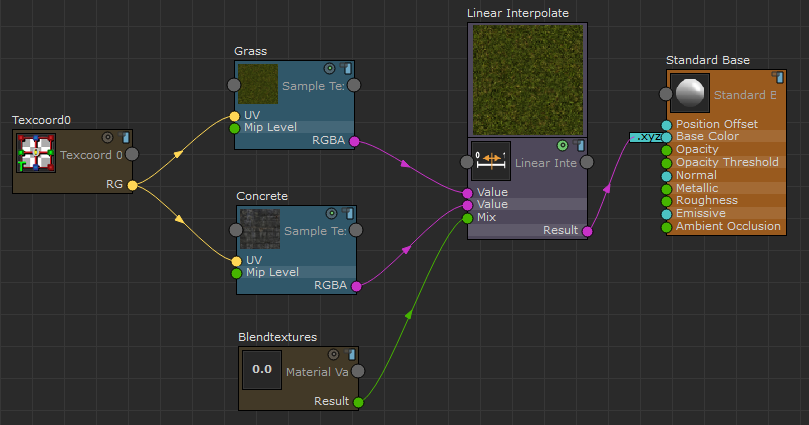
The following simple network demonstrates how to combine two textures using a Linear Interpolate Mix node and control the contribution of each texture using a Scalar value.

Textures courtesy of www.cgtextures.com
Exposing ShaderFX nodes to the Attribute Editor
You can add nodes to your graph so that, when you close the ShaderFX editor, these nodes are exposed as attributes in the Stingray PBS Attribute Editor. This way, you can adjust these attributes while re-using the same custom preset, and without having to open your ShaderFX editor.
These nodes include:
- Sample Cube: accepts a cube map texture
- Sample Texture: accepts a 2d texture
- Material Variable
The name of your attribute is the taken from the name of your node. Therefore, you may want to change the default names of the nodes. In the example above, the default name texture map 5881422 was changed to Grass so that Grass (instead of texture map 5881422) appears as an attribute in the Attribute Editor when the ShaderFX editor is closed. To rename a node, select it and enter a new name in the Name field in the Attribute Editor.

Adjusting the lighting in your shader
You can clamp the number of lights that contribute to shadowing in your shader. Having a large number of lights in your shader calculations may slow down your shader performance, so you may want to keep it to a reasonable number. Select the Standard Base node in the ShaderFX editor to display its Attribute Editor, and select any number from 1 to 3, or none, or all, from the Num Shadow Lights drop-down list.
In addition, the light intensity in the Stingray PBS node is measured in light stops to match the lighting calculations of the Stingray game engine. As a result, the same light intensity appears a lot more bright for Stingray PBS materials than it does for Maya shaders.
If you are only planning to use this shader inside Maya and do not plan to export the shading network to the Stingray game engine, you can disable the Light Intensity in Stops option in the Standard Base node Attribute Editor.
IBL color encoding
Select the type of encoding that your IBL cube map (the global diffuse and global specular textures in your shader) uses from the IBL Encoding drop-down list in the Standard Base node Attribute Editor.
Roughness and reflection
Enable the Remap Roughness hotness option in the Standard Base node Attribute Editor to reduce the hotness of your specular reflection.