Final gather is a simple and efficient method of producing indirect illumination. You can add lighting effects to your scene without using lights or photons (as in other types of illumination: global illumination, caustics and so on). Instead, final gather allows you to illuminate your scene from surface to surface by using the irradiance color of a surface shader as the source of bounce color.
Final gather is the last step that occurs in rendering. It occurs after photon tracing, and after the lighting and shadow calculations are complete. Therefore, final gather allows the irradiance color to spill and bleed into shadows.
The sample workflow below illustrates how to illuminate a scene using only final gather without the use of any additional lighting. First, you create a surface shader and assign it to a piece of geometry such as a plane. Adjust the Out Color attribute of the surface shader; this is the irradiance color of the plane. You can now light the objects in your scene by placing this plane above the scene like a studio soft light.
Before getting started
The following examples require that the mental ray for Maya plug-in be loaded. Select Windows > Settings/Preferences > Plug-in Manager and ensure that the Mayatomr plug-in is loaded.
Lighting your scene using surfaces
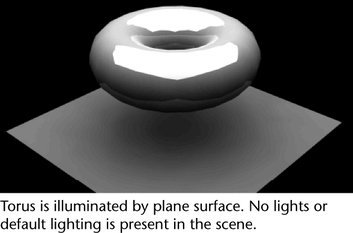
The following workflow uses the irradiance of a surface shader as the only source of light for the scene. No other lights are added to the scene, and the default lights are disabled.
- Select File > New Scene to create a new scene.
- Select the Rendering menu set.
- Select Create > Polygon Primitives > Torus to create a torus. Select Create > Polygon Primitives > Plane to create a ground plane to catch soft shadows. Move the torus so that it lies above the ground plane.
- Assign a Blinn material to the Torus. Select the Torus and then select Lighting/shading > Assign New Material. The Assign New Material window appears. Select Maya > Surface > Blinn.
- Select Render > Render Using > mental ray. Final Gather is a mental ray for Maya feature and is only supported if the mental ray renderer is selected.
- Select Windows > Rendering Editors > Render Settings to open the Render Settings window.
- Click on the Common tab. Under the Render Options section, uncheck Enable Default Light.
- Click on the Quality tab of the mental ray tabs. Under Quality Presets, select Production: Fine Trace.
- Adjust the following settings under the
Quality tab:
- Change the Min Sample Level and Max Sample Level from 1 and 2 to 0 and 2 (respectively). This will speed up the rendering process.
- The Raytracing options are optimally set (for the purpose of this exercise) at 1 for Reflections and 1 for Refractions.
- Expand the Final Gathering section and check Final Gathering to enable the algorithm.
- Lights are not needed in this scene. Open the Hypershade window (Windows > Rendering Editors > Hypershade). Click on the Lights tab and delete any lights present.
- In the Hypershade window, select Create > Materials > Surface Shader to create the Surface Shader.
- Click the Surface Shader. In the Attribute Editor, set the Out Color parameter by choosing white as your Out Color. This is the irradiance color of the surface shader.
- Select Create > Polygon Primitives > Plane to create a plane. This is your light source.
- Move and scale the plane above the midpoint of your scene. A larger plane will create a softer lighting.
- Assign the surface shader to the plane. Select the plane, then right-click the surface shader swatch to select Assign Material to Selection.
- Render the frame.
Tip: To brighten the illumination in your scene, increase the V value of the Out Color to a value between 3 and 5. This increases the irradiance of your light card.