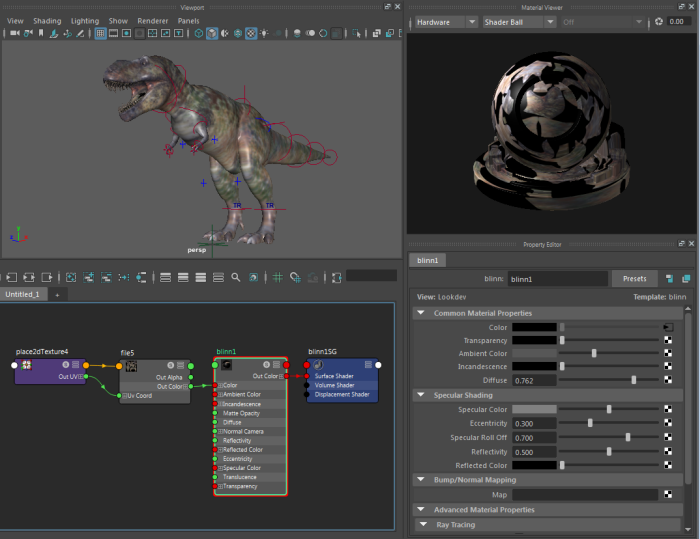
Follow this introductory workflow to create and assign a material to your object. For a more advanced workflow example, see Create a shader network in the Hypershade video tutorial.
- Click
 in the status line to open the
Hypershade.
- Select
Window > Viewport from the
Hypershade menu to open a viewport panel.
Drag the viewport panel and dock it to any location in the Hypershade that suits you.
- From the
Create tab, middle-drag the material (for example, Blinn) into the
Hypershade work area.
Tip: You can also press Tab in the Hypershade work area and enter the name of your material to create it.
- Select your object in the viewport, then right-click the material in the
Hypershade and select
Assign Material to Viewport Selection.
Click 5 in the viewport to switch to shaded mode.
Your object now appears shaded in the viewport with the material you just created. You can also see your material in the Material Viewer panel on the top-right of the Hypershade.
- Select the shader in the
Hypershade and adjust its properties in the
Property Editor.
For example, click the color swatch beside any of the shader attributes, such as Color, Transparency, and so forth. See the viewport and Material Viewer update in real-time to reflect your changes.
- (Optional) Map a texture to any of the shader properties.
In addition to adjusting the color swatch or values of the attributes, you can also connect a texture to any of the shader properties. Click the map button
 next to an attribute and select a 2d or 3d texture from the
Create Render Node.
Click 6 in the viewport to switch to textured mode to see the texture on your shader.
Tip: To connect an image texture file, map the File node.
Create a material by connecting node attributes
As you perform the steps above, a shader network is created and graphed in the work area of the Hypershade. In lieu of this basic workflow, you can also create materials and textures and connect them via their attributes by dragging connection lines in the work area. In fact, the node editing interface allows you to build more complex and advanced shader networks while experimenting with different textures and procedurals. For more information, see Connect nodes in the Hypershade by dragging connection lines.
