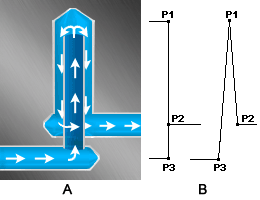
Bubblers are created within a mold by drilling a blind hole and then fitting a smaller diameter concentric tube up the hole almost to its top, thus creating a central circular channel and an outer annular channel. Coolant is introduced into the inner channel and flows along the channel to the top of the bubbler hole, returning along the outer channel to the outlet point. By this means cooling can be introduced to otherwise inaccessible areas of the mold.

A indicates the bubbler cross-section and B indicates the mold model representation. The beam element between P3 and P1 is circular in cross-section with Heat Transfer Effectiveness (HTE)=0. The beam element between P1 and P2 is annular in cross section with HTE=1. Orange is the default color assigned to a bubbler.
- Click
 () and create a line from the center line of the inlet (P3), to the top of the tube (P1).
 - Create a line from the top of the tube (P1), to the center line of the outlet hole (P2), including a small distance along the axis of the bubbler hole to separate the two new curves.
- Select the inner channel (line P1-P3), right-click and select Properties. Click Yes to the Assign new property? prompt.
- Click New and select Channel .
- Enter 0 for the Channel heat transfer effectiveness (HTE).
- In the Name box, enter an appropriate name for the channel property, then click OK twice.
- Select the outer channel (P1-P2), right-click and select Properties. Click Yes to the Assign new property? prompt.
- Click New and select Bubbler.
- Enter 1 for the Channel heat transfer effectiveness (HTE).
- Specify the required dimensions, mold material, name the bubbler appropriately, then click OK twice. The inner diameter of the bubbler should be equal to or larger than that of the channel you created in Step 4.
- Right-click on the Mesh Type Selection task in the Study Tasks pane and select Define Mesh Density . Set the mesh density to 2.5 times the diameter of your bubbler. Click Apply and OK.
- Click
 (), deselect the check boxes, then click Mesh Now.