After placing a wall, you can override its initial top and base constraints by attaching its top or base to another element in the same vertical plane. By attaching a wall to another element, you avoid the need to manually edit the wall profile when the design changes.
The other element can be a floor, a roof, a ceiling, a reference plane, or another wall that is directly above or below. The height of the wall then increases or decreases as necessary to conform to the boundary represented by the attached element.
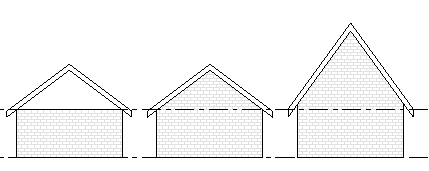
In the following example, the image on the left shows a roof placed on walls that have been drawn with their top constraint specified as Level 2. The middle image shows the effect of attaching the walls to the roof. The image on the right shows how the wall profile changes accordingly when the pitch of the attached roof is changed.

Effect of attaching walls to a roof
The following guidelines apply:
- You can attach wall tops to non-vertical reference planes.
- You can attach walls to in-place roofs or floors.
- If a wall's top is currently attached to a reference plane, attaching the top to a second reference plane detaches it from the first.
- You can attach walls that are parallel in the same vertical plane; that is, directly above or below one another.
To attach walls to other elements
- In the drawing area, select one or more walls you want to attach to other elements.
- Click Modify | Walls tab
 Modify Wall panel
 Attach Top/Base.
 - On the Options Bar, for Attach Wall, select either Top or Base.
- Select the elements to which the wall will attach.
To detach walls from other elements
- In the drawing area, select the walls to detach.
- Click Modify | Walls tab
 Modify Wall panel
 Detach Top/Base.
 - Select the individual elements from which to detach the walls. Alternatively, if you want to detach the selected walls from all other elements at once (or you are not sure which elements are attached), click Detach All on the Options Bar.