In the Rendering dialog, use the Background settings to specify a background for a rendered image.
- When you create an interior view that includes natural light, the sky and cloud background can affect the quality of light in the rendered image. For more diffuse natural light, use more clouds.
- When you render an image using Autodesk® A360 (available with an Autodesk Subscription), you can apply background environments, such as a field, riverbank, or seaport.
Consider the following:
To specify a solid color
- In the Rendering dialog, under Background, for Style, select Color.
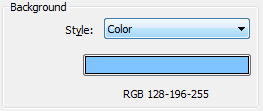
- Click the color swatch.
- In the Color dialog, specify the background color for the rendered image.
- Click OK.
- Continue to define other render settings.
To specify a background with sky and clouds
- In the Rendering dialog, under Background, for Style, select a Sky option that indicates the desired number of clouds.
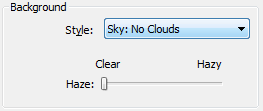
- For Haze, drag the slider between Clear and Hazy.
- Continue to define other render settings.
Note: If you use Revit LT to open a Revit project that specifies an image as the background, the Background Style is set to Image. If the background image is available, it is used to render the view. If the image is not available, a warning displays and the view renders with a solid gray background.) You can use Revit LT to change Background Style to another setting, but you cannot specify a different image.