In this exercise, you complete the interior of the model by adding a staircase on the lower level, and then adding and modifying railings on the entry level.
|
Objectives
- Create a stair between the lower level and entry level.
- Create railings using an offset value and picking model lines.
- Create railings using an offset value and drawing along model lines.
- Change the railing type to a pipe guardrail.
Create Stairs
- Open project GSG_09_stairs_railings.rvt. Note: It is recommended that you use the provided exercise file for this part since changes have been made to the project to enhance the model:
- The roof sketch was edited to extend over the entry porch, and the roof type was changed to use standing metal material for the exterior face.
- The entry level floor was edited to add an entry porch.
- A sloping walkway was added leading up to the entry porch. A slope arrow was used in the sketch of the floor in order to have the walkway slope down to the toposurface.
- At the corner where the 2 curtain walls meet, the mullions were removed from the edge of one curtain wall. The type for the mullions at the edge of the other curtain wall was changed to a corner mullion.
- The type was changed for the upper walls of the model to a wall with exterior siding.
- Interior walls were changed to use a typical interior partition type.
- Verify that the 02 - Entry Level floor plan is open.
- Click Architecture tab
 Circulation panel
 (Stair).
 - On the Properties palette, under Constraints:
- For Base Level, select 01 - Lower Level.
- For Top Level, select 02 - Entry Level.
- In the east room, click the "X" to start the stair run.
This X was added to the project to serve as a guide for placement.
- Move the cursor to the left until the tooltip indicates that 0 risers remain, and click to specify the stair endpoint.
- On the Mode panel, click
 (Finish Edit Mode).
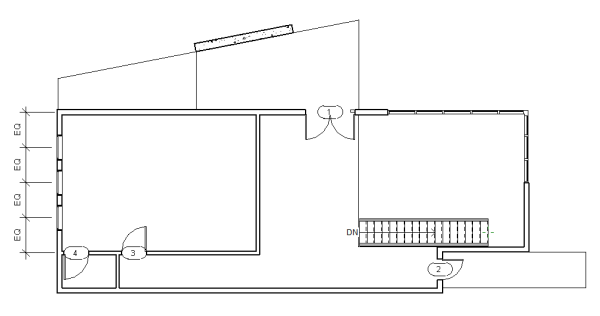
Create Railings
- Click Architecture tabCirculation panelRailing drop-down
 (Sketch Path).
 You will create a railing at the top of the stairs.
- On the Draw panel, click
 (Pick Lines).
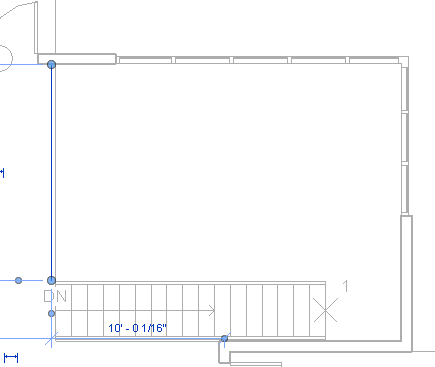
 - On the Options Bar, for Offset, enter 3".
- Position the cursor over the edge of the floor on the left at the top of the stairs, and when the dashed line displays to the left, click to place the railing.
- Select the railing, click the endpoint at the corner of the stair, and drag the endpoint up until it clears the stair, as shown:
- On the Mode panel, click (Finish Edit Mode).
- Click Architecture tabCirculation panelRailing drop-down (Sketch Path).
You will create a railing on the entry porch.
- On the Draw panel, click
 (Line).
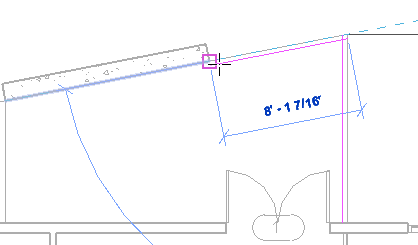
 - On the Options Bar, for Offset, enter 3", and select Chain.
- Click at the corner of the external walls to the right of the double doors, move the cursor up, and click at the intersection of the walls, move the cursor to the left, and click to create a railing on the entry porch, as shown:
- On the Mode panel, click (Finish Edit Mode).
- Click Architecture tabCirculation panelRailing drop-down (Sketch Path).
You will create a railing on the back deck.
- On the Draw panel, click (Line).
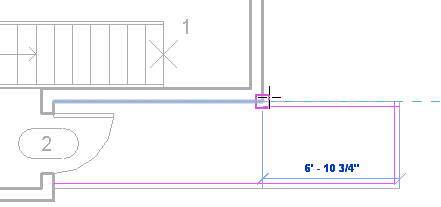
- On the Options Bar, for Offset, enter 3", and verify that Chain is selected.
- Starting at the lower-left corner and drawing counter-clockwise, place railings on the back deck, as shown:
- On the Mode panel, click (Finish Edit Mode).
Modify the Railing Type
- On the Quick Access Toolbar, click
 (Default 3D View).
 - Zoom in to the railing on the entry porch.
- Select the railing, right-click, and click Select All InstancesIn Entire Project.
- In the Type Selector, select Guardrail - Pipe.
