Rotate the entire model in plan views, changing its orientation to Project North (the top of the drawing area).
To rotate a view to True North, use the Rotate True North tool.
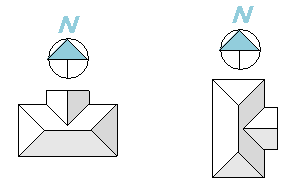
The following example illustrates the model before and after using the Rotate Project North tool.
The Rotate Project North tool does the following:
- Affects model elements and view-specific detail elements, including text notes, detail lines, filled regions, revision clouds, and more.
- Preserves the relative position of links.
- Affects plan views whose Orientation property is defined as Project North. It does not affect drafting views, callouts of plan views, or other types of views.
Note: If the model contains links that are pinned due to shared positioning, you cannot rotate Project North. See Shared Coordinates and Linked Models in Revit LT.
To rotate Project North
- Open a plan view, and, in the Properties palette, confirm that the Orientation property is defined as Project North.
When you rotate Project North for this view, the change also affects other plan views whose Orientation is set to Project North.
- Click Manage tab
 Project Location panelPosition drop-down
 Rotate Project North.
 - In the Rotate Project dialog, select the desired option.
- Click OK.
A message displays to indicate that the model was rotated. Verify the results in all plan views.
The message also shows errors, if any. You can export errors to review and correct them.