The Vault Data Standard dialog is available in Inventor and AutoCAD. Whenever you first save a file, the Data Standard dialog displays. Fill in the required fields and any additional fields set up by your administrator and click OK to save your data. The data is saved as a Data Sheet that can be modified in the future.
Default Data Standard Dialogs
Data Standard for Vault installs default Data Standard dialogs that can be modified by an administrator.
The default dialog differs based on your release of Vault.
Users can enter a new title, description, and company information for the file. All other fields are automatically determined by the XAML.
By default, the following fields are provided.
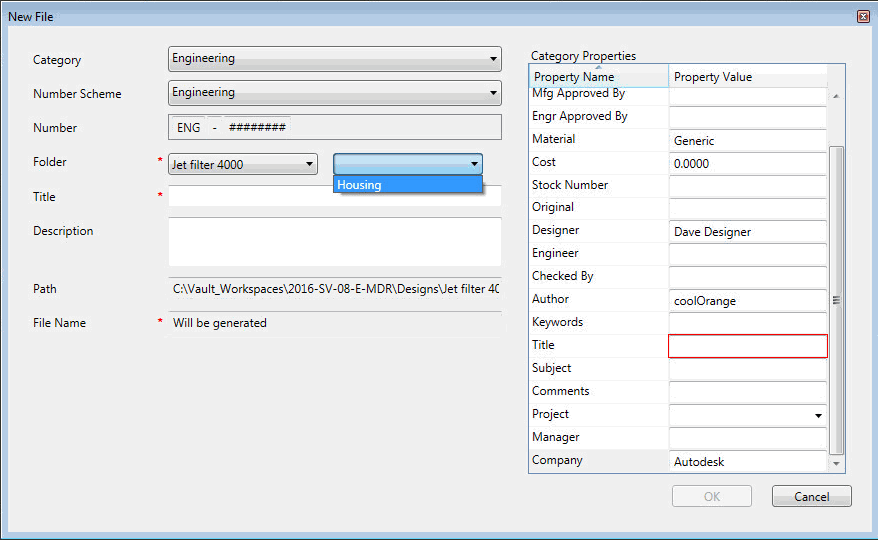
Users can select a numbering scheme and, if applicable, any prefixes or suffixes. Users can also specify a folder for the file, and enter a title, description, and comments for the file.
All other fields are automatically determined by the XAML.
The file name is generated when the user clicks OK.
Enable Data Standard for Inventor or AutoCAD
- Launch Inventor or AutoCAD.
- Create a new file or open an existing file.
Once the file is opened, the Data Standard tab becomes visible on the icon ribbon.
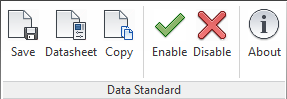
- Click Enable to start using the Data Standard dialog.
Click Disable at any time to stop using it.
Saving Files
When the Data Standard feature is enabled, you are prompted to enter file details every time you first save a file. This occurs whether you click Save on the main toolbar or on the Data Standard ribbon. Enter the required details and click OK to save your data. If the administrator has enabled the Check-in dialog for Vault, you may be prompted to fill your check-in details as well.
Copying Files
Use the Copy command to copy an assembly or part that needs to be modified.
For each new copy, the Data Standard dialog appears when the file is saved for the first time.
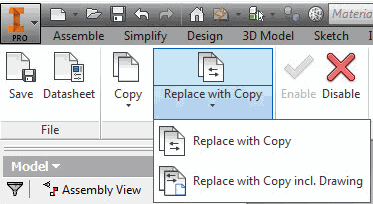
Replace with Copy (Inventor Only)
Use the Replace with Copy command to copy a component of an assembly and replace it in the original file. This is useful when you want to reuse an Inventor assembly and replace the components that need to be modified with a copy.
Use the Replace with Copy incl. Drawing command to copy the component and the drawing that references it and replaces both in the original file. The copied drawing will reference the copied component.
For each new copy, the Data Standard dialog appears when the file is saved for the first time.
Replace with Copy or Replace with Copy including Drawing
- In an open Inventor Assembly, click Replace with Copy or Replace with Copy incl. Drawing on the Data Standard ribbon.
- Select the component that you want to copy from the Inventor Browser.
If the component is not checked out to you or you do not have the latest version or the component is not in a vault, you are asked if you want to proceed. Click OK.
Note: The base part of a derived part and 3rd party OLE references are not copied and replaced. - Enter the desired information on the Copy dialog and click OK.
- If there are multiple instances of the selected component in the assembly, decide whether you want to replace one or all instances.
- If the component is used as base view and you selected Replace with Copy incl. Drawing, the Copy Dialog displays for the Drawing as well.
Enter the desired information and click OK.
- Click OK.
The selected component is copied and the reference is replaced with the copy.
Replace with Copy Including Drawing When the Drawing Has Two Base Views
- Open the assembly (Assembly1.iam) and click Copy on the Data Standard ribbon to create a copy of the assembly (Assembly2.iam).
- In the copied assembly (Assembly2.iam), select the component (Part1.ipt) and click Replace with Copy on the Data Standard Ribbon.
- The Data Standard dialog for the component displays. Fill in the necessary information and click OK.
A copy of the component (Part2.ipt) is created and replaced in the assembly (Assembly2.iam).
- The Data Standard dialog for the related drawing displays. Enter the necessary information and click OK.
A copy of the drawing (Drawing2.dwg) is created and the view of the component (Part2.ipt) is replaced in the drawing (Drawing2.dwg). However, the reference to the base view to the original assembly (Assembly1.iam) is still in the new drawing (Drawing2.dwg).
- Open the new drawing (Drawing2.dwg) and select Replace Model Reference in Inventor. Replace the original assembly (Assembly1.iam) with the copied assembly (Assembly2.iam) manually.
If the drawing you want to copy and replace inside an assembly has two base views, you must perform additional steps to replace with copy. For clarity, we will use example names in parentheses.
The drawing (Drawing2.dwg) now contains the views to the copied assembly (Assembly2.iam) and to the copied component (Part2.ipt).
Modify an Existing Datasheet
- Open the file for which you want to modify the datasheet.
- Click Datasheet on the Data Standard ribbon.
- Make your changes and click OK to save your data. Note: The OK button remains disabled until all required fields are filled in.Note: AutoCAD users must manually check in the file after the Data Standard dialog closes.