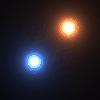
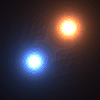
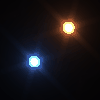
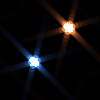
GlareBright lighting in CG images is often difficult to accomplish. Many times bright areas appear as solid white splotches with unrealistically hard edges. Glare comes to the rescue in these situations by giving a halo around extra bright areas.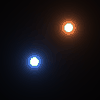
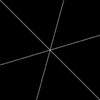
Parameters Glare can begin to slow down rendering times when the scene has large bright areas. Quality lets the artist set the tradeoff between detail and speed. Lower Quality settings will cause Glare to run more quickly, but may cause the glare halo to be "boxy," whereas Higher Quality will give a better overall effect, but will of course take longer. Generally, a mid-level setting is appropriate for most scenes. Spread controls how sensitive Glare is to bright objects. Lower values for Spread will cause smaller glare halos while higher values will cause larger glare halos. Very high values will cause dark objects to have halos. (Try not to abuse the Spread parameter. The best way to increase an object's halo is to increase its brightness, not to increase the Spread.) Overlay Only mode will cause Glare to produce a glare "overlay". The overlay is an image of the glare effect only; the original underlying image is removed. This mode is useful when render speed is critical, so that Glare can be run on a lower resolution image to produce an overlay, which can then be composited with a higher resolution underlying image. Verbose turns on verbose output, so that the progress of Glare can be monitored. Streaks When active, the Streaks feature allows you to specify an image file that will be used to create a streaking effect, as seen when looking at bright images through glass or, in photographs, through a camera lens. Streak Image is the streak template that Glare uses to draw streaks. Two example images are provided: "Glare-Eye" models the streaks caused by the human eye, and "Glare-Star" models the streaks cause by a star-filter camera lens. 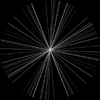


|
